1999 F150 Passenger Air Bag switch light out


Thread Starter
|
Member
Joined: Jul 2006
Posts: 14
Likes: 0
Part One:
I just fixed the Passenger AIR BAG disable switch on my 1999 S-Cab 4x4. I used a RadioShack 276-271 Green LED for this repair. It was only $2.19!! I used this fix instead of buying the $100.00 replacement switch. It is hard to believe they don't sell a replacement light bulb, but they don't. It is a small 3/16" by 7/16" soldered in 12v light bulb and Ford considers the entire assembly bad if the bulb burns out. They should have used a LED in the first place and it probably wouldn't have ever failed. Anyway, here are the steps I used to fix it. I will try and post pictures later.
Before I start, the symptoms are the dash AIR BAG warning light blinks on and off a few times and then stays on indicating a failing AIR BAG system. There will be a code in the ECM for this failure. I think it is code 27. I am not positive on this one. The other symptoms are the AIR BAG “OFF” switch indicator light does not turn on when the AIR BAG is turned off. On my truck, you could hit the dash in the AIR BAG switch area and the light would work and come on for a day or two until the filament breaks loose again. I guess what I am saying is that you would only attempt this repair if you know or have a high confidence level that the only thing needing repair in the AIR BAG system is the Passenger AIR BAG switch AIR BAG “OFF” indicator. If you don’t have a high confidence level that this is the only thing wrong, I would suggest having a qualified technician trouble-shoot the system. It is not something to guess at. In my case I was certain the light was the failing component. Below are the steps used to fix my switch.
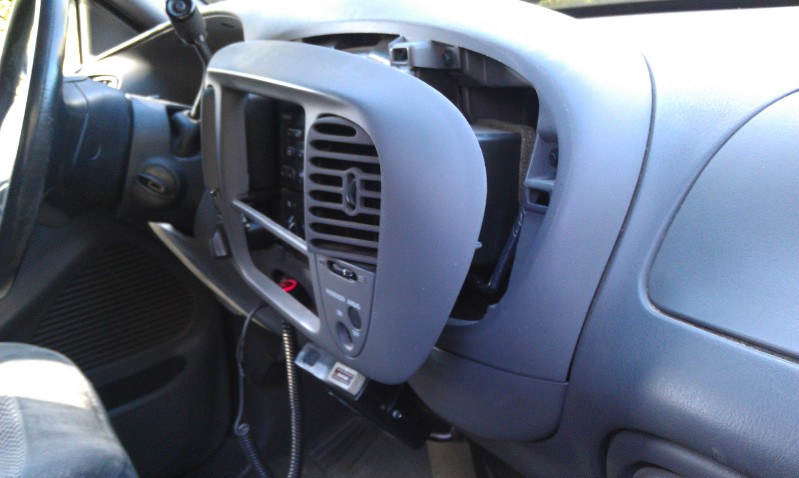
First I removed the panel the switch is mounted in. This was easy. It just pulls off. I ran my finger-nails around the edge till I could get a couple behind it and gave a firm pull. It popped right off. Then out come 3 screws and the switch assembly is off the panel. Unplug the wiring harness and you now can take the assembly to your work bench to repair it.
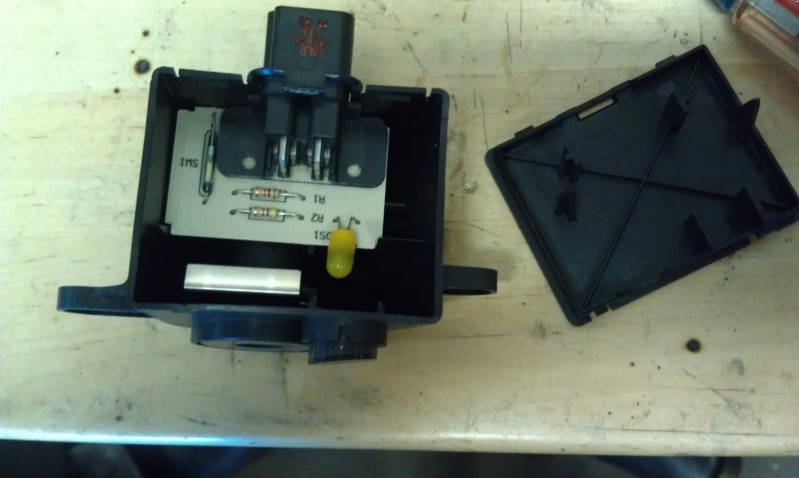
Now you have to remove the cover on the switch to expose the circut board. Use a small flat blade screw driver to pry the cover off. Then remove the circuit board. It just slides up and out. Next I just cut the old bulb out leaving the legs long. I then soldered the new LED to the pig-tails sticking out. The Red wire goes to the connection closest to the edge of the circuit board or the right side connection when viewed from the front.
Continued on next post to this listing!!
I just fixed the Passenger AIR BAG disable switch on my 1999 S-Cab 4x4. I used a RadioShack 276-271 Green LED for this repair. It was only $2.19!! I used this fix instead of buying the $100.00 replacement switch. It is hard to believe they don't sell a replacement light bulb, but they don't. It is a small 3/16" by 7/16" soldered in 12v light bulb and Ford considers the entire assembly bad if the bulb burns out. They should have used a LED in the first place and it probably wouldn't have ever failed. Anyway, here are the steps I used to fix it. I will try and post pictures later.
Before I start, the symptoms are the dash AIR BAG warning light blinks on and off a few times and then stays on indicating a failing AIR BAG system. There will be a code in the ECM for this failure. I think it is code 27. I am not positive on this one. The other symptoms are the AIR BAG “OFF” switch indicator light does not turn on when the AIR BAG is turned off. On my truck, you could hit the dash in the AIR BAG switch area and the light would work and come on for a day or two until the filament breaks loose again. I guess what I am saying is that you would only attempt this repair if you know or have a high confidence level that the only thing needing repair in the AIR BAG system is the Passenger AIR BAG switch AIR BAG “OFF” indicator. If you don’t have a high confidence level that this is the only thing wrong, I would suggest having a qualified technician trouble-shoot the system. It is not something to guess at. In my case I was certain the light was the failing component. Below are the steps used to fix my switch.
First I removed the panel the switch is mounted in. This was easy. It just pulls off. I ran my finger-nails around the edge till I could get a couple behind it and gave a firm pull. It popped right off. Then out come 3 screws and the switch assembly is off the panel. Unplug the wiring harness and you now can take the assembly to your work bench to repair it.
Now you have to remove the cover on the switch to expose the circut board. Use a small flat blade screw driver to pry the cover off. Then remove the circuit board. It just slides up and out. Next I just cut the old bulb out leaving the legs long. I then soldered the new LED to the pig-tails sticking out. The Red wire goes to the connection closest to the edge of the circuit board or the right side connection when viewed from the front.
Continued on next post to this listing!!
Last edited by 69Torino; Aug 31, 2006 at 02:10 AM.
Thread Starter
|
Member
Joined: Jul 2006
Posts: 14
Likes: 0
Part two:
If you want to be sure it is connected properly, you could now test the switch by just plugging it into the wire harness and turning on the ignition. Everything should be now working normally. You can switch the switch and see the AIR BAG OFF light come on. Once you are confident everything is working properly, you can remove the switch assembly again and continue. If it doesn’t work, make sure you have the connections right. Red wire from the LED assembly to the positive side of the circuit board. No harm comes from connecting it backwards. If you did this, just reverse the wires. I did this when I first connected it because I didn’t know what side was the + side on the circuit board.
Next I epoxied the LED assembly in with quick setting epoxy. I just put a bunch of epoxy on it. It kind of spread all over the place, but I consider this a one time fix, so it won't ever be worked on again. The LED should outlast the truck. I removed the Green plastic lens from the switch assembly that the light shines through. This is the one with the word “OFF“ on it. I then installed the circuit board back in the switch assembly. Removing the Green “OFF” lens allowed me to look through the hole where the lens mounts and position the LED assembly in the center of the hole. Be sure to keep it back from the hole so the Green “OFF” lens could be popped back in without any obstructions. If you used quick set epoxy, it should dry in about 5 to 10 minutes.
Then pop the Green “OFF” lens back in the switch reassembly. Next you put the cover back on the switch assembly. I did have to cut some plastic on one of the pins that hold the circuit board in place. These hold down pins are on the cover you remove to work on this assembly. It was pushing on the newly glued in LED. You will be able to tell this easily. Just trim till the peg until it doesn't restrict the installation of the cover.
It now works perfectly. Nice and bright when the light is on (indicating the air bag is off) and it has the slight glow when the light is off (indicating the air bag is on). This is required as they run a small current through the indicator to monitor that it is functional. It isn't visible during the day is just slightly glowing at night. If anything, it is kind of a nice hallo that helps you see where the switch is at night. I suspect the original bulb did this too, you just didn't pay much attention to it until you were working on it.
This is an easy fix. I went with the LED instead of the light bulb so I wouldn't have to ever fix it again. The Radio Shack part I used already has a resister built in so it will work with 12V. It also has a Green housing on it and this spreads the light over a larger area. It is also brighter with power applied than others LED's Radio Shack was selling.
Hope you find this helpful.