
First time using the G110


Thread Starter
|
Senior Member
Joined: Dec 2007
Posts: 413
Likes: 0
From: Carlyle, IL
First time using the G110
Another friend with a Jeep got some used half doors that were in pretty bad shape and wanted me to see what i could do with them. there are some scratches that wouldnt come out but they are plenty good for a jeep now.
Pics
Before


Test area with tape

Test area w/o the tape


First Door Done


Both Doors done

Process was
clay
a few passes w/ 105
205
21
34 spray
then 135 spray
Pics
Before
Test area with tape
Test area w/o the tape
First Door Done
Both Doors done
Process was
clay
a few passes w/ 105
205
21
34 spray
then 135 spray
Last edited by 31 YNOT; Feb 5, 2009 at 09:15 AM.

Senior Member
Joined: Jan 2008
Posts: 710
Likes: 0
From: Southeastern Virginia
Looks very good from the before to afters.
I also just bought a G110 for a black truck.
What selection of pads with what did you use?
How much time did you spend on that size areas.
Did you have any prior experience with a DA?
I also just bought a G110 for a black truck.
What selection of pads with what did you use?
How much time did you spend on that size areas.
Did you have any prior experience with a DA?
Thread Starter
|
Senior Member
Joined: Dec 2007
Posts: 413
Likes: 0
From: Carlyle, IL
It didnt take to much time at all, i did have to make a few passes with the M105 to all those scratches out
No prior experance besides reading on here and i also got the how to use the pc DVD from ADS it helped out quite a bit


Senior Member
Joined: Jul 2006
Posts: 1,285
Likes: 0
From: Cypress, TX
Nice improvement.
If you look in this pic, you can see some micro-marring. What pad, speed, etc did you use with the 205?

I would think that if you worked the 205 with the right speed and pad, you would be able to knock that out also ..
that is a decision you have to make based on thing like:
- finished expectations
- amount of available time
- amount of desired effort
very good job, especially for a first time.
If you look in this pic, you can see some micro-marring. What pad, speed, etc did you use with the 205?
I would think that if you worked the 205 with the right speed and pad, you would be able to knock that out also ..
that is a decision you have to make based on thing like:
- finished expectations
- amount of available time
- amount of desired effort
very good job, especially for a first time.
Thread Starter
|
Senior Member
Joined: Dec 2007
Posts: 413
Likes: 0
From: Carlyle, IL
i used speed #5 with the M205, Is that to fast? That is just what the guy recommended on the how to DVD thats why i did it.
Any pointers oh how to do a better job would be really appreciated.
One other thing i noticed when i was using the M105 at first i could wipe it off super easy but after a while it was really hard to wipe off the door. Did i just work it in to much or could there be other factors?
Any pointers oh how to do a better job would be really appreciated.
One other thing i noticed when i was using the M105 at first i could wipe it off super easy but after a while it was really hard to wipe off the door. Did i just work it in to much or could there be other factors?

Senior Member
Joined: May 2007
Posts: 3,460
Likes: 0
From: NYC, Ct & NC
i used speed #5 with the M205, Is that to fast? That is just what the guy recommended on the how to DVD thats why i did it.
Any pointers oh how to do a better job would be really appreciated.
One other thing i noticed when i was using the M105 at first i could wipe it off super easy but after a while it was really hard to wipe off the door. Did i just work it in to much or could there be other factors?
Any pointers oh how to do a better job would be really appreciated.
One other thing i noticed when i was using the M105 at first i could wipe it off super easy but after a while it was really hard to wipe off the door. Did i just work it in to much or could there be other factors?
Trending Topics

Senior Member
Joined: May 2005
Posts: 1,454
Likes: 0
From: Cary, NC
i used speed #5 with the M205, Is that to fast? That is just what the guy recommended on the how to DVD thats why i did it.
Any pointers oh how to do a better job would be really appreciated.
One other thing i noticed when i was using the M105 at first i could wipe it off super easy but after a while it was really hard to wipe off the door. Did i just work it in to much or could there be other factors?
Any pointers oh how to do a better job would be really appreciated.
One other thing i noticed when i was using the M105 at first i could wipe it off super easy but after a while it was really hard to wipe off the door. Did i just work it in to much or could there be other factors?

Senior Member
Joined: Nov 2007
Posts: 615
Likes: 0

Here ya go bud

Laminate it and keep it with your stuff.
I personally don't usually run my g110 under 4.5. I generally polish at 5-6. But go by the chart
and this is for LC pads if anyone needs it
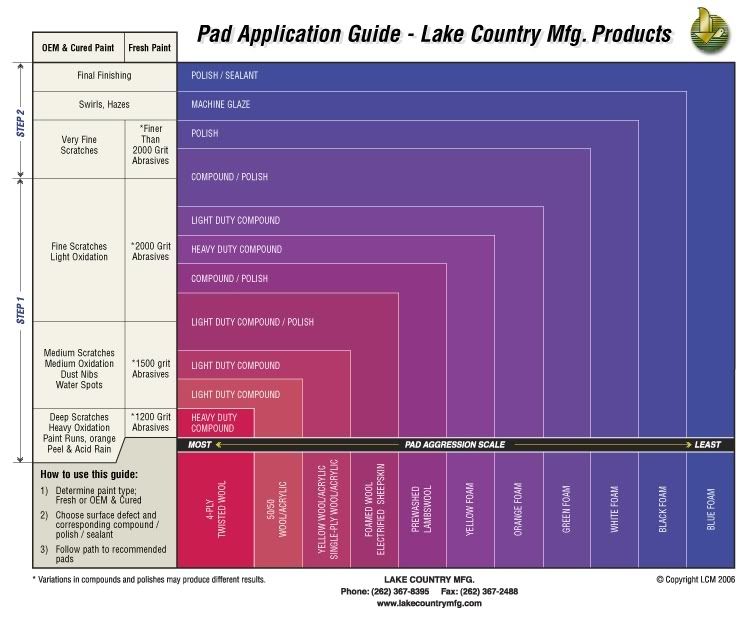
Credit to RR and whoever he got them from or made them
Thread Starter
|
Senior Member
Joined: Dec 2007
Posts: 413
Likes: 0
From: Carlyle, IL
Haha yes, i do like everything to come out pretty much perfect
My other car was always perfect and i always neglected the truck but not that its gone i gotta give it some attention and hopefully make some money off of other people. My car was pretty much perfect at all times this was after detailing it by hand with zaino products. The DA is much faster and easier

then after I paid some one detail it

thanks for the documents man, they are saved on my computer
Last edited by 31 YNOT; Feb 7, 2009 at 10:44 PM.
Senior Member
Joined: Jan 2008
Posts: 710
Likes: 0
From: Southeastern Virginia
I notice the charts never call for the 6 setting....wonder why.
I have used the G110 2 times and I know I have a long way to go but I used the 1-2 settings to spread the polishing product over the 18"X18" area then I bump it up to 4 and then six....wipe it down and go over it again at 6.
I read it's easier to add less aggressive product than to add paint so my method has been time consuming. My first 2 sessions were 8 hours each and I think I may have removed less than � of the swirls and scratches..
Just waxing application speed alone makes the DA a worthy purchase....All the time I wasted all these years.
Good looking black Firebird

Senior Member
Joined: Oct 2007
Posts: 1,333
Likes: 0
From: Bethlehem, PA
That it is, however, there comes a point where you need to step up the polish to something more aggressive. this is where the importance of a test spot comes in. Do a small 1'x1' area and check it before moving on. If you have defects remaining, then do that same 1'x1' area again and check it. If they're not gone after that, then you should probably move up to the next aggressive polish that you have. You can keep going the route of the less aggressive polish but the end result is going to be the same amount of clear being removed just in a lot more time. Just remember stronger polishes need to be followed up with lighter polishes (usually.)