
Auxiliary backup lights installed (How to/pics)


Senior Member
Joined: Nov 2008
Posts: 224
Likes: 0
From: West Chester Ohio
hey blackjack I like that new switch you put in next to the cig lighter... was it difficult to put it there and how did you go about getting there? I have a stx reg cab and do not have the drink holder so hopefully you didnt go in that way... and how did you get the wire back behind there?

Thread Starter
|
Technical Article Contributor
Joined: Nov 2005
Posts: 889
Likes: 0
From: Land of 10,000 Lakes
hey blackjack I like that new switch you put in next to the cig lighter... was it difficult to put it there and how did you go about getting there? I have a stx reg cab and do not have the drink holder so hopefully you didnt go in that way... and how did you get the wire back behind there?
You just need to pull the whole dash bezel off, grab it from the bottom and work your way up.
Here is a pic with it off
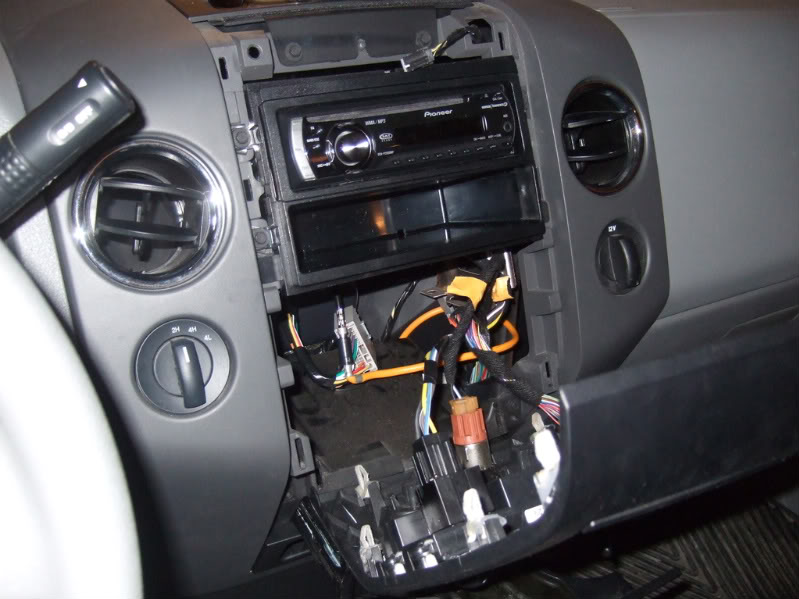
Then I think it was a 3/4" bit that I used to drill it out, of course that is after I marked the center of it out.
Thread Starter
|
Technical Article Contributor
Joined: Nov 2005
Posts: 889
Likes: 0
From: Land of 10,000 Lakes
Yes it just pulls out,there are 4 clips per side...you can see them if you look at the trim piece...some times they all come out with the trim piece and some times they stay in the dash slots. If they stay in dash slots I take a needle nose to get them out and clip them back to the trim piece...it just makes it easier when reinstalling to line everything up with they on the trim piece...O and yes it just hanging there by the wires and resting on the cup holders. Also dont forget to un-clip and re-clip the airbag light above the radio too.
Last edited by blackjack8900; Jan 20, 2010 at 02:04 AM.
Senior Member
Joined: Nov 2008
Posts: 224
Likes: 0
From: West Chester Ohio
So wanting to put this switch in my truck to turn off and on my lights that im going to install http://www.crazypc.com/products/vand...ch-82390B.html (diagram at the bottom of the page) guy said its possible but not sure how to go about doing it... im guessing that I should run my wire off my poss side of the battery onto the poss terminal and then run my 2 lights off of like 1 and 3 or 2 and 4? thanks again


Senior Member

Joined: Jan 2004
Posts: 1,115
Likes: 0
From: San Antonio, TX
I decided to tackle this project myself. I'm on an OBS SuperCrew though. I did it the "simple" way I guess. Mounted them and wired them to an independent switch so I control their use at all times. Didn't want them automatically coming on every time I back up.
Followed the suggestions though. Bought a set of "Burners" Fog lights from Wal-Mart (rectangle shape and only a couple inches big). Loomed all my wiring and followed the existing wires from the back to the front of the truck. That was a task since on my drivers side, the electrical is run on the inside of the frame for the majority of the run. That was fun.
Here are some pics though:
The switch. Was very pleased to be able to place it here. Very happy:

The lights:

The light output:

Let me know what you think or if you have any questions. Thanks.
Followed the suggestions though. Bought a set of "Burners" Fog lights from Wal-Mart (rectangle shape and only a couple inches big). Loomed all my wiring and followed the existing wires from the back to the front of the truck. That was a task since on my drivers side, the electrical is run on the inside of the frame for the majority of the run. That was fun.
Here are some pics though:
The switch. Was very pleased to be able to place it here. Very happy:
The lights:
The light output:
Let me know what you think or if you have any questions. Thanks.

Senior Member
Joined: Dec 2009
Posts: 231
Likes: 0
From: New Port Richey, Florida
I decided to tackle this project myself. I'm on an OBS SuperCrew though. I did it the "simple" way I guess. Mounted them and wired them to an independent switch so I control their use at all times. Didn't want them automatically coming on every time I back up.
Followed the suggestions though. Bought a set of "Burners" Fog lights from Wal-Mart (rectangle shape and only a couple inches big). Loomed all my wiring and followed the existing wires from the back to the front of the truck. That was a task since on my drivers side, the electrical is run on the inside of the frame for the majority of the run. That was fun.
Here are some pics though:
The switch. Was very pleased to be able to place it here. Very happy:
The lights:
https://www.f150online.com/forums/me...kup-lights.jpg
The light output:
https://www.f150online.com/forums/me...lumination.jpg
Let me know what you think or if you have any questions. Thanks.
BTW, It looks nice.
Senior Member
Joined: Jan 2004
Posts: 1,115
Likes: 0
From: San Antonio, TX
I pulled out the Headlight Switch and disconnected the harnesses. I unscrewed the one screw holding the dash piece tight. I then removed the one screw directly below the pictured switch on the lower dash piece (holds the emergency brake release, etc.). I also removed the screws anchoring the emergency brake release and the hood release. This allowed me enough play in the dash pieces to snake the wires up to the headlight switch hole. I tested my setup and once working I traced my template for my switch hole and dremeled it out (there was nothing immediately behind this spot in the dash). Hooked it up properly and then reassembled the dash pieces. Was pleasantly surprised I was able to do all that without serious complications. Worked out perfectly. Thanks for the compliment!

Senior Member
Joined: Dec 2009
Posts: 266
Likes: 0
From: Merritt Island, Fla.
"Navigator Hitch Mount Back Up Light"
Where did you get the switch?
Senior Member
Joined: Jan 2004
Posts: 1,115
Likes: 0
From: San Antonio, TX
Here's a daytime pic of where I installed them:

Thread Starter
|
Technical Article Contributor
Joined: Nov 2005
Posts: 889
Likes: 0
From: Land of 10,000 Lakes
Yes, I believe that is what they were called...They also come with brackets that you can use to mount them right to the hitch.
I got the switch from Fleet farm too.

Member
Joined: Jan 2009
Posts: 82
Likes: 0
From: Boston
Blackjack (or anyone who could answer this),
Where exactly is the ignition wire under the steering column that you tapped into? I have looked for a while on two seperate occasions and cant seem to find it. Since I couldnt find it, I tried tapping into the ignition wire that goes to the radio but for some reason it wouldnt work with the switch and relay. Any help would be greatly appreciated. Thanks in advance. Oh and sorry for bringing up an old thread.
Where exactly is the ignition wire under the steering column that you tapped into? I have looked for a while on two seperate occasions and cant seem to find it. Since I couldnt find it, I tried tapping into the ignition wire that goes to the radio but for some reason it wouldnt work with the switch and relay. Any help would be greatly appreciated. Thanks in advance. Oh and sorry for bringing up an old thread.
Thread Starter
|
Technical Article Contributor
Joined: Nov 2005
Posts: 889
Likes: 0
From: Land of 10,000 Lakes
Blackjack (or anyone who could answer this),
Where exactly is the ignition wire under the steering column that you tapped into? I have looked for a while on two seperate occasions and cant seem to find it. Since I couldnt find it, I tried tapping into the ignition wire that goes to the radio but for some reason it wouldnt work with the switch and relay. Any help would be greatly appreciated. Thanks in advance. Oh and sorry for bringing up an old thread.
Where exactly is the ignition wire under the steering column that you tapped into? I have looked for a while on two seperate occasions and cant seem to find it. Since I couldnt find it, I tried tapping into the ignition wire that goes to the radio but for some reason it wouldnt work with the switch and relay. Any help would be greatly appreciated. Thanks in advance. Oh and sorry for bringing up an old thread.


