
Dashboard removal - US Speedo Gauge Overlay Install


Thread Starter
|
Technical Article Contributor
Joined: Sep 2004
Posts: 81
Likes: 0
From: Indiana
Dashboard removal - US Speedo Gauge Overlay Install
I have not been able to find any instructions for removing the panels around the gauge cluster on the 2004+ F150, so here are mine. Hope they help.
1. There are 2 screws holding the panel under the column, remove those.

2. From the middle of the panel under the column, pull out gently.
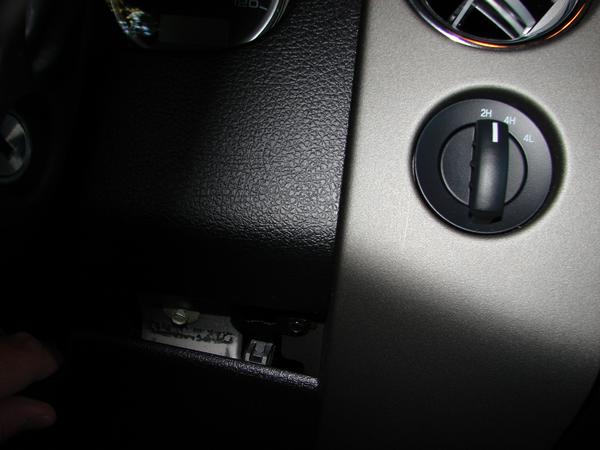


1. There are 2 screws holding the panel under the column, remove those.
2. From the middle of the panel under the column, pull out gently.
Thread Starter
|
Technical Article Contributor
Joined: Sep 2004
Posts: 81
Likes: 0
From: Indiana
Dashboard removal - US Speedo Gauge Overlay Install
3. Once removed, the screws on either side of column holding the top panel on are exposed, remove those.
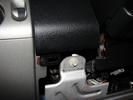
4. Remove the piece on top of column to allow for top dash panel to be removed.
5. Lift up on the top dash panel on either side of column to pop the panel out. Then, go to the back of the panel and pull it towards you�the panel fittings slide under the piece in front of it.

6. Now you can lift up on the dash panel.

4. Remove the piece on top of column to allow for top dash panel to be removed.
5. Lift up on the top dash panel on either side of column to pop the panel out. Then, go to the back of the panel and pull it towards you�the panel fittings slide under the piece in front of it.
6. Now you can lift up on the dash panel.

Thread Starter
|
Technical Article Contributor
Joined: Sep 2004
Posts: 81
Likes: 0
From: Indiana
Dashboard removal - US Speedo Gauge Overlay Install
8. Removing the connections on the top of the cluster is done by pulling the grey tab to the left or right, depending on which side you are working on. when you pull the tab, it pushes the connection out.


Thread Starter
|
Technical Article Contributor
Joined: Sep 2004
Posts: 81
Likes: 0
From: Indiana
Dashboard removal - US Speedo Gauge Overlay Install
9. Removing the Parking connection is just a bit tricker. push the black tab hanging down on one side to the inside and pull gently. then do the same on the either side and pull straight down.

10. With the cluster free, remove the clear panel by popping the tabs (2 on top and 4 on the bottom)
a. do this in clean, dust free environment and don�t touch the inside of the clear panel.

11. FOLLOW THE INSTRUCTIONS FROM US SPEEDO for the GAUGE INSTALL!!!!
a. I went with only the gauge overlay which was less than $90 from http://www.autoanything.com/
12. TIPS/HINTS:
a. Make note of how far down the needles are installed as you will need to reinstall the needles to that position.
b. The needles come off harder than expected. use the tool slowly and gently while also pulling up on it with fingers.
c. The OEM overlay will require a bit more force to remove than you expect as it is, for lack of a better description, �spot welded� around the holes.
d. Pop out the holes on the new overlay before you install it.
e. Be sure that you lay it down gently and ensure it is properly located before you try to adjust it�ONCE it is settled it will not come off easily.
f. Be sure to not push the needles to far down when reassembling.
10. With the cluster free, remove the clear panel by popping the tabs (2 on top and 4 on the bottom)
a. do this in clean, dust free environment and don�t touch the inside of the clear panel.
11. FOLLOW THE INSTRUCTIONS FROM US SPEEDO for the GAUGE INSTALL!!!!
a. I went with only the gauge overlay which was less than $90 from http://www.autoanything.com/
12. TIPS/HINTS:
a. Make note of how far down the needles are installed as you will need to reinstall the needles to that position.
b. The needles come off harder than expected. use the tool slowly and gently while also pulling up on it with fingers.
c. The OEM overlay will require a bit more force to remove than you expect as it is, for lack of a better description, �spot welded� around the holes.
d. Pop out the holes on the new overlay before you install it.
e. Be sure that you lay it down gently and ensure it is properly located before you try to adjust it�ONCE it is settled it will not come off easily.
f. Be sure to not push the needles to far down when reassembling.
Last edited by res1eott; Aug 18, 2007 at 09:36 AM.
Thread Starter
|
Technical Article Contributor
Joined: Sep 2004
Posts: 81
Likes: 0
From: Indiana
Dashboard removal - US Speedo Gauge Overlay Install
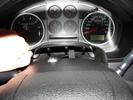
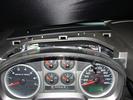
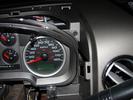
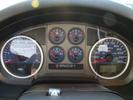
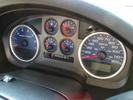
13. Installation and Reassembly from this point is the reverse of above. I suggest that before you put the dash panels back on, but have the gauge cluster secure, go for a test drive and ensure it is all working, then finish installation of panels. I had to readjust some needles due to slightly off positioning or to far pushed down on the needle. The needles are actually 2 parts, a hub and a spindle. I broke the hub off a couple of them as there are only very little, delicate tabs holding the hub to the spindle and there are weights inside the hub. I super-glued the hubs back on the spindles. I figured if this doesn’t work, I would break down and buy the replacement needles from US Speedo. So far it seems to be fine and once installed you cannot tell anything different. Here are a couple pics of the result. See my gallery for larger pics.
I might have overlooked something in the above, so if anyone sees some blank areas, let me know and I will answer best I can.
http://www.usspeedo.com/search.php
https://www.f150online.com/galleries/....cfm?gnum=8693
BFG A/T 305/65R18 - Daystar 2.5 leveling kit - Procomp 6079 wheels - Bushwacker extend-a-flares - Cloud-Rider grille inserts - Truxedo cover - Magnaflow exhaust - Outlaw CAI - Wet Okole seatcovers - custom painted skid plate - FX4 badging - mud flap - US Speed Gauge Blue Overlay
Last edited by res1eott; Aug 18, 2007 at 11:34 AM.

Senior Member
Joined: May 2004
Posts: 1,271
Likes: 0
Thanks for the write-up. When I put my US Speedo overlay on I too had to superglue 2 of the needles back together and I also pushed one too far down. The one I pushed down too far was having a hard time rotating, so I removed it an started over. Of course when I removed it I got fingerprints on the stainless and I had to clean the whole stainless sheet again. It was kind of a pain, but the end result came out really well. If I ever have to install another one I'm going to make a slotted spacer to fit around the pin that the needles fit over so I can push down the needles all the way to the spacer and they'll all be perfectly equal height.
Trending Topics


Senior Member
Joined: Mar 2006
Posts: 560
Likes: 0
Originally Posted by res1eott
13. Installation and Reassembly from this point is the reverse of above. I suggest that before you put the dash panels back on, but have the gauge cluster secure, go for a test drive and ensure it is all working, then finish installation of panels. I had to readjust some needles due to slightly off positioning or to far pushed down on the needle. The needles are actually 2 parts, a hub and a spindle. I broke the hub off a couple of them as there are only very little, delicate tabs holding the hub to the spindle and there are weights inside the hub. I super-glued the hubs back on the spindles. I figured if this doesn�t work, I would break down and buy the replacement needles from US Speedo. So far it seems to be fine and once installed you cannot tell anything different. Here are a couple pics of the result. See my gallery for larger pics.
I might have overlooked something in the above, so if anyone sees some blank areas, let me know and I will answer best I can.
http://www.usspeedo.com/search.php
https://www.f150online.com/galleries/....cfm?gnum=8693
BFG A/T 305/65R18 - Daystar 2.5 leveling kit - Procomp 6079 wheels - Bushwacker extend-a-flares - Cloud-Rider grille inserts - Truxedo cover - Magnaflow exhaust - Outlaw CAI - Wet Okole seatcovers - custom painted skid plate - FX4 badging - mud flap - US Speed Gauge Blue Overlay
![Smok][n's Avatar](data:image/svg+xml;utf8,<svg xmlns='http://www.w3.org/2000/svg' viewBox='0 0 50 50'><circle class='avatar-circle-default' fill='%23777acd' cx='25px' cy='25px' r='20px'></circle><text class='avatar-text-default' x='49%' y='53%' fill='white' text-anchor='middle' alignment-baseline='middle'>S</text></svg>)


Senior Member
Joined: Mar 2007
Posts: 303
Likes: 1
From: Blacksburg,VA
color
I've read about people trying to change their dash light color and failing because the stock overlay makes it green, not the bulbs themselves. With your new overlay, is the lighting still green or is the white shining through (i.e. do you think now you could swap bulbs for a different color backlighting)?
Thanks,
Thanks,


Member
Joined: Oct 2002
Posts: 63
Likes: 0
From: Burbank, CA
I just did somthing simmilar to that. I had bought a ROUSH performance cluster a while back. However I put off installing it because I figuered I had to reprogram the odometer again. Finally last week I figuered "the hell with it" and I installed just see if it worked. The Roush cluster ended up reading (.5 miles) but my truck had around 22,000. After turning on the truck and driving I noticed that the RPM and MPH needles werent moving. So I had to take apart the cluster so that I could free them up by opening up some of the controls on the cluster board. I finally got them to work, but my mileage was still off. At this point it was either pay someone else to program my cluster or try and find another way to have my mileage read correctly. So being that both clusters had the same XLT layout, I figured I would try to just swap faces. Keep in mind that the Roush cluster has a brushed aluminum type look along with EL illumination when dark. Otherwise there would be no point to swap out clusters or faces. Luckily it all worked out and I have a cluster with the Roush appearance that has my correct mileage. It was a pain to get all those needles to line back up perfectly, I had a massive headache when I was all done, hehe. I can post pics if any of you are interested.