

Wilderthing's Build Thread


Thread Starter
|
Senior Member
Joined: Feb 2012
Posts: 190
Likes: 1
Wilderthing's Build Thread
Ok, thought I should start a build thread. Here it is.
Truck: 98 F150 Scab 4x2
Engine:4.6
Kilometers: 375, 000
Use: everything and anything- used as a truck for the most part lol
Mods: Bed cover, Flowmaster muffler (I know- but was better then factory I thought), Chrome grill surround, Tailget strip, door panel chrome (I think you can call it that), Tail light covers, spare tire bedliner, probably more that I can't think of at the moment.
Future mods: bedliner, Suspension system, BUILT Power train, more plans that I can't think of at the moment.
Here she is when she turned to 370, 000, Dirty :
:


Today-Getting the Rad Support replaced. What fun lol:
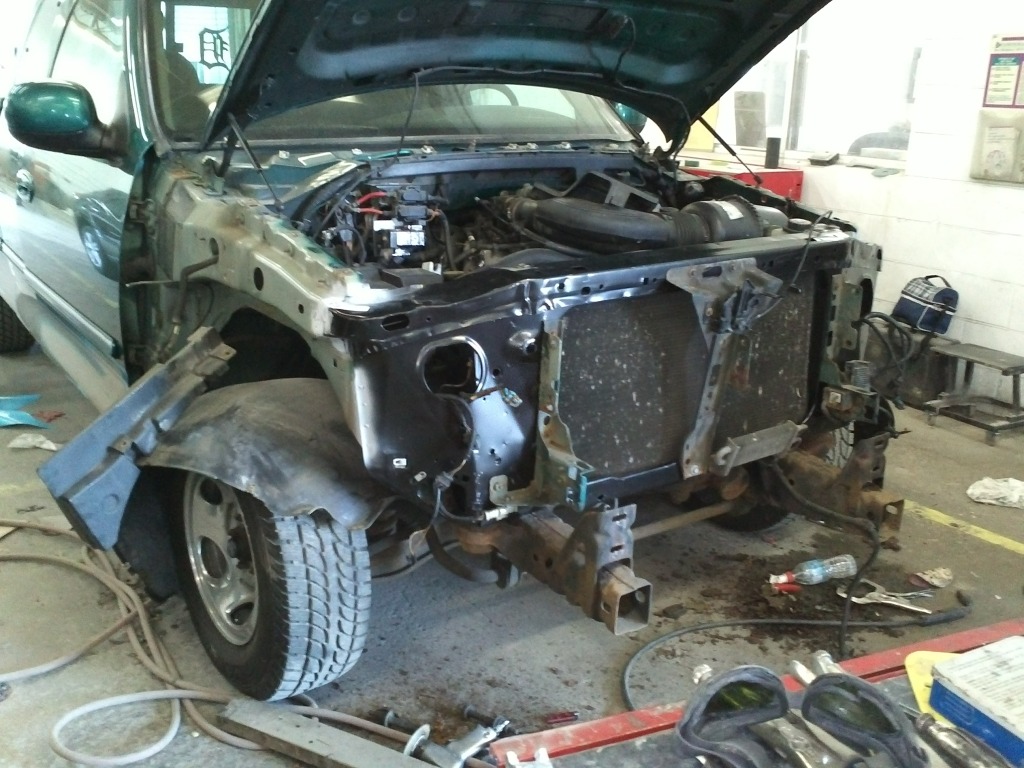


The original which was completely gone:

Sprayed the spare tire with bedliner, messed up the first coat very bad so it could look better. IMO anything is better then what I started with. There's a Separate thread in my sig if you wanna see before and after/ steps:

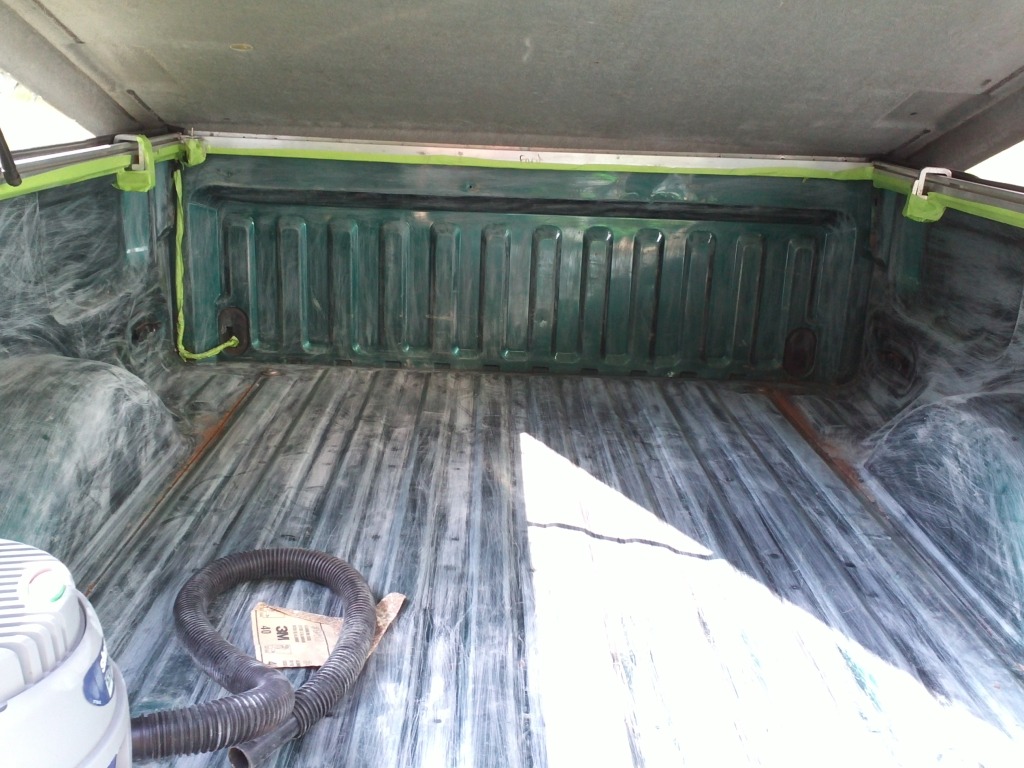
I started the bed liner- I used Duplicolor Bed Armor. I only have pics of the first coat. Right now I have two on but am going to put at least a total of 4 coats. I find it comes out much better using a brush and not the roller they give you. IMO the roller is ok for flat surfaces only. So far it has held up great to fire wood and misc stuff being thrown in. Sanded with 40 grit by hand and used their prep chemical (non spray). Will see how tuff this stuff is.


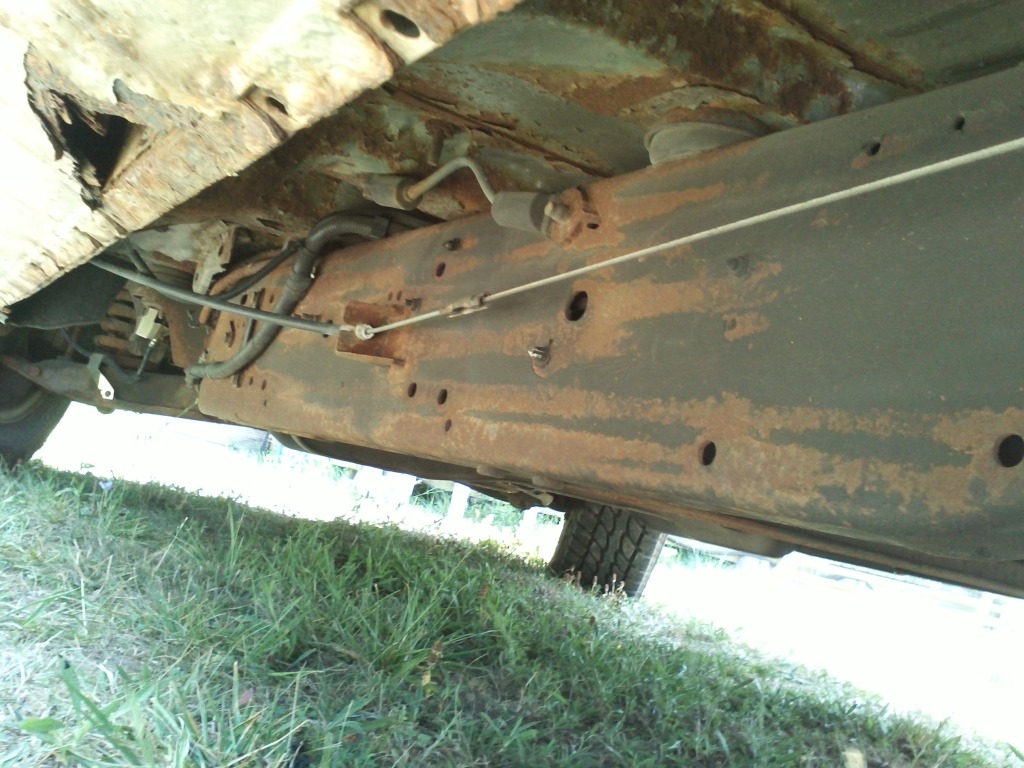
Then I turned my attention to the undercarriage. This is a Canadian truck and the last owner didn't do much in the terms of rust proofing. I am using a 3 step process that I have heard should work well. First I clean up the rust by getting rid of the flakes only and any dirt, etc. Then apply a coat of Tremclad (Rustoleum) semi gloss black OIL BASED rust paint in a can (brush on) and then after it dries for about a week do a second coat. This stuff seems to absorb into the rust which is why the long re coat window. Then in late August I am going to get Krown to spray it. The Reason I am paint before Krown is because I heard it adheres best to clean metal or paint. That should help seal the paint. All metal on the chassis is really solid still.
My previous experience with Krown is it washes off Rust half way through winter. I wash the truck at least once a week all year round to keep salt off it.
Time will tell how well this works this time, Krown should make it last a lot longer.
I did one coat on the axel and it looks awesome- after it fully dried. Still need to do a second coat on everything thou gh.
gh.
Before:

One Coat:


BakFlip
Finally got a BakFlip. Wanted one for 2 years and found a local deal I couldn't refuse. IMO its a huge improvement over that heavy, awkward one it replaced. It rained pretty Hard the other day and only a few drops got into the bed- can be fixed when I tweak it a bit. The functionality is amazing. So much easier to get stuff in/ from the front of the bed. I see now it would have been worth reg price for me (the way I use the truck).


Will try to update this thread with more pics/ better pics frequently.
Truck: 98 F150 Scab 4x2
Engine:4.6
Kilometers: 375, 000
Use: everything and anything- used as a truck for the most part lol
Mods: Bed cover, Flowmaster muffler (I know- but was better then factory I thought), Chrome grill surround, Tailget strip, door panel chrome (I think you can call it that), Tail light covers, spare tire bedliner, probably more that I can't think of at the moment.
Future mods: bedliner, Suspension system, BUILT Power train, more plans that I can't think of at the moment.
Here she is when she turned to 370, 000, Dirty
:Today-Getting the Rad Support replaced. What fun lol:
The original which was completely gone:
Sprayed the spare tire with bedliner, messed up the first coat very bad so it could look better. IMO anything is better then what I started with. There's a Separate thread in my sig if you wanna see before and after/ steps:
I started the bed liner- I used Duplicolor Bed Armor. I only have pics of the first coat. Right now I have two on but am going to put at least a total of 4 coats. I find it comes out much better using a brush and not the roller they give you. IMO the roller is ok for flat surfaces only. So far it has held up great to fire wood and misc stuff being thrown in. Sanded with 40 grit by hand and used their prep chemical (non spray). Will see how tuff this stuff is.
Then I turned my attention to the undercarriage. This is a Canadian truck and the last owner didn't do much in the terms of rust proofing. I am using a 3 step process that I have heard should work well. First I clean up the rust by getting rid of the flakes only and any dirt, etc. Then apply a coat of Tremclad (Rustoleum) semi gloss black OIL BASED rust paint in a can (brush on) and then after it dries for about a week do a second coat. This stuff seems to absorb into the rust which is why the long re coat window. Then in late August I am going to get Krown to spray it. The Reason I am paint before Krown is because I heard it adheres best to clean metal or paint. That should help seal the paint. All metal on the chassis is really solid still.
My previous experience with Krown is it washes off Rust half way through winter. I wash the truck at least once a week all year round to keep salt off it.
Time will tell how well this works this time, Krown should make it last a lot longer.
I did one coat on the axel and it looks awesome- after it fully dried. Still need to do a second coat on everything thou
gh.Before:
One Coat:
BakFlip
Finally got a BakFlip. Wanted one for 2 years and found a local deal I couldn't refuse. IMO its a huge improvement over that heavy, awkward one it replaced. It rained pretty Hard the other day and only a few drops got into the bed- can be fixed when I tweak it a bit. The functionality is amazing. So much easier to get stuff in/ from the front of the bed. I see now it would have been worth reg price for me (the way I use the truck).
Will try to update this thread with more pics/ better pics frequently.
Last edited by wilderthing; Oct 12, 2012 at 02:22 PM. Reason: back flip installed

Thread Starter
|
Senior Member
Joined: Feb 2012
Posts: 190
Likes: 1
No its not. To tell the truth I didn't do all of it- I don't have a welder yet. I paid for it to be done and fixed everything that was wrong when I got it back- stereo etc. Long boring story.
Next year is when this will get interesting- new suspension and drive line
Next year is when this will get interesting- new suspension and drive line

Looks good! Im doing the same with my frame but using POR15 and then using 3m rubberized undercoating on all of the floor and bed pans...Man i must say its been taking forever! But deff worth it. Looks great!


Trending Topics
Thread Starter
|
Senior Member
Joined: Feb 2012
Posts: 190
Likes: 1

I thought about swapping to a 4x4 bumper. But I don't know, after I lift it I think I will be able to decide. Need to put more thought in it. Currently working on some plans to tweak this bumper though. Make look and perform better.
Thanks.
Plan on putting new shocks all around today or tomorrow just to hold me off until I do the new suspension. One boot is cracked and the rest feel pretty worn. Will update with pics if I remember to take pics.
Thanks for the feedback, suggestions and comments everyone
Last edited by wilderthing; Jul 29, 2012 at 11:41 PM.


