
DEI Valet 551T Installation Report
#1
 01-10-2002, 06:20 PM


Join Date: Dec 2001
Location: Bend, Oregon
Posts: 10
Likes: 0
Received 0 Likes
on
0 Posts
DEI Valet 551T Installation Report
DEI Valet 551T Remote Start Installation with Factory Keyless Entry
The goal of this project was to add a remote start module to the existing factory keyless entry system in my 2002 F150 SuperCrew Lariat. Why? Because I like the way the Ford factory keyless works and didn't want to recreate the functionality in a new keyless/remote start system.
DISCLAIMER: know what you're doing before you start. It would be easy to really foul up your truck by doing this wrong because you're working with the main electrical systems, ignition and tach systems and your factory keyless/security system.
DISCLAIMER 2: Any wire colors, signal polarities, locations, etc. are the ones we found on MY truck. Your truck might be different, might operate differently, etc. If you decide to go this route, verify everything yourself -- don't trust my experience! This document is no substitute for your own knowledge...
I quickly found that all of the available documentation was focused around controlling vehicle components through aftermarket alarm and keyless entry systems. Of course I wanted to the opposite: control an aftermarket remote starter from my factory keyless system. Research was needed....
I was getting discouraged after checking with several keyless entry system manufacturers and finding that their systems were not easily integrated with a factory system. Then I learned of the Valet series of remote starters by Directed Electronics (DEI). They had a remote start module, the 551T, that is specifically designed to be added into an existing alarm or keyless system. They also made a transponder bypass kit, the 555F, designed to work with the Ford PATS system. Now I had the modules necessary to add remote start. But how to activate it from my keyless system?
A call to my Ford dealer resulted in the loan of the 2002 Service and Wiring manuals for my truck. Fortunately the diagrams matched the color code sheet from DEI. I knew I wanted to use the lock button from my keyfob to activate the starter (that way the doors would be locked while the truck warmed up). The diagrams showed that PK/YE was the lock lead and that PK/LG was the unlock lead from the door lock switch to the actuator. Looked good enough for me...time to do the install!
Getting Started
The DEI installation manuals are very well done. The installation process consists of identifying and testing the wires you need to tie into, determining a location for the remote starter and the hood switch, then building up and installing the remote start wiring harnesses. Once everything is wired up, you program the remote start system and then test it. The manuals also have detailed troubleshooting instructions in case there are any problems.
Identifying and testing the standard vehicle wires went quickly and matched the provided documentation in every case. Next we had to figure out how to get the activation signal for the remote starter. This was the most difficult part of the job.
Finding an Appropriate Activation Source
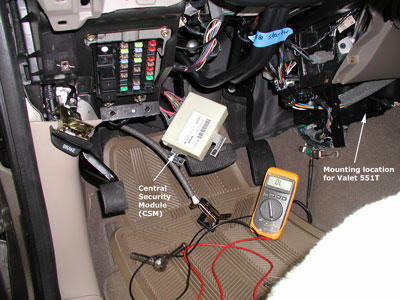
We eventually determined that the Central Security Module (CSM), the brains of the keyless entry system, changes the way some of the vehicle wires work. (The CSM is found on the driver's side of the firewall high above the pedals. It is a light-colored, roughly 4" x 5" box attached to the firewall with two nuts. After removing the nuts, there is enough slack in the wiring to bring it down almost to floor level.)
We found that PK/YE, the "lock" lead from the door lock switch didn't provide a negative pulse (or at least not one that we could detect) when the keyfob lock button was pushed. Obviously the CSM was handling the signaling from the keyfob. With PK/YE ruled out, we had to get the Ford wiring diagrams out again. After poring over the diagrams we determined that PK/BK was a lock lead that went to the door lock actuator motors. We tested this lead and found that it generated a positive pulse whenever the door lock switch or keyfob lock buttons were pressed. Using a relay would reverse the polarity and provide the negative pulse we needed to activate the remote starter.
"Safe" Activation Circuit
I was worried, however, about the possibility of a child playing with the door lock switch and possibly starting the vehicle. After some thought and further probing, we determined that another relay could be used to detect the press of the door lock switch through the PK/YE lead and then not send an activation pulse to the remote starter module. The circuit we designed is shown below:
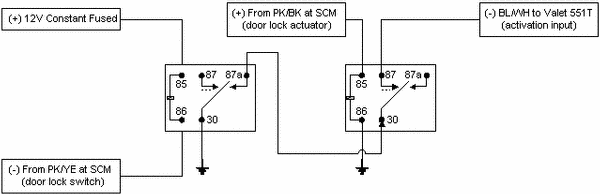
The circuit works like this:
1 - The righthand relay activates when the doors are locked (keyfob or door lock) and passes whatever is on pin 30 to the activation input of the 551T.
2 - The lefthand relay passes ground to pin 30 of the righthand relay unless the door lock switch is pressed. In that case it passes nothing (i.e. open) to pin 30 of the righthand relay, resulting in no signal being passed to the 551T.
This accomplished our goal of using the lock button on the keyfob to generate negative pulses without allowing the door lock switches to do the same. The negative pulses are passed to the 551T's activation input lead.
The goal of this project was to add a remote start module to the existing factory keyless entry system in my 2002 F150 SuperCrew Lariat. Why? Because I like the way the Ford factory keyless works and didn't want to recreate the functionality in a new keyless/remote start system.
DISCLAIMER: know what you're doing before you start. It would be easy to really foul up your truck by doing this wrong because you're working with the main electrical systems, ignition and tach systems and your factory keyless/security system.
DISCLAIMER 2: Any wire colors, signal polarities, locations, etc. are the ones we found on MY truck. Your truck might be different, might operate differently, etc. If you decide to go this route, verify everything yourself -- don't trust my experience! This document is no substitute for your own knowledge...
I quickly found that all of the available documentation was focused around controlling vehicle components through aftermarket alarm and keyless entry systems. Of course I wanted to the opposite: control an aftermarket remote starter from my factory keyless system. Research was needed....
I was getting discouraged after checking with several keyless entry system manufacturers and finding that their systems were not easily integrated with a factory system. Then I learned of the Valet series of remote starters by Directed Electronics (DEI). They had a remote start module, the 551T, that is specifically designed to be added into an existing alarm or keyless system. They also made a transponder bypass kit, the 555F, designed to work with the Ford PATS system. Now I had the modules necessary to add remote start. But how to activate it from my keyless system?
A call to my Ford dealer resulted in the loan of the 2002 Service and Wiring manuals for my truck. Fortunately the diagrams matched the color code sheet from DEI. I knew I wanted to use the lock button from my keyfob to activate the starter (that way the doors would be locked while the truck warmed up). The diagrams showed that PK/YE was the lock lead and that PK/LG was the unlock lead from the door lock switch to the actuator. Looked good enough for me...time to do the install!
Getting Started
The DEI installation manuals are very well done. The installation process consists of identifying and testing the wires you need to tie into, determining a location for the remote starter and the hood switch, then building up and installing the remote start wiring harnesses. Once everything is wired up, you program the remote start system and then test it. The manuals also have detailed troubleshooting instructions in case there are any problems.
Identifying and testing the standard vehicle wires went quickly and matched the provided documentation in every case. Next we had to figure out how to get the activation signal for the remote starter. This was the most difficult part of the job.
Finding an Appropriate Activation Source
We eventually determined that the Central Security Module (CSM), the brains of the keyless entry system, changes the way some of the vehicle wires work. (The CSM is found on the driver's side of the firewall high above the pedals. It is a light-colored, roughly 4" x 5" box attached to the firewall with two nuts. After removing the nuts, there is enough slack in the wiring to bring it down almost to floor level.)
We found that PK/YE, the "lock" lead from the door lock switch didn't provide a negative pulse (or at least not one that we could detect) when the keyfob lock button was pushed. Obviously the CSM was handling the signaling from the keyfob. With PK/YE ruled out, we had to get the Ford wiring diagrams out again. After poring over the diagrams we determined that PK/BK was a lock lead that went to the door lock actuator motors. We tested this lead and found that it generated a positive pulse whenever the door lock switch or keyfob lock buttons were pressed. Using a relay would reverse the polarity and provide the negative pulse we needed to activate the remote starter.
"Safe" Activation Circuit
I was worried, however, about the possibility of a child playing with the door lock switch and possibly starting the vehicle. After some thought and further probing, we determined that another relay could be used to detect the press of the door lock switch through the PK/YE lead and then not send an activation pulse to the remote starter module. The circuit we designed is shown below:
The circuit works like this:
1 - The righthand relay activates when the doors are locked (keyfob or door lock) and passes whatever is on pin 30 to the activation input of the 551T.
2 - The lefthand relay passes ground to pin 30 of the righthand relay unless the door lock switch is pressed. In that case it passes nothing (i.e. open) to pin 30 of the righthand relay, resulting in no signal being passed to the 551T.
This accomplished our goal of using the lock button on the keyfob to generate negative pulses without allowing the door lock switches to do the same. The negative pulses are passed to the 551T's activation input lead.
#2
01-10-2002, 06:24 PM
Join Date: Dec 2001
Location: Bend, Oregon
Posts: 10
Likes: 0
Received 0 Likes
on
0 Posts
part 2
Installation
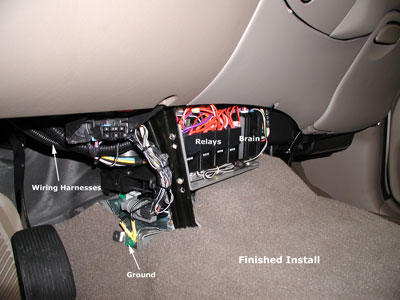
With that hurdle cleared, we were ready to proceed with the installation. We decided to put the remote starter behind the black plastic cover that sits atop the center hump. There is a nice open space there and easy access to a steel dash support that provides a good mounting point. There is also easy access to the steering column and driver's footwell area.
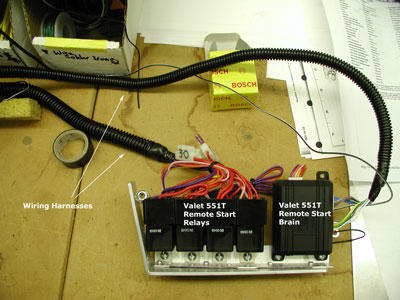
We then fabricated a mounting bracket for the 551T and its associated relays. We used some scrap 1"; wide aluminum strap for the bracket and some 3/4"; x 3/4"; angle aluminum for the component mounts. We bent the strap to match the angle of the steel support leg and riveted the angle aluminum to the bracket. The entire assembly is secured to the steel leg with two bolts. The following photo shows the components mounted to the bracket as we organized the wiring harnesses prior to installation.
Under the Hood
The next step was to install the hood safety switch and tach lead. The safety switch is a plunger switch that prevents the remote starter from activating if the hood is open. That way you won't be as likely to start the vehicle when you're working under the hood...
We ended up fabricating a mounting bracket for the switch that ties in to the hood stop and the grill surround (see photo below). This gave us a nice flat surface with easy access to wiring channels.
We then pulled wire to the back along the battery side of the engine compartment, secured with tie wraps, where we used the existing wiring chases along the back wall of the engine compartment. Finally, we came throught the firewall at the grommet located in the driver's footwell area.
Here are links to some pictures of the under the hood work:
https://www.f150online.com/galleries...0-861-7890.jpg
https://www.f150online.com/galleries...0-861-7888.jpg
https://www.f150online.com/galleries...0-861-7889.jpg
With that hurdle cleared, we were ready to proceed with the installation. We decided to put the remote starter behind the black plastic cover that sits atop the center hump. There is a nice open space there and easy access to a steel dash support that provides a good mounting point. There is also easy access to the steering column and driver's footwell area.
We then fabricated a mounting bracket for the 551T and its associated relays. We used some scrap 1"; wide aluminum strap for the bracket and some 3/4"; x 3/4"; angle aluminum for the component mounts. We bent the strap to match the angle of the steel support leg and riveted the angle aluminum to the bracket. The entire assembly is secured to the steel leg with two bolts. The following photo shows the components mounted to the bracket as we organized the wiring harnesses prior to installation.
Under the Hood
The next step was to install the hood safety switch and tach lead. The safety switch is a plunger switch that prevents the remote starter from activating if the hood is open. That way you won't be as likely to start the vehicle when you're working under the hood...
We ended up fabricating a mounting bracket for the switch that ties in to the hood stop and the grill surround (see photo below). This gave us a nice flat surface with easy access to wiring channels.
We then pulled wire to the back along the battery side of the engine compartment, secured with tie wraps, where we used the existing wiring chases along the back wall of the engine compartment. Finally, we came throught the firewall at the grommet located in the driver's footwell area.
Here are links to some pictures of the under the hood work:
https://www.f150online.com/galleries...0-861-7890.jpg
https://www.f150online.com/galleries...0-861-7888.jpg
https://www.f150online.com/galleries...0-861-7889.jpg
#3
01-10-2002, 06:25 PM
Join Date: Dec 2001
Location: Bend, Oregon
Posts: 10
Likes: 0
Received 0 Likes
on
0 Posts
Part 3
Connecting It Up
We installed the remote starter components in their final location, routed the wires and connected everything together.

Programming and Testing
The final steps involved programming the 551T brain and testing remote start operation. We started the vehicle with the key then pressed and held the 551T programming button while it learned the tach. It took about 2 seconds to learn the tach...
The 551T came programmed with a default of one pulse to activate the remote start. I re-programmed it to 3 pulses and then we were ready to test the system.
At my DEI dealer's recommendation, we initially tested the 551T remote start without the 555F transponder. After passing those tests, we programmed the 555F transponder into PATS using both factory keys. That went flawlessly and the transponder worked with the remote starter.
After that you tie wrap the 555F transponder to the ignition cylinder with the transponder very close to the PATS antenna (a black ring around the cylinder). Test the remote start again to make sure it still works and then you're ready to finish securing wiring and put the dash back together!
Final testing included trying to activate the system from the door lock switch (it won't), testing the hood switch cutoff, brake switch cutoff, and making sure it wouldn't try to start while in gear. The system passed all tests with flying colors...
Conclusion
After buttoning things up there is no visible sign of a mod in the interior. Under the hood there are a couple of changes but everything is wrapped and routed like a factory wire. Very pleasing to me...
The unit has worked perfectly so far and I have no reason to expect any problems with it. My only remaining task is to get my dealer to eliminate the horn chirp on the second and third lock pulses so that I don't annoy people in the mornings.
The total cost of the system (at retail) was about $160 including the wiring supplies and the two relays for the custom circuit. The components could be had for less but I liked the local DEI dealer and appreciated the support and help they provided during the installation process (and I like buying locally when I can).
We installed the remote starter components in their final location, routed the wires and connected everything together.
Programming and Testing
The final steps involved programming the 551T brain and testing remote start operation. We started the vehicle with the key then pressed and held the 551T programming button while it learned the tach. It took about 2 seconds to learn the tach...
The 551T came programmed with a default of one pulse to activate the remote start. I re-programmed it to 3 pulses and then we were ready to test the system.
At my DEI dealer's recommendation, we initially tested the 551T remote start without the 555F transponder. After passing those tests, we programmed the 555F transponder into PATS using both factory keys. That went flawlessly and the transponder worked with the remote starter.
After that you tie wrap the 555F transponder to the ignition cylinder with the transponder very close to the PATS antenna (a black ring around the cylinder). Test the remote start again to make sure it still works and then you're ready to finish securing wiring and put the dash back together!
Final testing included trying to activate the system from the door lock switch (it won't), testing the hood switch cutoff, brake switch cutoff, and making sure it wouldn't try to start while in gear. The system passed all tests with flying colors...
Conclusion
After buttoning things up there is no visible sign of a mod in the interior. Under the hood there are a couple of changes but everything is wrapped and routed like a factory wire. Very pleasing to me...
The unit has worked perfectly so far and I have no reason to expect any problems with it. My only remaining task is to get my dealer to eliminate the horn chirp on the second and third lock pulses so that I don't annoy people in the mornings.
The total cost of the system (at retail) was about $160 including the wiring supplies and the two relays for the custom circuit. The components could be had for less but I liked the local DEI dealer and appreciated the support and help they provided during the installation process (and I like buying locally when I can).


#5
01-10-2002, 08:06 PM

Member
Join Date: Dec 2001
Location: Las Vegas, NV
Posts: 12
Likes: 0
Received 0 Likes
on
0 Posts
#6
01-10-2002, 08:45 PM
Join Date: Dec 2001
Location: Bend, Oregon
Posts: 10
Likes: 0
Received 0 Likes
on
0 Posts
Sorry for any confusion...the tach lead comes out of the engine compartment. We picked it up from one of the coils then joined that lead into the loom with the hood safety switch to bring the two of them back through the firewall into the driver's compartment.
The wiring chase at the back of the engine compartment is ideally situated for this use. There's even a pre-made exit down to that coil area...
Cheers,
Mike Wilson
The wiring chase at the back of the engine compartment is ideally situated for this use. There's even a pre-made exit down to that coil area...
Cheers,
Mike Wilson
#7
01-11-2002, 07:31 AM

Member
Join Date: Nov 2001
Location: Oregon Coast
Posts: 18
Likes: 0
Received 0 Likes
on
0 Posts

Trending Topics
#8
01-11-2002, 08:46 AM

#9
01-15-2002, 12:32 PM

Member
Join Date: Nov 2001
Location: Marietta GA
Posts: 19
Likes: 0
Received 0 Likes
on
0 Posts
#10
01-15-2002, 01:57 PM

Senior Member
Join Date: Sep 2001
Location: Omaha, NEBRASKA
Posts: 215
Likes: 0
Received 0 Likes
on
0 Posts