2010 F150 XLT SCREW Stereo Upgrade
#1
 04-04-2011, 11:15 PM


Join Date: May 2010
Location: Boise, Idaho
Posts: 25
Likes: 0
Received 0 Likes
on
0 Posts
2010 F150 XLT SCREW Stereo Upgrade
Bought my 2010 F150 XLT SuperCrew back in October of 2009. I have been very happy and having a hard time resisting spending a ton of money on it with all the mods I see on this forum  I have been a long time lurker, with a few posts, but there is a ton of information on here and a lot of good guys and gals helping others out. I would like to thank brn2ryd and Langlowe
  mainly even though I know the derived a lot of their info from other helpful threads. Anyways enough of that and onto the install.
Sticking with the stock head unit with Sync. Ford did something right with the Sync system. Does Bluetooth to my phone, I can stream audio through BT from my iPhone w/ Pandora, and the extra USB connection in the back allows me to run an external HDD with my entire music library.
My system is second hand to me, my buddy sold his truck and took his stereo out of it. Ended up picking up the 2 Kicker amps, 2 Subs, bluetop Optima, wiring, and fuses for $350.
Parts list:
-Kicker ZX750.1
-Kicker ZX350.4
-Kicker 12' CVT x 2
-Maxxsonics MX-1
-Infinity 6030 6 1/2 Component Fronts
-Infinity 6032 6 1/2 2 way Rears
-EFX Dblock - Distribution/Combination Power-Ground
-EFX Wafer Fuse Holder
-Stinger SPI216 2 Channel 6 Ft RCA Cable x 2
-Stinger SPI213 2 Channel 3 Ft RCA Cable
-Stinger ANL_S150 High Current ANL Fuse
-Stinger SMD100 Midi Style Fuse 100 Amp x 2
-Stinger SHW514BC 14 Ga Twisted Blue Speaker Wire - 5 Ft.
-RAAMmat BXT II - 75ft^2
-4 in 1 - 16 Ga speaker wire
I am very very happy with the end result. I would say the bass is more along the lines of SQ as apposed to the blow your eardrums out type. Everything is pretty well tuned got a little more work to do. Also need to finish carpeting the box. Spent a couple weekends and pretty much everyday after work on this bad boy. A lot of time, but I could not be happier with the end product. If you have any questions or want more pics let me know.
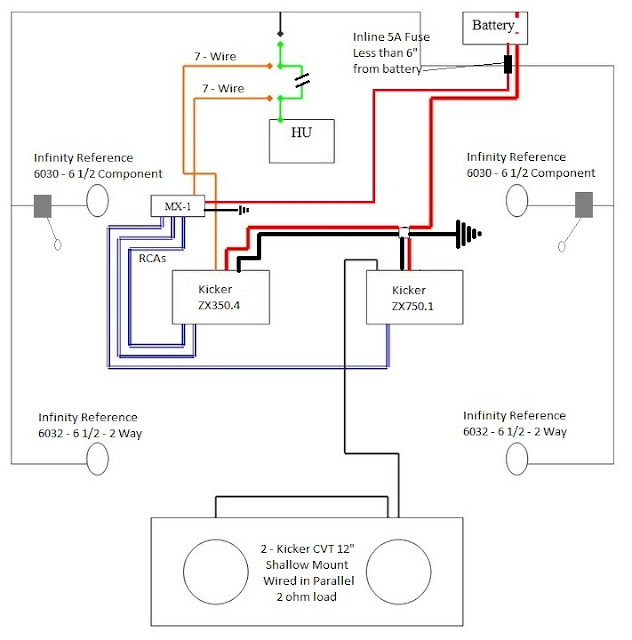
Ok let's start out with the wiring diagram. Don't mind the 7 wire thing, not sure what I was thinking lol
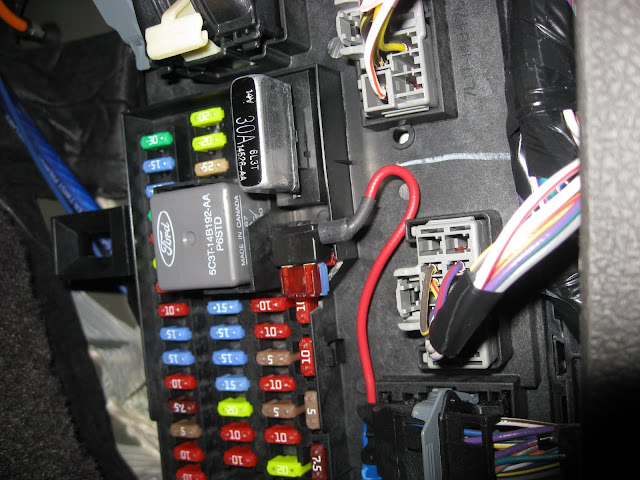
Mounted the 150A fuse right behind the battery mounted to the frame. 4ga wire goes right through the firewall that everyone else uses and just put a hole in the grommet that was there:

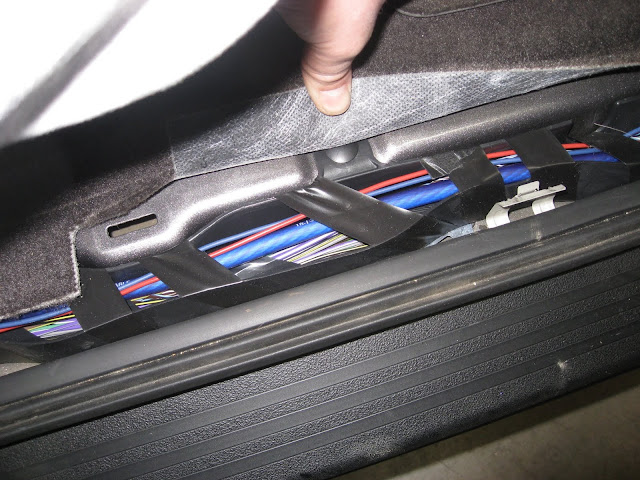
Power, Remote, and MX-1 power down the passenger side. Pretty easy to run just did a lot of fishing:
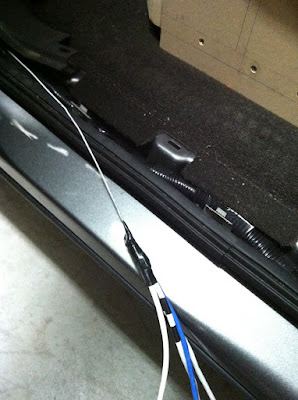
Speaker wire and **** controls down the driver side:

Fishing Wires ran 4 of the 4in1 16ga wires

Add a fuse for the MX-1 Power with a little custom dremel work

Rear Doors RAAMat installed with the new speakers and baffles installed. A lot of work into these doors. Got better and better as time went on but still time consuming. Did one door at a time each day after work:

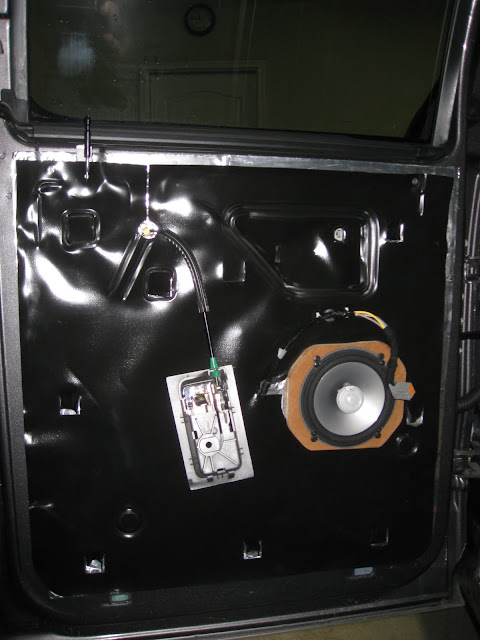
Front doors all done with speakers and crossovers installed. Baffles are coated with Thompsons Water Seal:


Door panel back on with the tweeters installed. Really happy with how they turned out. I am able to adjust the tweeter mounts so they point up towards the passenger and driver. Passenger tweeter is pointed towards the driver and driver towards the passenger:


Back panel all covered with RAAMat. Second pic is on the driver side you can see I added the some filter mesh and covered 50% of the rear vent. Passenger side vent is completely covered. Noise is greatly reduced and you still don't blow out your ear drums when you shut the doors:


What a mess!!

Test fitting my panels:


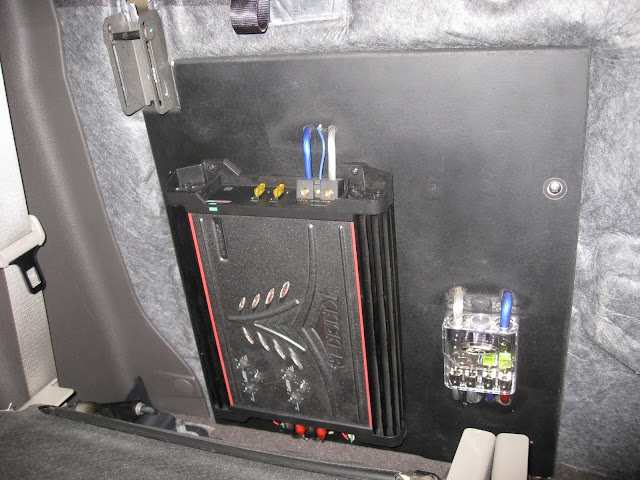
Final placement with the back carpet panel reinstalled. Rather than cutting around the amp boards I cut it slightly smaller than the boards. I also removed a lot of the backing so the boards would snug up right against the back wall. This allows a clean look and you don't have the edge of the backing sticking out. Will bottoms will go all the way up, there is a small amount of rubbing when they are all the way up though. With the box in there I won't have my seats up much so no biggie to me.


I have been a long time lurker, with a few posts, but there is a ton of information on here and a lot of good guys and gals helping others out. I would like to thank brn2ryd and Langlowe mainly even though I know the derived a lot of their info from other helpful threads. Anyways enough of that and onto the install.Sticking with the stock head unit with Sync. Ford did something right with the Sync system. Does Bluetooth to my phone, I can stream audio through BT from my iPhone w/ Pandora, and the extra USB connection in the back allows me to run an external HDD with my entire music library.
My system is second hand to me, my buddy sold his truck and took his stereo out of it. Ended up picking up the 2 Kicker amps, 2 Subs, bluetop Optima, wiring, and fuses for $350.
Parts list:
-Kicker ZX750.1
-Kicker ZX350.4
-Kicker 12' CVT x 2
-Maxxsonics MX-1
-Infinity 6030 6 1/2 Component Fronts
-Infinity 6032 6 1/2 2 way Rears
-EFX Dblock - Distribution/Combination Power-Ground
-EFX Wafer Fuse Holder
-Stinger SPI216 2 Channel 6 Ft RCA Cable x 2
-Stinger SPI213 2 Channel 3 Ft RCA Cable
-Stinger ANL_S150 High Current ANL Fuse
-Stinger SMD100 Midi Style Fuse 100 Amp x 2
-Stinger SHW514BC 14 Ga Twisted Blue Speaker Wire - 5 Ft.
-RAAMmat BXT II - 75ft^2
-4 in 1 - 16 Ga speaker wire
I am very very happy with the end result. I would say the bass is more along the lines of SQ as apposed to the blow your eardrums out type. Everything is pretty well tuned got a little more work to do. Also need to finish carpeting the box. Spent a couple weekends and pretty much everyday after work on this bad boy. A lot of time, but I could not be happier with the end product. If you have any questions or want more pics let me know.
Ok let's start out with the wiring diagram. Don't mind the 7 wire thing, not sure what I was thinking lol
Mounted the 150A fuse right behind the battery mounted to the frame. 4ga wire goes right through the firewall that everyone else uses and just put a hole in the grommet that was there:
Power, Remote, and MX-1 power down the passenger side. Pretty easy to run just did a lot of fishing:
Speaker wire and **** controls down the driver side:
Fishing Wires ran 4 of the 4in1 16ga wires
Add a fuse for the MX-1 Power with a little custom dremel work
Rear Doors RAAMat installed with the new speakers and baffles installed. A lot of work into these doors. Got better and better as time went on but still time consuming. Did one door at a time each day after work:
Front doors all done with speakers and crossovers installed. Baffles are coated with Thompsons Water Seal:
Door panel back on with the tweeters installed. Really happy with how they turned out. I am able to adjust the tweeter mounts so they point up towards the passenger and driver. Passenger tweeter is pointed towards the driver and driver towards the passenger:
Back panel all covered with RAAMat. Second pic is on the driver side you can see I added the some filter mesh and covered 50% of the rear vent. Passenger side vent is completely covered. Noise is greatly reduced and you still don't blow out your ear drums when you shut the doors:
What a mess!!
Test fitting my panels:
Final placement with the back carpet panel reinstalled. Rather than cutting around the amp boards I cut it slightly smaller than the boards. I also removed a lot of the backing so the boards would snug up right against the back wall. This allows a clean look and you don't have the edge of the backing sticking out. Will bottoms will go all the way up, there is a small amount of rubbing when they are all the way up though. With the box in there I won't have my seats up much so no biggie to me.
#2
04-04-2011, 11:17 PM
Join Date: May 2010
Location: Boise, Idaho
Posts: 25
Likes: 0
Received 0 Likes
on
0 Posts
Part Deux
Here's the enclosure I built. Right at 1ft^3 per sub. Used 3/4" MDF for the base and ends. 1/2" MDF everywhere else so I could get that much space in the same area. All sealed with silicone and filled with 2lbs of polyfil.


Added spacers to the bottom to make sure there was no carpet contact.


Radio mess up front, didn't use the Metra Harness, but ultimately accomplished the same thing. If I do take the stereo out then I can just hook the wires back up without having to cut anything more than I already have.


Also did the USB2 install in the front glovebox. I love having that much music at my fingertips:


Let me know what you think. Comments and questions are always welcome. If you would like to see more pics of anything.
Again thanks to everyone on the Forum for all the awesome information. I couldn't have done it without you
Added spacers to the bottom to make sure there was no carpet contact.
Radio mess up front, didn't use the Metra Harness, but ultimately accomplished the same thing. If I do take the stereo out then I can just hook the wires back up without having to cut anything more than I already have.
Also did the USB2 install in the front glovebox. I love having that much music at my fingertips:
Let me know what you think. Comments and questions are always welcome. If you would like to see more pics of anything.
Again thanks to everyone on the Forum for all the awesome information. I couldn't have done it without you


#6
04-05-2011, 12:23 AM
Join Date: May 2010
Location: Boise, Idaho
Posts: 25
Likes: 0
Received 0 Likes
on
0 Posts
Thanks guys
As for the seats hardest part is getting them down the first time. From there I did the zip tie mod to allow me to pull the pin easier and release the seat down. Here a is a shot of the latch mechanism. With the zip ties on there it's so easy to put the seats down if I need to get back there.

As for the seats hardest part is getting them down the first time. From there I did the zip tie mod to allow me to pull the pin easier and release the seat down. Here a is a shot of the latch mechanism. With the zip ties on there it's so easy to put the seats down if I need to get back there.
#7
04-05-2011, 01:02 AM

Senior Member
Join Date: Oct 2010
Location: Austin, Tx
Posts: 327
Likes: 0
Received 0 Likes
on
0 Posts

Trending Topics
#9
04-05-2011, 09:35 PM

I really like your box.
I just started my install then stopped. I'll post pics when I get going again. I was just going to splice into the factory wiring like you, but wussed-out so I'm waiting on the Metra harness to be delivered before I start up again.
I am wondering, you are able to fit the component's crossovers behind the door panels like that? Any trouble getting the door back together with the crossovers on there?
#10
04-05-2011, 11:46 PM
Join Date: May 2010
Location: Boise, Idaho
Posts: 25
Likes: 0
Received 0 Likes
on
0 Posts
Nope no issues getting the door back on. Just be careful where you place them to make sure you have room. I taped them up there first to be sure they fit so I didn't put unneeded hole in my door. Driver side is on the lower right of the speaker due to the bigger bunch of wires in that door.
#11
04-06-2011, 02:25 PM

Junior Member
Join Date: Feb 2003
Location: New Orleans, LA
Posts: 5
Likes: 0
Received 0 Likes
on
0 Posts
#12
04-06-2011, 07:49 PM

Senior Member
Join Date: Jul 2005
Location: Anchorage, AK
Posts: 319
Likes: 0
Received 0 Likes
on
0 Posts
I see you had to dremel out the front door covers to make room for the comps... did you have to do the same for the rear doors? How close was it with those front speakers anyway? I'm looking to install a set of 6 and halfs in the front as well, but I'd like to avoid cutting into the plastic if possible, so I was thinking about using thinner sheet of MDF than you did for your adapter plates.
#13
04-06-2011, 10:09 PM
Join Date: May 2010
Location: Boise, Idaho
Posts: 25
Likes: 0
Received 0 Likes
on
0 Posts
I see you had to dremel out the front door covers to make room for the comps... did you have to do the same for the rear doors? How close was it with those front speakers anyway? I'm looking to install a set of 6 and halfs in the front as well, but I'd like to avoid cutting into the plastic if possible, so I was thinking about using thinner sheet of MDF than you did for your adapter plates.
Last edited by Fritzz; 04-06-2011 at 10:12 PM.
#14
04-07-2011, 03:48 AM
Senior Member
Join Date: Jul 2005
Location: Anchorage, AK
Posts: 319
Likes: 0
Received 0 Likes
on
0 Posts
I used 1/2" MDF I couldn't see going any smaller than that. I did have to use the dremel on the front and the rear doors. I probably could have gotten away without cutting out the door, but I didn't want to run the risk of the speakers rubbing. With the 1/2" MDF I used there was maybe 1/8" to 3/16" of an inch of space. My speakers did come with some plastic rings, could have maybe used those, but seems like they would be too flimsy.
#15
04-07-2011, 07:59 AM
Join Date: May 2010
Location: Boise, Idaho
Posts: 25
Likes: 0
Received 0 Likes
on
0 Posts
I was thinking about it some more and honestly I can't see why you couldn't use a piece of 1/4" MDF. It's not like the opening is a lot bigger than the speaker, just a different shape. I was initially worried about flex with the 1/4", but I think if you made it as big as the opening put more than 4 screws in it and used some sound deadening material you would have a solid platform. I also wasn't real careful about placement and that would play a big factor on how much or if you had to cut.
Try it out and let us know.
Try it out and let us know.