Fog Lamps on at All times '05 - '06 ( maybe 04 )
#1
 03-20-2006, 12:39 AM


I was asked by another member if it could be done to have the fog lamps on with both the low and high beams ( not drop out like the factory function does ) on a '05. The answer is yes, and it is not that hard to do.
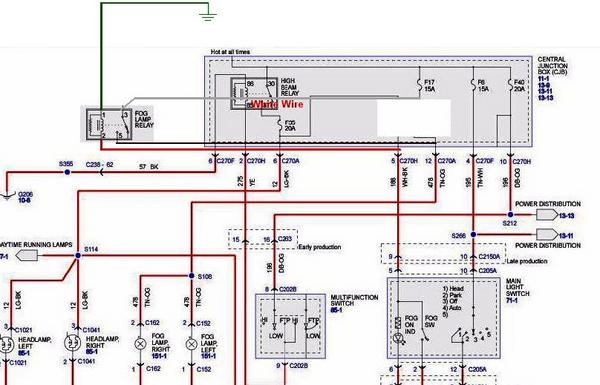
The standard diagram for the fog lamps ( this is the '05 EVTM, worked on my '06 that I took the pictures on for documentation ). It might work on a '04, I have not had time to look at the EVTM for a 2004, to see if it is the same.
In the Central Junction Box ( CJB ) the Fog Lamp Relay is 202, top row of 3 Relays with fuses inbetween, it is the center Relay.
The Fog lamps turn off, when the high beams are on. This is due to the fact that the Fog Lamp Relay coil is grounded via the high beam elements. When the high beams are turned on, both sides of the coil for the fog lamp relay have power, and the coil drops out, thus the fog lamsp turn off.
I just modified the Fog lamp circuit, so the ground on the Fog Lamp Relay is on at all times. This is done via the pigtail, as the pin 1 ( ground side of the fog lamp relay coil ) is inside the CJB.
Modification of the Fog Lamp Relay :
I used trailer wire, as I have a spool of it. Use any 16 AWG wire you want, it was just handy that I needed 4 wires, and these were bonded together.
The Relay that is being extended :

Make note of the pin numbers on the end of it, and place them 1:1 back into the CJB, with the exclusion of Pin #1. That is the one to the ground lug.
I had to file down the terminals I had.
1 had to be smaller width wise, to match the pins on the relay.
The other 2 I just took of the lip on the side, so I could insert them all the way into the CJB. Take the time to find the correct width Male Spade terminals, for a better fit, or be a bit more careful them me filing them down, I went a bit too far.
Cont in next posting
The standard diagram for the fog lamps ( this is the '05 EVTM, worked on my '06 that I took the pictures on for documentation ). It might work on a '04, I have not had time to look at the EVTM for a 2004, to see if it is the same.
In the Central Junction Box ( CJB ) the Fog Lamp Relay is 202, top row of 3 Relays with fuses inbetween, it is the center Relay.
The Fog lamps turn off, when the high beams are on. This is due to the fact that the Fog Lamp Relay coil is grounded via the high beam elements. When the high beams are turned on, both sides of the coil for the fog lamp relay have power, and the coil drops out, thus the fog lamsp turn off.
I just modified the Fog lamp circuit, so the ground on the Fog Lamp Relay is on at all times. This is done via the pigtail, as the pin 1 ( ground side of the fog lamp relay coil ) is inside the CJB.
Modification of the Fog Lamp Relay :
I used trailer wire, as I have a spool of it. Use any 16 AWG wire you want, it was just handy that I needed 4 wires, and these were bonded together.
The Relay that is being extended :
Make note of the pin numbers on the end of it, and place them 1:1 back into the CJB, with the exclusion of Pin #1. That is the one to the ground lug.
I had to file down the terminals I had.
1 had to be smaller width wise, to match the pins on the relay.
The other 2 I just took of the lip on the side, so I could insert them all the way into the CJB. Take the time to find the correct width Male Spade terminals, for a better fit, or be a bit more careful them me filing them down, I went a bit too far.
Cont in next posting
Last edited by SSCULLY; 03-22-2006 at 12:20 PM.
The following users liked this post:
#2
03-20-2006, 12:48 AM
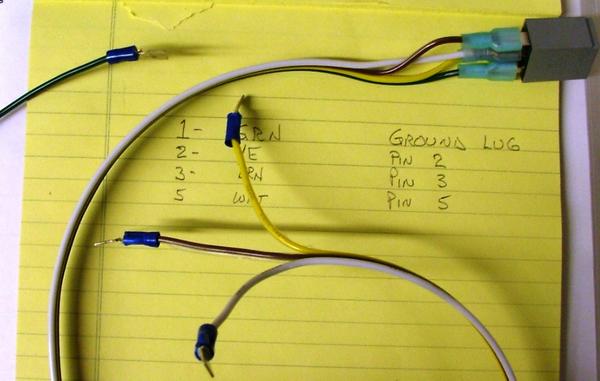
When you look at the pin end of the relay, you will see the numbers on it. 1-2-3-5.
I used the color code to pin assignments :
1=Green = Ground lug
2=Yellow= pin 2
3=Brown=Pin3
5=White=Pin5.
When installing the pig tail into the CJB, just hold the relay up, as if you were going to plug it in, and install the male spade terminals one at a time.
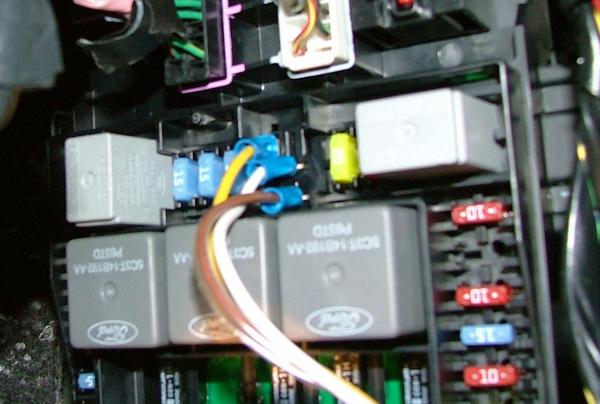
There are only 3 that get installed in the CJB. The green wire or what ever color you used for pin 1, gets installed to the ground lug below the CJB lower right hand corner ( need to pull back a bit on the kick panel part left to get a clear shot at it ) :

I know I just shoved it under the lugs that were there for testing. Take the time to put that fork under the bolt with a socket and ratchet. Looks to be a 7mm, but double check it.
With the wires placed in the CJB, and the Pin 1 wire placed under the ground lug, that is it. Wire tie up the pigtail, maybe add a round of electrical tape around the base of the Fog Lamp Relay, and put in back into the kick panel so you can get the CJB cover and kick panel cover back on.

That is it, as long as you followed the 3 pins into the CJB and the 1 under the ground lug, now when you pull on your fog lamps, they will operate with them in the parking lamp position, low beams ( as normal ) or now in the high beam position of the MFS. This means when you FTP your lamps, all 3 will be on, low, high and fog lamps.
Few picture in the last album in my gallery, if you want to see the sizing of the male spade terminals, or the likes.
Please feel free to ask questions, or comment on my wirint skills. Typos are to be expected.
I used the color code to pin assignments :
1=Green = Ground lug
2=Yellow= pin 2
3=Brown=Pin3
5=White=Pin5.
When installing the pig tail into the CJB, just hold the relay up, as if you were going to plug it in, and install the male spade terminals one at a time.
There are only 3 that get installed in the CJB. The green wire or what ever color you used for pin 1, gets installed to the ground lug below the CJB lower right hand corner ( need to pull back a bit on the kick panel part left to get a clear shot at it ) :
I know I just shoved it under the lugs that were there for testing. Take the time to put that fork under the bolt with a socket and ratchet. Looks to be a 7mm, but double check it.
With the wires placed in the CJB, and the Pin 1 wire placed under the ground lug, that is it. Wire tie up the pigtail, maybe add a round of electrical tape around the base of the Fog Lamp Relay, and put in back into the kick panel so you can get the CJB cover and kick panel cover back on.
That is it, as long as you followed the 3 pins into the CJB and the 1 under the ground lug, now when you pull on your fog lamps, they will operate with them in the parking lamp position, low beams ( as normal ) or now in the high beam position of the MFS. This means when you FTP your lamps, all 3 will be on, low, high and fog lamps.
Few picture in the last album in my gallery, if you want to see the sizing of the male spade terminals, or the likes.
Please feel free to ask questions, or comment on my wirint skills. Typos are to be expected.
#3
03-20-2006, 06:43 PM

Member
Join Date: Mar 2006
Location: Prompton,PA.
Posts: 92
Likes: 0
Received 0 Likes
on
0 Posts


#5
03-20-2006, 06:49 PM
Member
Join Date: Mar 2006
Location: Prompton,PA.
Posts: 92
Likes: 0
Received 0 Likes
on
0 Posts
#6
03-20-2006, 07:20 PM
Originally Posted by bobfawcett
..<snip>...I still can't believe you chanced that wiring experiment on a brand new truck! too!!...<snip>...
Originally Posted by bobfawcett
..<snip>...I think maybe your a little crazy...<snip>...

Glad it turned out. If you wanted to pretty it up, could have gooten the relay base from Ford that matches the relay, but I did not see the need for it myself.
Enjoy all that light

#7
03-20-2006, 07:23 PM
Member
Join Date: Mar 2006
Location: Prompton,PA.
Posts: 92
Likes: 0
Received 0 Likes
on
0 Posts
Trending Topics

#9
03-22-2006, 12:17 PM
Quintin,
That is note really an accurate ( full ) description of what the mod does.
More so the thread title should be Fog lamps on with low and high beams ( don't drop out with the high beams like the stock function does ).
I'll see if I can edit the title of the thread, so it is more accurate.
EDIT: Nope can't edit the title of the thread, learned something new today
Thanks for pointing that out, I was jacked up on caffiene and B-12 so things were a little skewed when I wrote this
Steve
#10
03-23-2006, 01:24 PM
Originally Posted by bobfawcett
2000 that's it?! I have almost 21000 on mine already!
Aside from that either it is one of the motorcycles ( running errands ) or a taxi ( going out ). I only use the truck for errands when it is large load or rain / snow or below 18* F.
#11
03-25-2006, 01:05 PM

Member
Join Date: Nov 2005
Location: Dexter, MO
Posts: 58
Likes: 0
Received 0 Likes
on
0 Posts
Not to take away from SSCULLYs project but another member here posted how to do this before and it only requires adding one wire instead of four. Here is the link to his site http://users.cableaz.com/%7Ekinzerfo...og_Lights.html
#12
03-26-2006, 11:20 AM
Originally Posted by gibs04
Not to take away from SSCULLYs project but another member here posted how to do this before and it only requires adding one wire instead of four. Here is the link to his site http://users.cableaz.com/%7Ekinzerfo...og_Lights.html
I would have thought that the coil might have snapped off inside the relay for putting that much pressure on it ( turning the pin 180*), guess it works just fine. .
Nice quick way to do it, and get to the same point.
This is what his diagram would turn out to be, compared to mine above :

I posted the diagram and the URL in my 3rd album, so I have it for ref material :
https://www.f150online.com/galleries...3912&anum=2028
Thanks for the info and the URL
Steve
Last edited by SSCULLY; 03-26-2006 at 11:31 AM.
#14
07-27-2006, 12:42 AM

Member
Join Date: Jun 2006
Location: Ont. Canada
Posts: 76
Likes: 0
Received 0 Likes
on
0 Posts

#15
07-27-2006, 07:38 AM
