How To: Door Switch LED Swap
#1
 12-13-2009, 01:56 AM


Join Date: Feb 2008
Location: Rosenberg/Baytown TX
Posts: 8,673
Likes: 0
Received 0 Likes
on
0 Posts
How To: Door Switch LED Swap
So ive done Raptor's how-to Blue led cluster swap, and ive done my own headlight switch blue led swap so the next logical step is to do the door switches.
Previously i havent had them since i have an xl but when getting some xlt mirrors i got power ones, along with new door panels and switches so i decided it was time to do a write up on swapping them to blue led's
The process is simple but requires a degree of skill to perform,.
what youll need:
pocket knife
flat head screw driver
soldering iron
3mm Led's (color of your choice)
small pliers
patience
to start.
remove your switch panels and then the switches from them

then to remove the button you use the knife or the screw driver to pry it up and it just pops off.
will look like this and your gonna need to remember not to loose the little metal clip deal in the picture below


then using the knife or screwdriver based on which one is easiest for you, separate the top and bottom pieces of the switch.
driver side window

all others

remove the white pieces that sit in the switch
now its time for the soldering iron. you need to heat up the solder around the leads for the stock bulbs. the lead for the stock bulb will be bent over and youll need to find it and bend it straight once the solder is hot. after the lead is straight you can heat up both leads solder and then use the knife or screw driver to pry the stock bulb out. if a lead breaks dont worry, just heat up the solder and use some small pliers to remove it.
from what i found the drivers door switch was the hardest to do. also the metal is surrounded by plastic so it is easy to melt the plastic a bit. dont worry as long as all the metal remains connected where it should be and not moved alot youll be fine
the top of the switch will now need to be modified before the new bulbs put in.

i circled the areas that need to be modified. for the tall one i simple cut that piece off because the bulbs i have were bigger at the base than stock. for the lower ones i did my best to carve out the outside of the hole till the bulb would fit down to the bottom or low enough not to effect using the switch. i used a box cutter for that part.
heres what one of my bulbs looked like

the longer of the two leads will be the positive
i made two diagrams to show how to connect the leds so the get power to the correct side and work haha. the red arrows point to the positive side
for all the switches except the drivers window

drivers window

now youll need to feed the led leads into the bulb sockets. this may be hard and you may need to heat up the stock solder to help out. if you melt the plastic and the leads wont go through dont worry. you can feed the leads through by heating the are up and it may move the metal on the switch but just feed it through and make sure you make the metal and the leads go back to the stock locations and not touch any other metal or anything that may mess them up. this happened to me once or twice.
next you need to bend the leads over to flat on the contact plates and solder the lead to the plate. it doesnt have to be pretty at all just make the connection.
heres some pics of mine after.


now you just need to cut the excess leads off and re-assemble the switches and test them to see if they work.


Previously i havent had them since i have an xl but when getting some xlt mirrors i got power ones, along with new door panels and switches so i decided it was time to do a write up on swapping them to blue led's
The process is simple but requires a degree of skill to perform,.
what youll need:
pocket knife
flat head screw driver
soldering iron
3mm Led's (color of your choice)
small pliers
patience
to start.
remove your switch panels and then the switches from them
then to remove the button you use the knife or the screw driver to pry it up and it just pops off.
will look like this and your gonna need to remember not to loose the little metal clip deal in the picture below
then using the knife or screwdriver based on which one is easiest for you, separate the top and bottom pieces of the switch.
driver side window
all others
remove the white pieces that sit in the switch
now its time for the soldering iron. you need to heat up the solder around the leads for the stock bulbs. the lead for the stock bulb will be bent over and youll need to find it and bend it straight once the solder is hot. after the lead is straight you can heat up both leads solder and then use the knife or screw driver to pry the stock bulb out. if a lead breaks dont worry, just heat up the solder and use some small pliers to remove it.
from what i found the drivers door switch was the hardest to do. also the metal is surrounded by plastic so it is easy to melt the plastic a bit. dont worry as long as all the metal remains connected where it should be and not moved alot youll be fine
the top of the switch will now need to be modified before the new bulbs put in.
i circled the areas that need to be modified. for the tall one i simple cut that piece off because the bulbs i have were bigger at the base than stock. for the lower ones i did my best to carve out the outside of the hole till the bulb would fit down to the bottom or low enough not to effect using the switch. i used a box cutter for that part.
heres what one of my bulbs looked like
the longer of the two leads will be the positive
i made two diagrams to show how to connect the leds so the get power to the correct side and work haha. the red arrows point to the positive side
for all the switches except the drivers window
drivers window
now youll need to feed the led leads into the bulb sockets. this may be hard and you may need to heat up the stock solder to help out. if you melt the plastic and the leads wont go through dont worry. you can feed the leads through by heating the are up and it may move the metal on the switch but just feed it through and make sure you make the metal and the leads go back to the stock locations and not touch any other metal or anything that may mess them up. this happened to me once or twice.
next you need to bend the leads over to flat on the contact plates and solder the lead to the plate. it doesnt have to be pretty at all just make the connection.
heres some pics of mine after.
now you just need to cut the excess leads off and re-assemble the switches and test them to see if they work.
#2
12-13-2009, 02:42 AM
Join Date: Feb 2008
Location: Rosenberg/Baytown TX
Posts: 8,673
Likes: 0
Received 0 Likes
on
0 Posts
if you have any questions or if i missed a step or need some more clarification on anything just let me know
this was done on the switches for a 98 supercab but should work for all 97-03 and possibly 04+. i dont have access currently to switches for a newer model but if i do i will do this to them, add pics, and then sell them
or if youd like me to do yours just ask im more than willing to help
this was done on the switches for a 98 supercab but should work for all 97-03 and possibly 04+. i dont have access currently to switches for a newer model but if i do i will do this to them, add pics, and then sell them
or if youd like me to do yours just ask im more than willing to help


#5
12-13-2009, 02:00 PM
Join Date: Feb 2008
Location: Rosenberg/Baytown TX
Posts: 8,673
Likes: 0
Received 0 Likes
on
0 Posts
If you got LEDs that fit into the buckets without modifyig them then I dont think you would. The problem is you need them to sit down in the buckets like the stock ones otherwise you won't be able to use the switch because the bulb will interfere with the motion. It could also be the fact that the LEDs are just so much brighter than the stock incandesent bulbs.
#6
12-13-2009, 02:24 PM


#7
12-13-2009, 03:08 PM
Join Date: Feb 2008
Location: Rosenberg/Baytown TX
Posts: 8,673
Likes: 0
Received 0 Likes
on
0 Posts
Trending Topics
#8
12-13-2009, 03:12 PM
#9
12-13-2009, 03:50 PM
If you got LEDs that fit into the buckets without modifyig them then I dont think you would. The problem is you need them to sit down in the buckets like the stock ones otherwise you won't be able to use the switch because the bulb will interfere with the motion. It could also be the fact that the LEDs are just so much brighter than the stock incandesent bulbs.
#10
12-13-2009, 03:57 PM
Join Date: Feb 2008
Location: Rosenberg/Baytown TX
Posts: 8,673
Likes: 0
Received 0 Likes
on
0 Posts
yea i used 3mm ones and im sure you can get ones with out the little thing mine had on the base and they may fit in there easier but those are just the ones i got from superbrightleds.com and they took over a week to get to tx from mo so.
i found some 1.8mm and 2 mm but the problem is they all look like this and they didnt have blue
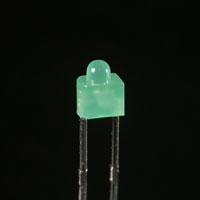

which wouldnt seem to help any
i found some 1.8mm and 2 mm but the problem is they all look like this and they didnt have blue
which wouldnt seem to help any
#11
12-13-2009, 05:22 PM
#12
12-13-2009, 06:07 PM
Join Date: Feb 2008
Location: Rosenberg/Baytown TX
Posts: 8,673
Likes: 0
Received 0 Likes
on
0 Posts
#13
12-13-2009, 06:33 PM

#15
12-13-2009, 08:51 PM
Would these work?
http://cgi.ebay.ca/100pcs-3mm-5000mc...item2a0360153a
Also what kind would i need to do the a/c heater control ones, the steering wheel controls and the headlight switch?
http://cgi.ebay.ca/100pcs-3mm-5000mc...item2a0360153a
Also what kind would i need to do the a/c heater control ones, the steering wheel controls and the headlight switch?

