
 04-13-2015, 02:28 PM
Last edit by: IB Advertising
Replacing you rear axle seals and bearings
This helpful guide with ease the process of this difficult task with pictures, detailed intrusions, and tools needed to complete the task.
Read full discussion for further information
This helpful guide with ease the process of this difficult task with pictures, detailed intrusions, and tools needed to complete the task.
Read full discussion for further information

How to replace rear axle seals and bearings in your 04+ F150 (lots of pics)
#16
06-23-2007, 02:10 PM


Okay, with the C-clips in, pull the axles straight out until the C-clip is sitting flush with the spider gears, kinda like the one on the right in this picture. Don't worry, you'll know when you've got it all the way in; the pinion shaft won't go in unless the C-clips and axle shafts are fully seated.
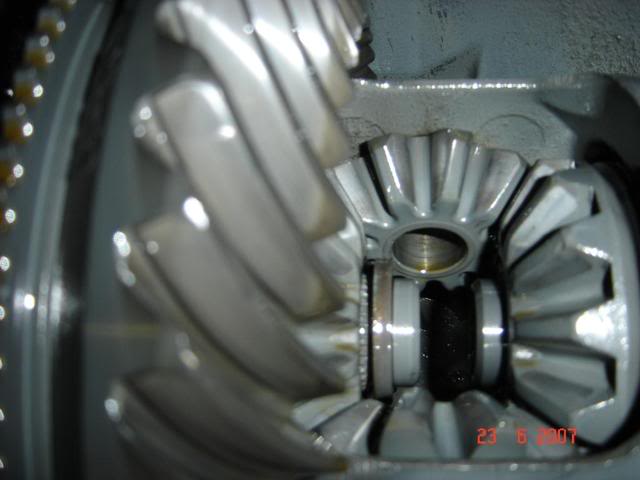
Install the pinion shaft. The book will say you're supposed to replace the pinion shaft retaining bolt...the only time I replace them is if I stripped one out on removal or I'm replacing the ring and pinion since a new gearset comes with a new pin anyways. Clean the pin threads with brake cleaner, and clean the threads in the carrier with brake cleaner. Put a dab of blue loctite on the pin threads (not red or green!) and torque it to 22 ft/lbs.
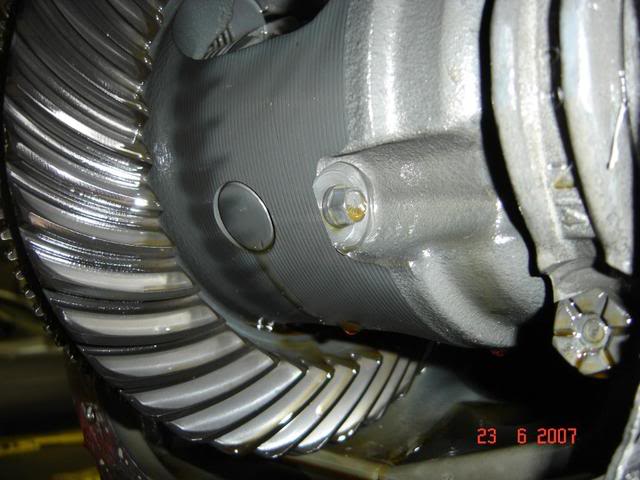
It's all downhill from here. Take the differential cover and clean it up. If you've got access to an air compressor and a die grinder, that's the easiest and fastest way, but a razor blade and/or a wire brush will work too. It doesn't have to be clean enough to eat off, just make sure you get any big blobs of sealer off the surface of the cover where it meets the axle housing.
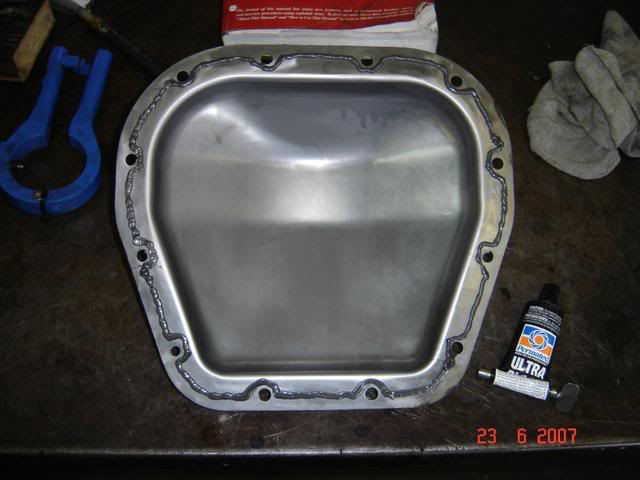
I've seen some folks get real carried away with RTV sealer. A little goes a long way here, guys. I install the cover immediately upon applying the sealer. Torque the cover bolts to 24 ft/lbs.
Install the pinion shaft. The book will say you're supposed to replace the pinion shaft retaining bolt...the only time I replace them is if I stripped one out on removal or I'm replacing the ring and pinion since a new gearset comes with a new pin anyways. Clean the pin threads with brake cleaner, and clean the threads in the carrier with brake cleaner. Put a dab of blue loctite on the pin threads (not red or green!) and torque it to 22 ft/lbs.
It's all downhill from here. Take the differential cover and clean it up. If you've got access to an air compressor and a die grinder, that's the easiest and fastest way, but a razor blade and/or a wire brush will work too. It doesn't have to be clean enough to eat off, just make sure you get any big blobs of sealer off the surface of the cover where it meets the axle housing.
I've seen some folks get real carried away with RTV sealer. A little goes a long way here, guys. I install the cover immediately upon applying the sealer. Torque the cover bolts to 24 ft/lbs.
#17
06-23-2007, 02:15 PM
Here's the cover installed. Don't forget to put your axle ID tags back on a couple of the cover bolts.
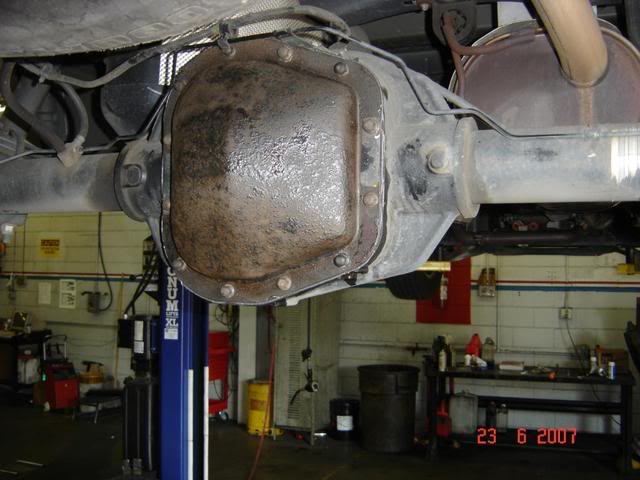
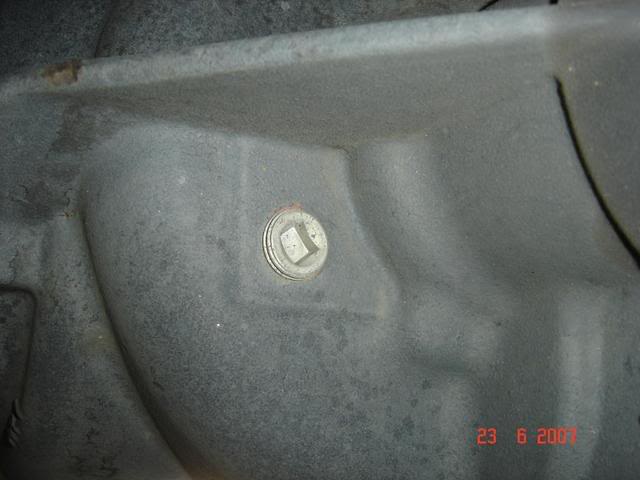
Now we've gotta fill the axle back up. First, remove the fill plug. It'll be on the driver's side of the axle housing, and it's a 3/8" square drive. Get a pretty long pull handle if you can, sealer was applied to the plug from the factory and sometimes they can be a bear to get out.
It'll take just a bit over three quarts of fluid. Fill it 'till the fluid is just at the bottom of the fill hole. If you've got a limited slip axle, there's an easier way to add the friction modifier than through the fill hole...
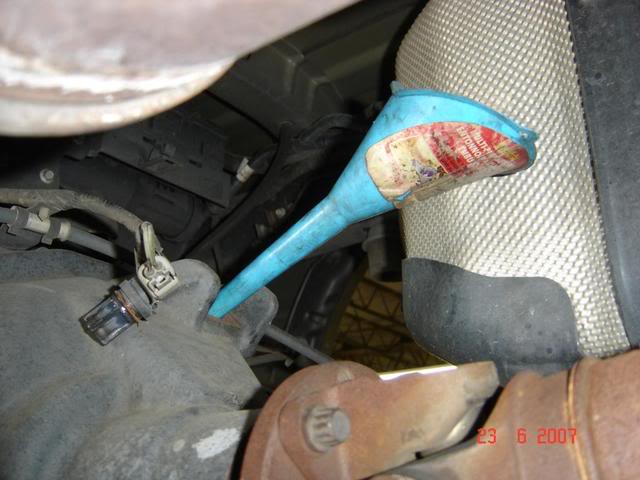
I remove the ABS sensor (it's held in with one 10mm bolt) and use a small funnel to dump the modifier in. Be advised - friction modifier smells like death. Seriously. Don't get a drop of that crap on you. It doesn't come out easily.
Now we've gotta fill the axle back up. First, remove the fill plug. It'll be on the driver's side of the axle housing, and it's a 3/8" square drive. Get a pretty long pull handle if you can, sealer was applied to the plug from the factory and sometimes they can be a bear to get out.
It'll take just a bit over three quarts of fluid. Fill it 'till the fluid is just at the bottom of the fill hole. If you've got a limited slip axle, there's an easier way to add the friction modifier than through the fill hole...
I remove the ABS sensor (it's held in with one 10mm bolt) and use a small funnel to dump the modifier in. Be advised - friction modifier smells like death. Seriously. Don't get a drop of that crap on you. It doesn't come out easily.
#18
06-23-2007, 02:19 PM
And finally, last thing to check especially with an axle seal leak is to be sure that the axle vent tube is not restricted. A blockage in the vent tube will allow pressure to build up in the axle housing, blowing seals out.
I hope this helps someone. From start to finish on this job, including time to take pictures, goof off with my co-workers and running back and forth between parts was about three hours. On a scale of 1-10, this one's about a five in regards to difficulty, or a 4 if you're replacing just the axle seals and not the bearings. Definitely something you can do in your driveway with a few basic hand tools.
Next how to...um, rear brakes and/or disassembly and lubing of the driveshaft slip yoke, depending on which one I get to first.
#19
06-23-2007, 02:29 PM

Senior Member
Join Date: Oct 2004
Location: Murray , Kentucky
Posts: 2,392
Likes: 0
Received 0 Likes
on
0 Posts


#21
06-23-2007, 03:30 PM

Senior Member


 j/k
j/k
#23
06-23-2007, 06:26 PM

Senior Member
Join Date: May 2004
Location: Reno, TX
Posts: 772
Likes: 0
Received 0 Likes
on
0 Posts
#24
06-23-2007, 08:53 PM

#25
06-23-2007, 08:55 PM
Originally Posted by ieee_raider
For those asking how much...
I had mine done at a local shop. They're not the cheapest in the area, but the ones I trust the most.
These are the prices they quoted me:
$175: Replace one seal
$275: Replace both seals
$430: Replace both seals and bearings
I had mine done at a local shop. They're not the cheapest in the area, but the ones I trust the most.
These are the prices they quoted me:
$175: Replace one seal
$275: Replace both seals
$430: Replace both seals and bearings
#26
06-23-2007, 09:08 PM
#27
06-23-2007, 11:40 PM


#29
06-24-2007, 12:37 AM
Senior Member
Join Date: May 2004
Location: Reno, TX
Posts: 772
Likes: 0
Received 0 Likes
on
0 Posts
#30
06-24-2007, 03:13 AM

Senior Member
Join Date: Feb 2007
Location: Native New Yorker
Posts: 3,329
Likes: 0
Received 0 Likes
on
0 Posts