04-08 Rear Seat Backrest - photos of the back side of the back rest
#1
 05-19-2009, 01:13 AM


04-08 Rear Seat Backrest - photos of the back side of the back rest
This thread is for anyone who is even remotely thinking about removing the rear seat backrest of a SuperCab or SuperCrew F150 (2004-2008).
There have been many threads on HOW to remove the back rest, one of which I authored, can be found here. https://www.f150online.com/forums/ar...08-my-way.html
But several people have asked me to post pics of the details of the back of the seat, since, if one is trying to remove it, the effort can be difficult. Sometimes it helps just to be able to see (ahead of time) what you cannot see before you start. So here goes:
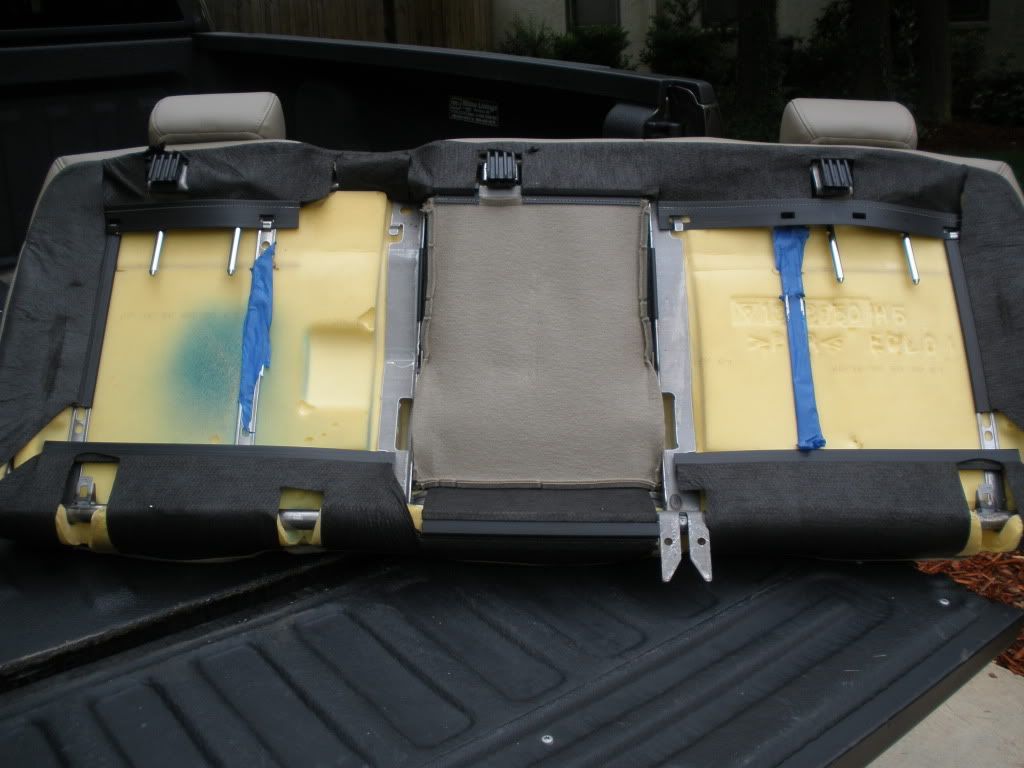
Here is the entire backside of the back rest. Never mind the blue junk...I taped the metal straps so it would not scratch my amps. I have the straps covered much better now. The blue color on the foam, I am not sure how it got there, but it had something to do with the blue painters tape....weird that I cannot remember.
P5090308.jpg?t=1242708538
In the pic above, of particular importance to note is the metal rods extending down from the head rests. Do NOT forget them when thinking about where you will place your amps on the back wall!!!
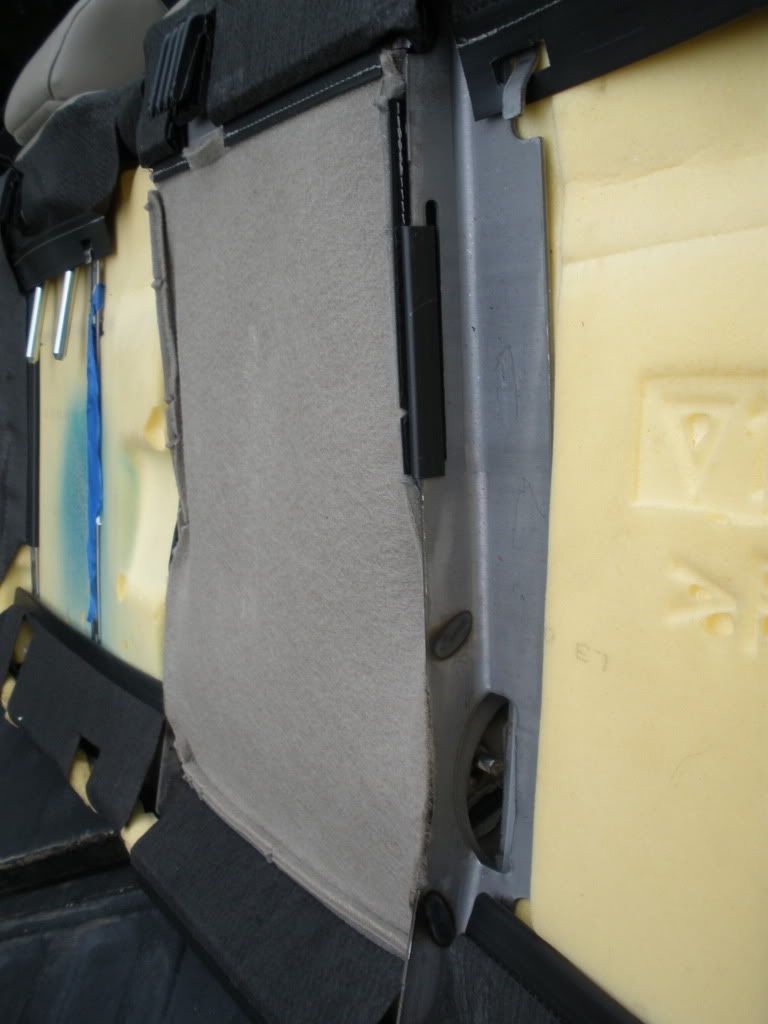
You can also note the metal struts which flank the armrest in the center of the backrest. Those will get in the way of any equipment you might wish to mount on the rear wall as well. Here is a different view of those struts.
P5090318.jpg?t=1242709941
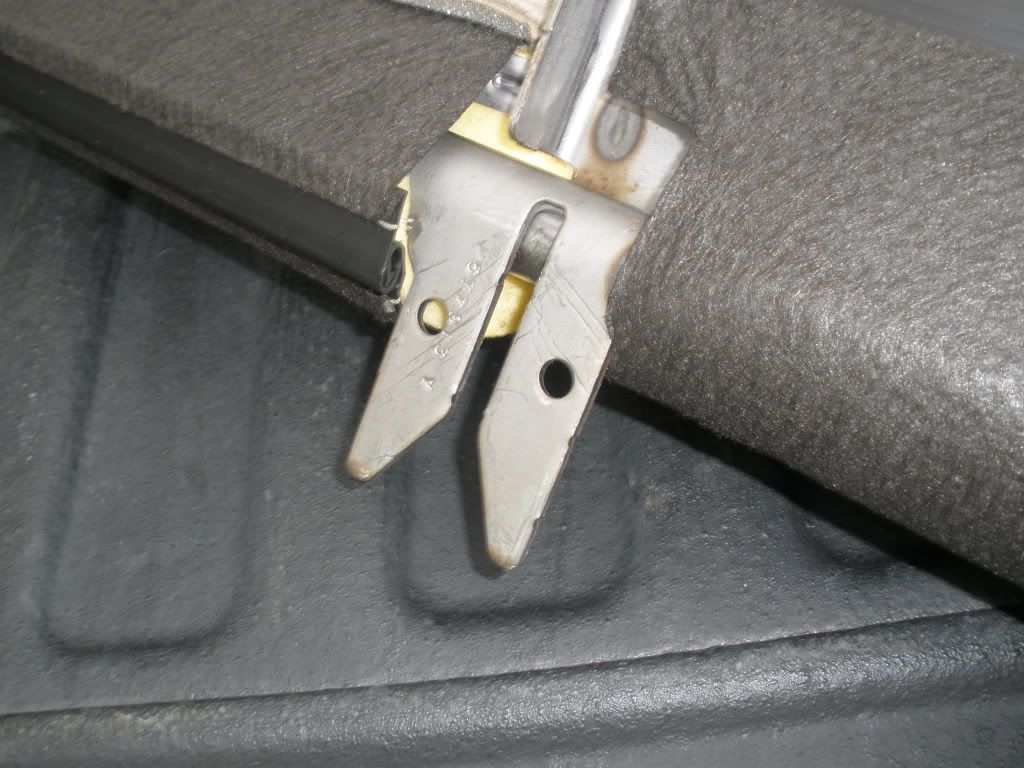
Here is a pic of the very sharp seat alignment fork (for lack of better terms) that slides down onto the rear seat tubular brace. After you successfully break the backrest free, and pull it away from the wall, be very careful as this lil puppy will rip the leather on your rear seat if you are not careful!
P5090311.jpg?t=1242709304
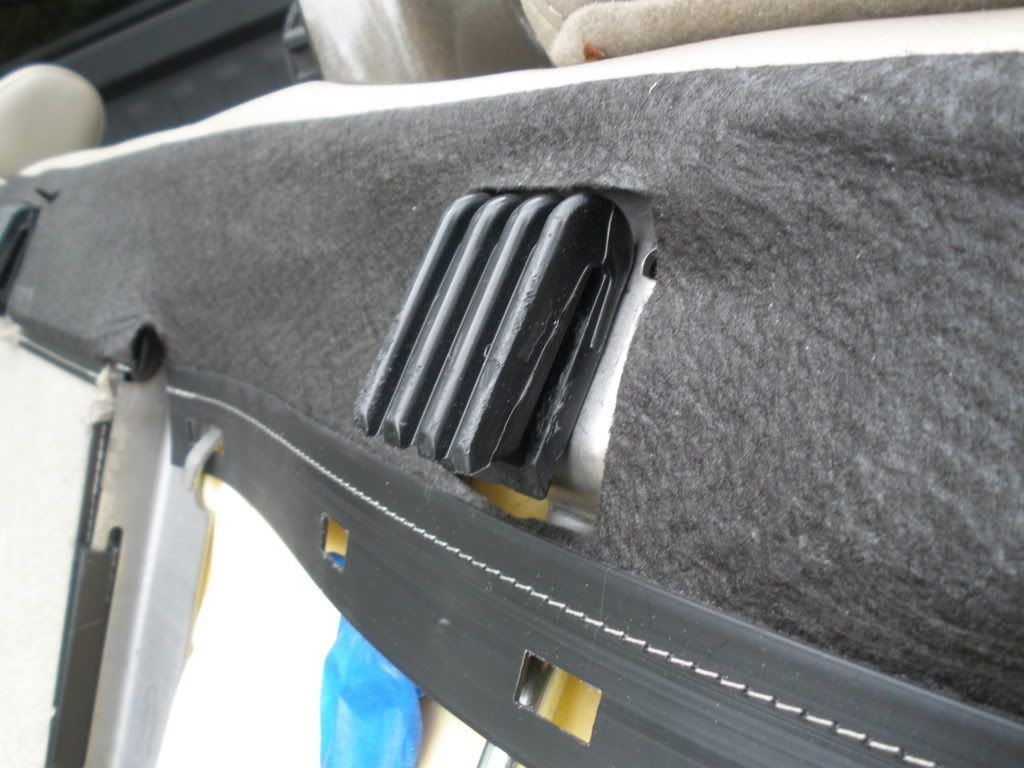
There are three plastic clips at the top of the back rest that anchor it to the rear wall. When removing the backrest, the bottom of the backrest must be kicked forward and then the backrest must go vertically upward (all in one swift motion. These clips show you why the back rest must go up as the final step before the seat is free to be taken from the truck.
P5090315.jpg?t=1242709530
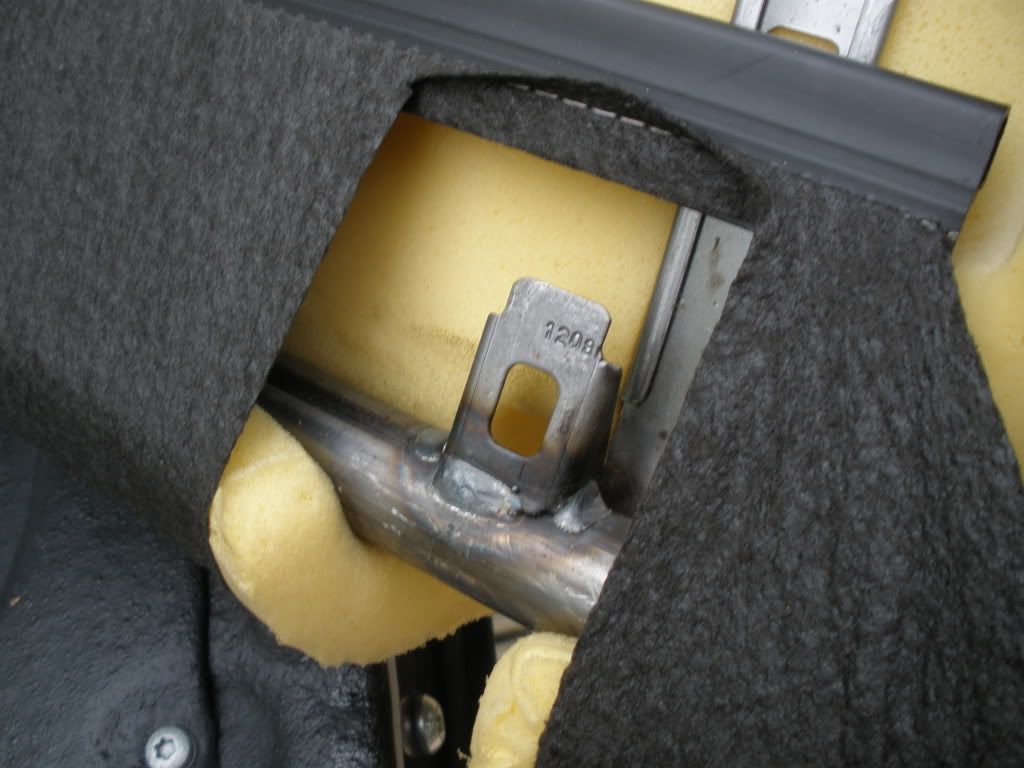
The diagram I made for removing the seat shows an area where a screw driver must be inserted (if using my method) to reach the black plastic release clips holding the seat down. Here is a pic, showing the metal "tabs" through which your screw driver must pass on its way to touching the release clips.
P5090310.jpg?t=1242709689
Remember...you are looking at all these pics from the backside. When sitting on your rear seat, you will obviously have a different view point.
Hope this helps someone!
There have been many threads on HOW to remove the back rest, one of which I authored, can be found here. https://www.f150online.com/forums/ar...08-my-way.html
But several people have asked me to post pics of the details of the back of the seat, since, if one is trying to remove it, the effort can be difficult. Sometimes it helps just to be able to see (ahead of time) what you cannot see before you start. So here goes:
Here is the entire backside of the back rest. Never mind the blue junk...I taped the metal straps so it would not scratch my amps. I have the straps covered much better now. The blue color on the foam, I am not sure how it got there, but it had something to do with the blue painters tape....weird that I cannot remember.
P5090308.jpg?t=1242708538
In the pic above, of particular importance to note is the metal rods extending down from the head rests. Do NOT forget them when thinking about where you will place your amps on the back wall!!!
You can also note the metal struts which flank the armrest in the center of the backrest. Those will get in the way of any equipment you might wish to mount on the rear wall as well. Here is a different view of those struts.
P5090318.jpg?t=1242709941
Here is a pic of the very sharp seat alignment fork (for lack of better terms) that slides down onto the rear seat tubular brace. After you successfully break the backrest free, and pull it away from the wall, be very careful as this lil puppy will rip the leather on your rear seat if you are not careful!
P5090311.jpg?t=1242709304
There are three plastic clips at the top of the back rest that anchor it to the rear wall. When removing the backrest, the bottom of the backrest must be kicked forward and then the backrest must go vertically upward (all in one swift motion. These clips show you why the back rest must go up as the final step before the seat is free to be taken from the truck.
P5090315.jpg?t=1242709530
The diagram I made for removing the seat shows an area where a screw driver must be inserted (if using my method) to reach the black plastic release clips holding the seat down. Here is a pic, showing the metal "tabs" through which your screw driver must pass on its way to touching the release clips.
P5090310.jpg?t=1242709689
Remember...you are looking at all these pics from the backside. When sitting on your rear seat, you will obviously have a different view point.
Hope this helps someone!
#2
05-19-2009, 01:17 AM

Senior Member
Join Date: Apr 2008
Location: Fairfield,CA
Posts: 1,016
Likes: 0
Received 0 Likes
on
0 Posts

#3
05-19-2009, 01:22 AM
You are welcome. I was just going to add these to my previous thread and then it occurred to me that some people might want to have access to these photos who are not necessarily in the middle of an audio installation/build. Myh other thread is focusing on that issue. So I made a new thread, and I also updated the previous threads with links and images.
#5
05-19-2009, 12:04 PM


Join Date: Aug 2006
Location: Northern California
Posts: 7,862
Likes: 0
Received 0 Likes
on
0 Posts
#6
05-19-2009, 01:35 PM

Senior Member
Join Date: Jan 2009
Location: Destin, Florida
Posts: 3,172
Likes: 0
Received 0 Likes
on
0 Posts
I've got to figure out if my amps will fit back there!

#7
05-19-2009, 08:56 PM
Trending Topics
#8
05-19-2009, 10:42 PM
Senior Member
Join Date: Jan 2009
Location: Destin, Florida
Posts: 3,172
Likes: 0
Received 0 Likes
on
0 Posts
#9
05-20-2009, 12:18 AM

Suspended
Join Date: Nov 2007
Location: Navasota, Tx
Posts: 701
Likes: 0
Received 0 Likes
on
0 Posts
#10
06-10-2013, 07:57 PM

Thanks for the method and pics. The Haynes manual is completely, utterly, stupidly useless for this.
My $0.02 contribution, when you reach back behind the seat, you'll find a vertical plastic piece back there, maybe three inches high and maybe 3/8" in cross-section, a little curve and with sort of a hook on top. That's not the latch, but it's close - the piece you're looking for is just in front of that one, a little shorter, and a lot flatter & thinner, maybe an inch wide and 1/16" thick. Pry that thinner piece toward the back. It doesn't have to move very far to release that side, maybe a quarter inch or so.
My $0.02 contribution, when you reach back behind the seat, you'll find a vertical plastic piece back there, maybe three inches high and maybe 3/8" in cross-section, a little curve and with sort of a hook on top. That's not the latch, but it's close - the piece you're looking for is just in front of that one, a little shorter, and a lot flatter & thinner, maybe an inch wide and 1/16" thick. Pry that thinner piece toward the back. It doesn't have to move very far to release that side, maybe a quarter inch or so.
#11
06-11-2013, 04:00 AM


#12
06-17-2013, 09:55 AM

All it says for this is something like "Release the seat-back catches (see photo)", and the photo shows a screwdriver in the proper position but literally zero detail about what needs to be done. Um, gee, thanks for the help, Mr. Haynes.

#13
05-22-2016, 06:31 PM

Backrest removal
I used your link the schematics and instructions made my life so easy. Thank you!
This thread is for anyone who is even remotely thinking about removing the rear seat backrest of a SuperCab or SuperCrew F150 (2004-2008).
There have been many threads on HOW to remove the back rest, one of which I authored, can be found here. https://www.f150online.com/forums/ar...08-my-way.html
But several people have asked me to post pics of the details of the back of the seat, since, if one is trying to remove it, the effort can be difficult. Sometimes it helps just to be able to see (ahead of time) what you cannot see before you start. So here goes:
Here is the entire backside of the back rest. Never mind the blue junk...I taped the metal straps so it would not scratch my amps. I have the straps covered much better now. The blue color on the foam, I am not sure how it got there, but it had something to do with the blue painters tape....weird that I cannot remember.
In the pic above, of particular importance to note is the metal rods extending down from the head rests. Do NOT forget them when thinking about where you will place your amps on the back wall!!!
You can also note the metal struts which flank the armrest in the center of the backrest. Those will get in the way of any equipment you might wish to mount on the rear wall as well. Here is a different view of those struts.
Here is a pic of the very sharp seat alignment fork (for lack of better terms) that slides down onto the rear seat tubular brace. After you successfully break the backrest free, and pull it away from the wall, be very careful as this lil puppy will rip the leather on your rear seat if you are not careful!
There are three plastic clips at the top of the back rest that anchor it to the rear wall. When removing the backrest, the bottom of the backrest must be kicked forward and then the backrest must go vertically upward (all in one swift motion. These clips show you why the back rest must go up as the final step before the seat is free to be taken from the truck.
The diagram I made for removing the seat shows an area where a screw driver must be inserted (if using my method) to reach the black plastic release clips holding the seat down. Here is a pic, showing the metal "tabs" through which your screw driver must pass on its way to touching the release clips.
Remember...you are looking at all these pics from the backside. When sitting on your rear seat, you will obviously have a different view point.
Hope this helps someone!
#14
06-16-2019, 03:58 PM

You are welcome. I was just going to add these to my previous thread and then it occurred to me that some people might want to have access to these photos who are not necessarily in the middle of an audio installation/build. Myh other thread is focusing on that issue. So I made a new thread, and I also updated the previous threads with links and images.