*** Soft Brake Pedal Resolved ***
#197
#198
Well, pumping the brakes with the truck off definitely worked - no vacuum whatsoever when removing the master cylinder. I gave the actuator a 1/2 turn and on the test drive the pedal definitely firmed up. Afterwards, I checked the temp of the front rotors and they were very hot. So, I applied the parking brake, put it in neutral, jacked up the passenger side and the wheel turned but there was definitely some rubbing. Then I started the truck and I couldn't turn the wheel at all, so I just put the actuator back to its original position. This mod didn't work for me. Too bad. 

#199
Originally Posted by 051fdrof
I gave the actuator a 1/2 turn and on the test drive the pedal definitely firmed up. Afterwards, I checked the temp of the front rotors and they were very hot. So, I applied the parking brake, put it in neutral, jacked up the passenger side and the wheel turned but there was definitely some rubbing. Then I started the truck and I couldn't turn the wheel at all, so I just put the actuator back to its original position. This mod didn't work for me. Too bad. 


Originally Posted by rms8
All it takes is that rod being a 1/16" too far in to give the pedal the wrong feeling.
Originally Posted by rms8
As far as the tiny bit of adjustment goes, as I stated early on in the post, every 1/16th" makes a dramatic difference.
Originally Posted by rms8
So, again, a word of caution when performing this, just take your time and by all means DO NOT make large adjustments. Make very tiny adjustments. As I stated before, less than a 1/16Ē is a HUGE difference in this area. HUGE!
edit:
on 2nd thought, if your brakes were already clamping down with just a 1/2 turn, you are correct in that this may not be the fix for you. Just my 2cents....:o
Last edited by rms8; 04-08-2008 at 01:26 PM.
#200
Awesome !!!!!!!!!!
Wow, what a difference this made! Another happy customer with an '07 SuperCrew. Had the double pump issue since new. Got tired of it and bought a MOTIVE power bleeder (well worth the investment - what an great tool). Anyway, after spending this afternoon bleeding all 4 corners (made no difference) I thought I would hop on here to see if it was a common problem and happened across this post - what a godsend!
It truly is an easy fix... one of those caveman deals. Reading all the posts, I do have another tip too. I would suggest taking your rig out for a test drive before making any changes. Make it a drive that doesn't require alot of braking so when you get back to your garage you can do a quick check of the rotor temps. That way, after you've made the adjustments you can take another test drive and make sure your pads aren't dragging. I started by going 3/4 of a turn and ended up having to run it back in 1/4 turn to get it just right. It really does make a day and night difference.
1). With vehicle off, pump brakes a few times to release vacuum.
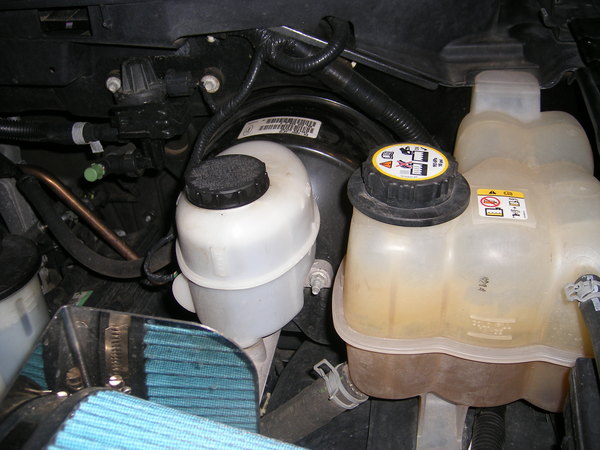
2). Unbolt 2 master cylinder nuts and swing master cylinder out of the way. Make sure "O" ring is still in place where the master cylinder and booster mate.
3). You will see the rod end - to make things easier to get to, I pushed the brake pedal in and propped it with a stick so I could get to the rod a little easier.
4). Holding rod shaft with pliers, I backed the end of the rod out (counter clockwise) what ended up being a 1/2 turn. It doesn't sound like much, but believe me it makes all the difference in the world !!!
5). Reinstall master cylinder and test drive.
Thanks again for making this original post - I have hated my brakes since the day I brought this thing home !!!!! Now they are great !!!!!!
#201
…Wow, what a difference this made! Another happy customer with an '07 SuperCrew.
...and happened across this post - what a godsend!
…It truly is an easy fix... one of those caveman deals
…Thanks again for making this original post - I have hated my brakes since the day I brought this thing home !!!!! Now they are great !!!!!!
You are VERY WELCOME !!!!!!!!!
 Glad it worked for you! As anyone with an ounce of sense can see, this fix has helped countless people on this forum!
Any immature, negative comments from mkosu04 ?
 Yeah, that's what I thought.
#202
After 6 months, multiple trips, contact with the dealership owner & his calls to Ford engineers & threatening to take my $80K annual business to Chevy...I seem to at last have a firm pedal. Didn't get to talk to the Service Dept head and get the exact fix (answering machine message mentioned some sort of "breakthrough" service ticket shows new booster. I'll see what more info I get later. I actually thought something was wrong with it on the ride home, cuz every time I stepped on the brake- the van slowed down 
It's had improvements before, that didn't last long, so my complete approval is still pending.

It's had improvements before, that didn't last long, so my complete approval is still pending.
#203
#204
It was pretty simple, thanx to this post. I took some pic's and will try to post them. Seems to have helped alot. After I removed the MC, I used some nail polish to lightly make an orientation mark on the screw, and then proceeded. Small turns, about 1/3 rotation, test drove, tried again, 1/3 turn. For a total of 1 full turn. I need to give it a good once over though just to be sure/safe.
#206
It was pretty simple, thanx to this post. I took some pic's and will try to post them. Seems to have helped alot. After I removed the MC, I used some nail polish to lightly make an orientation mark on the screw, and then proceeded. Small turns, about 1/3 rotation, test drove, tried again, 1/3 turn. For a total of 1 full turn. I need to give it a good once over though just to be sure/safe.
>>> A N O T H E R <<<
successful, satisfied DIY'er!!!!!!!!!!!!!!!!!
Great pics too! Just one thing, I'd definitely keep an eye on it for a while. One full turn seems like A LOT.

#207
#209
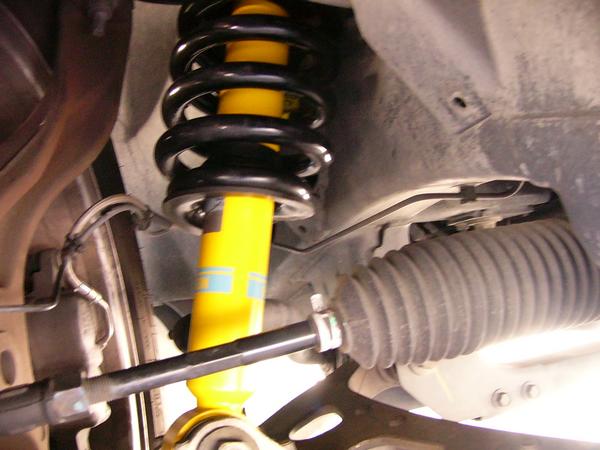
One of the best mods I made concerning brake feel is installing some SS brake lines. Here is a picture of Russell SS brake lines next to the Bilstein shocks.

Also, I would like to know if there was some spec as to what the clearance between the MC and rod is. You might, with the proper tools, be able to measure the gap and reduce the chance of having to little clearance.

Also, I would like to know if there was some spec as to what the clearance between the MC and rod is. You might, with the proper tools, be able to measure the gap and reduce the chance of having to little clearance.
#210


