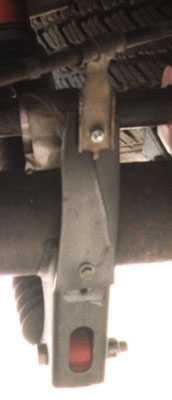
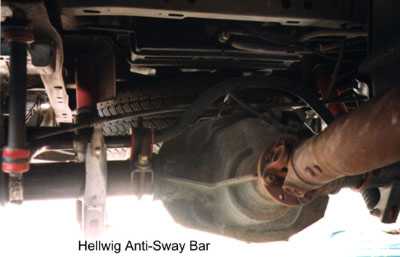
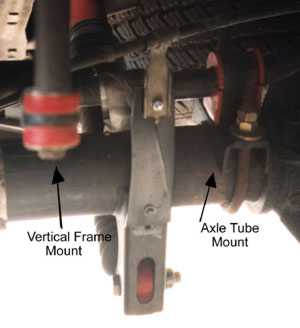
I recently purchased a Hellwig anti-sway bar for my 1997 F150 4x4. This bar does exactly what the box promises. It is marketed as a "Handling Improvement Kit". It does reduce body roll, improves handling and it aids in rear wheel traction. The kit includes detailed instructions that any novice handyman/shadetree mechanic can understand. This is a universal kit that includes hardware for the 2 and 4 wheel drive models. The installation takes about 1.5 hours. Simple hand tools including wrenches and sockets are required to perform the installation. The unit mounts to the rear axle with U-bolts and brackets and the bar is then connected to the frame with vertical bolts and bushings. All bushings included in the kit are polyurethane.
To install the bar all hardware should be laid out and identified. Then the main anti-sway bar should be positioned over the rear drive shaft and then the U-blots, brackets and polyurethane spacers should be placed over the rear axle tube and the sway bar should be attached with corresponding hardware. Do not tighten this hardware. Only loosely attach all hardware. The frame mounting hardware should be installed next. This includes all frame brackets and vertical attaching bolts. These vertical bolts should be attached to the sway bar with the polyurethane bushings provided. The anti sway bar should then be positioned so as to make the connecting bolts as vertical as possible. After all hardware is loosely attached check for clearance and tighten all hardware to recommended specs.
I only ran into a few problems while doing this installation. First the drivers side frame mount is much harder to access than the passenger side. You must move some tubing that runs along the inside of the drivers' side frame. These tubes are just pulled out of their mounts to allow access to the hole that the frame mounting bolt must pass through. There is no need to detach them, just pull them out of their clips. I suggest doing the drivers side first. Then when you get to the passenger side you will be pleasantly surprised at how easy this side is. The second problem I ran into was the parking brake cable mount needed to be repositioned. The parking brake cable mounts to the axle tube on the passenger side. The cable can not be mounted in the original position once the sway bar in installed. I made a new bracket out of some thin metal stock that I had laying around. I attached one end of the new bracket to the original position and then attached the parking brake cable to the other end. My third problem was the brake lines were very close to the mounting hardware of the anti sway bar on the drivers' side of the differential. The brake line was not in contact with the sway bar, but I bent it out a little to avoid any problems in the future. Other than these minor problems the installation was very straightforward.
As a note I have a 5.4L motor and with that comes the 9.75" rear end. This rear end is larger than the 8.8" that comes with the 4.2L and the 4.6L. Therefore the brake line and parking brake cable problems may not occur with the 8.8" rear end.
My impressions of the sway bar are great. It really reduces body roll. I noticed a definent improvement in handling around town, but the major improvement I noticed was on the highway. It really helps in high wind environments. It also reduces the amount of movement caused by being passed by a large truck. Overall I think it is a great investment. The installation is simple and the benefits are great.