Flex-A-Lite 270 Kit Installed...
#16
 02-11-2003, 10:39 AM


Originally posted by hapynzap
However the Flex-a-lite kit could have the holes in it's shroud pre-drilled to pass the wires from each fan thru. I had to drill my own holes when wiring it up (not like my original picture above - is wrong) Also the allen bolts on the side mounts could be easily replaced in the kit with hex bolts for easier installation, IMO.
However the Flex-a-lite kit could have the holes in it's shroud pre-drilled to pass the wires from each fan thru. I had to drill my own holes when wiring it up (not like my original picture above - is wrong) Also the allen bolts on the side mounts could be easily replaced in the kit with hex bolts for easier installation, IMO.
Originally posted by hapynzap
I got my kit from Summit back at the end of last year and had to wait a couple weeks because it was on back order. The price then was $289.95 and I got in on the 10% discount code they run like twice a year to bring the price down to $259.95. Anyplace you can find it for under $300 sounds good to me! The reason I've taken this long to put it in is because I then found out I only have the 1 inch - 1 row radiator so then I had to upgrade and get me one of the 2 row - 2 inch radiators and then that meant I had to also order new hoses and a thremostat too if I was going to visit that cooling issue (new radiator), heh.
I got my kit from Summit back at the end of last year and had to wait a couple weeks because it was on back order. The price then was $289.95 and I got in on the 10% discount code they run like twice a year to bring the price down to $259.95. Anyplace you can find it for under $300 sounds good to me! The reason I've taken this long to put it in is because I then found out I only have the 1 inch - 1 row radiator so then I had to upgrade and get me one of the 2 row - 2 inch radiators and then that meant I had to also order new hoses and a thremostat too if I was going to visit that cooling issue (new radiator), heh.
 On another note - why did you replace your radiator? Just because or did you have an issue? I ask because my truck has the 1 inch too. I have not had a problem with it so far, but...
#17
02-11-2003, 02:28 PM

Senior Member
Join Date: Jul 2002
Location: WISCONSIN
Posts: 610
Likes: 0
Received 0 Likes
on
0 Posts
Originally posted by B-Man
On another note - why did you replace your radiator? Just because or did you have an issue? I ask because my truck has the 1 inch too. I have not had a problem with it so far, but...
On another note - why did you replace your radiator? Just because or did you have an issue? I ask because my truck has the 1 inch too. I have not had a problem with it so far, but...
The reason I upgraded my cooling system is because I live in the Phoenix Arizona Metro Area and we have over 100, 100+ degree days a year here. I haven't really had a problem with over heating but when going over the mountains from El Centro CA to San Diego my temp gauge did go up when running the AC and towing our Coleman tent camper plus having the truck bed loaded with gear and Driver + 2 passengers.
I got my 2 row radiator from radiator.com for $190 + tax. The shipping was to be free but they have a local warehouse here in Phoenix so I sent the wife over to pick it up rather than have UPS beat the crap out of it. I figured getting a new radiator was a cheap upgrade and my truck is 5 years old now (1998) so the radiator hoses need to be changed anyways. I threw in a new motorcraft thermostat too for good measure. I figure this is just cheap insurnace for the aluminum heads.
ALSO, I have the factory towing package with factory tranny cooler but why in the world they only put a 1 row radiator for an Arizona Truck is crazy in my book. You might do a search for towing package radiator on this site. It appears that people who got the factory towing package but only received the 1 row 1 inch radiator 2000+ are getting a new 2 row radiator installed by Ford or I think they give you $100. Check it out.
Where did you do your ignition tap for your flex-lite and where did you do your AC switch tap? I'm still head scratching on this as I'm not very good at auto electric. If you got any pictures that would be a big help too.
Last edited by hapynzap; 02-11-2003 at 02:40 PM.

#19
02-11-2003, 03:43 PM
Senior Member
Join Date: Jul 2002
Location: WISCONSIN
Posts: 610
Likes: 0
Received 0 Likes
on
0 Posts
CONTROLLER LOCATION
Here's picture of where I put my controller on the rightside radiator support, betwen the radiator and the right headlight.
I marked the holes with a sharpie then drilled tap holes and used the provided sheet metal screws from the kit.
Notice the absense of the AC to controller wire, heh.

I marked the holes with a sharpie then drilled tap holes and used the provided sheet metal screws from the kit.
Notice the absense of the AC to controller wire, heh.
#20
02-11-2003, 06:37 PM
Senior Member
Join Date: Jul 2002
Location: WISCONSIN
Posts: 610
Likes: 0
Received 0 Likes
on
0 Posts
Installed pic
Here's a picture of the FAL 270 installed on my truck. I drilled holes into the top fascia cover and used the supplied allen bolts with flat stainless washers to attach it to the existing holes on the FAL top. I also got 6 new fascia retainers at Autozone (2 for 99cents) part number 45810, to hold the top fascia to the radiator support.
There's got to be 6 inches of clearance between the pullies and the FAL. Changing belts or an alternator should be easy now, heh.
I'm still looking for help on the AC to controller wiring.

There's got to be 6 inches of clearance between the pullies and the FAL. Changing belts or an alternator should be easy now, heh.
I'm still looking for help on the AC to controller wiring.
Last edited by hapynzap; 02-11-2003 at 09:16 PM.
#21
02-11-2003, 06:42 PM
Originally posted by hapynzap
Where did you do your ignition tap for your flex-lite and where did you do your AC switch tap? I'm still head scratching on this as I'm not very good at auto electric. If you got any pictures that would be a big help too.
Where did you do your ignition tap for your flex-lite and where did you do your AC switch tap? I'm still head scratching on this as I'm not very good at auto electric. If you got any pictures that would be a big help too.
I wired the ignition on lead direct to the battery. I measured the draw of the module when the fans are not running and it is in the 25ma range. That isn't any more than the current used by your computer from keyless entry, station back-up on the radio, etc. so battery discharge is not an issue. I've seen OEM electrics wired the same way (ever walk past a car at the mall and the fan is running for a few seconds with no one in the car?)
I plan on re-doing the install wiring (and controller location) this weekend. We've been having a ration of bad weather, so I've been putting off getting out there for a while.
I'll post pics and diagrams of all the wiring once I complete it.
PS. I'm glad to see my truck isn't the only one with a rusty power steering pump unit...
")
Last edited by B-Man; 02-11-2003 at 06:44 PM.
#22
02-11-2003, 07:59 PM
Senior Member
Join Date: Jul 2002
Location: WISCONSIN
Posts: 610
Likes: 0
Received 0 Likes
on
0 Posts
Well I took the truck out today to return the worthless clutch fan puller kit from Autozone. I ended up going to Harbor Freight Tools and got a big screw driver for .99 cents and a big 12 inch crecent wrench that opens 1 3/8 inch for another $6.00. That pulled the old fan off for me.
The truck seems to launch off the line a lot easier now. I went thru a fast food drive thru and the fans were coming on and cycling normal so everything seems OK so far with the exception of the AC-controller wiring that's not hooked up.
I pulled my ignition wiire off of the passenger side coil pack power supply wire. I think the FAL controller uses so very little power that it shouldn't hurt the coil pack, at least that's my hope. I liked using that hook up because it is closest to the controller. I found that when I hooked my test light up to the positive side of the battery then put the tip to the controller that was enough energy running thru the little bulb in the tester to activate the FAL controller.
As for the rusty power steering. Who the heck looks down there anyways?
That's some of the little rust on my truck and it probably got help from me washing my engine, heh.
Well I'm really glad we are all helping each other out on this project. This makes it fun instead of a chore. I'm glad you motivated me to get off my keister and get mine in. I'm glad it's mostly done now.
#23
02-11-2003, 08:04 PM


Slight diff between your under hood and mine ( 2001 )

I think you might have the same wire, if you traced it to the AC.
As for run only power, I used the red w/ black stripe under the dash, the one that is comming from the steering wheel power connector ( ign switch ). This is hot in run only mode.
The fans will run after the power is shut off, for ~ 30 sec or so. If you keep power to this pin, the fans will run and run until the temp probe indicates that they are below the turn on point for the 60% run cycle.
This shows the ign switch location from the 2001 manual where I got the red/w black stripe wire at.

Let me know if this answers your questions.
Steve
I think you might have the same wire, if you traced it to the AC.
As for run only power, I used the red w/ black stripe under the dash, the one that is comming from the steering wheel power connector ( ign switch ). This is hot in run only mode.
The fans will run after the power is shut off, for ~ 30 sec or so. If you keep power to this pin, the fans will run and run until the temp probe indicates that they are below the turn on point for the 60% run cycle.
This shows the ign switch location from the 2001 manual where I got the red/w black stripe wire at.
Let me know if this answers your questions.
Steve
Last edited by SSCULLY; 02-11-2003 at 11:07 PM.
#24
02-11-2003, 09:12 PM
Senior Member
Join Date: Jul 2002
Location: WISCONSIN
Posts: 610
Likes: 0
Received 0 Likes
on
0 Posts
#25
02-12-2003, 12:17 AM

Senior Member
Join Date: Jun 2000
Location: Anchorage
Posts: 1,167
Likes: 0
Received 0 Likes
on
0 Posts
Here's where I tapped into the fuse box for the AC neg. signal and ignition on power source. I used one of the supplied piggy-taps with the AC relay. Then use a female connector and slide the AC relay back in, it'll be a tight fit.
You might want to double check your fusebox with a volt meter, since Ford makes changes every year. I also drilled a small hole on the side of the fuse box so the wires could pass through.
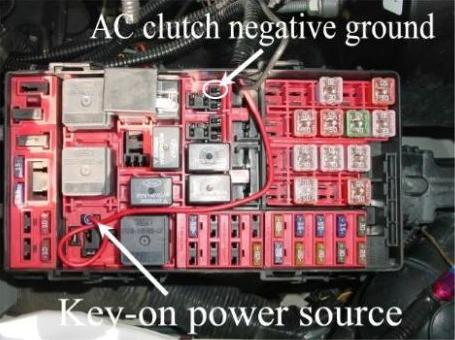
You might want to double check your fusebox with a volt meter, since Ford makes changes every year. I also drilled a small hole on the side of the fuse box so the wires could pass through.
Last edited by Jupiterak; 02-12-2003 at 12:23 AM.
#26
02-12-2003, 12:38 PM

I will have to keep track of this for when the weather warms up. I have the PPI (Mike Troyer) kit. I want to place the fan controllers inside the cab in the RPO relay area. I play off road and the controllers do not like MUD or WATER. I have the single row rad and so far it is adiquate.
JMC
I have the single row rad and so far it is adiquate. JMC
#27
02-12-2003, 02:31 PM
FYI,
The PPI or Derale kit uses the + signal from the A/C Compressor clutch. It is powered by the WOT relay that is PCM controlled. It turns off when at WOT so the fans will too. Could someone with the Manual "OFF" switch verrify that it does not stay iluminated when the engine is turned off and the key removed.
Thanks
JMC
#28
02-12-2003, 04:19 PM
Senior Member
Join Date: Jul 2002
Location: WISCONSIN
Posts: 610
Likes: 0
Received 0 Likes
on
0 Posts
Jupiterak
Thanks for posting the picture. Unfortunately for me the power distribution box by the master cylinder on my 1998 F150 is different. I looked at my owners manual and the relays in mine are for the lights, washer pump, fuel pump, horn and EEC. So it must be in the cab fuse box. Would that be the ACC relay?
I was also re-checking out the gray wire I spliced into for the AC clutch negative ground. The FAL instructions say to hook it up to terminal 7 and when I do this it kills the engine so I must have the wrong wire.
I'm still trying to figure this all out.
If all fails then I will install a manual switch in the cab for activation/deactivation off running off the #6 post of the controller.
#29
02-12-2003, 05:55 PM
Senior Member
Join Date: Jun 2000
Location: Anchorage
Posts: 1,167
Likes: 0
Received 0 Likes
on
0 Posts
You should have two fuse boxes. The one inside the cab in the dash above the brake pedal. The second one is next to the air filter housing on the inner fender (driver's side).
Also, when making connections to the VSC. Be sure you have the correct connections. The VSC can short out very easily.
The one inside the cab in the dash above the brake pedal. The second one is next to the air filter housing on the inner fender (driver's side).Also, when making connections to the VSC. Be sure you have the correct connections. The VSC can short out very easily.
#30
02-12-2003, 07:18 PM
Senior Member
Join Date: Jul 2002
Location: WISCONSIN
Posts: 610
Likes: 0
Received 0 Likes
on
0 Posts
Well I called Flex-a-lite and talked to Phil. He wasn't much help. Basically he said Chevies use positive switch wires while Fords use negatives. I guess my next step is to crawl under the front of the truck and peel the sheathing back from the leads to the AC compressor to figure out which wire is the switch wire. Needless to say I'm not liking this.
Phil did clarify that terminal 5 is used for a manual override switch to turn the fans off (water crossings) and terminal #6 on the controller is used to turn the fans on manually with a switch in the cab.
Phil did clarify that terminal 5 is used for a manual override switch to turn the fans off (water crossings) and terminal #6 on the controller is used to turn the fans on manually with a switch in the cab.