4.2 plug change questions
#1
 07-22-2015, 07:01 PM


4.2 plug change questions
First off, 2 of my brand new sp504 plugs are gapped correctly, the other 4 are at 0.49 to 0.50. They must have been bent slightly during shipping. Do I just pull them with pliers?
Is the passenger side near the firewall still hard to get to like the older models? I've done plug changes on the 4.6 and the fuel rail was annoying, but this engine looks easier. At least the drivers side does.
What are the recommended torque specs? Ford said 11-14 lb/ft and I've read it's better to go a little higher. So are we talking 20 lb/ft? Or more than that?
I also read Raptors how to, but stopped reading when he started it only takes 5 mins. I don't believe it'll go that quick. That's on top of letting the truck cool down to a temp where I don't mind sticking my hands down near the manifold.
Thanks in advance!


Last edited by 2008_XL; 07-22-2015 at 07:05 PM.
#2
07-22-2015, 09:08 PM
#4
07-23-2015, 03:49 PM
Done. Whoever said it only takes 5 minutes was absolutely lying ha! Took 1.5 hours. Drivers side was simple, passengers side, was very annoying.
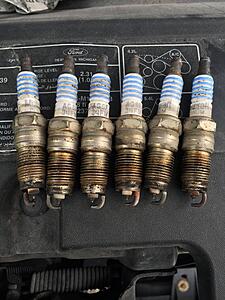
The old plugs are gapped at 0.60 so not too bad. They've only been in for 50k miles (originals changed due to a misfire).
I want to say it runs smoother, because that was an annoying job, but I'm pretty sure it runs the same. Smooth before, smooth now.
EDIT: definitely idles smoother than before. Driving I don't notice a difference though.
Old plugs:

Last edited by 2008_XL; 07-23-2015 at 04:29 PM.
#6
07-26-2015, 07:28 PM
I didn't end up using anti seize. Tightened up to hand snug. Used dielectrics grease just in the boots. Did it last thurs, all is well.
#7
07-26-2015, 07:45 PM
Senior Member

Trending Topics
#8
07-26-2015, 08:22 PM
#11
11-09-2015, 04:58 AM

#12
11-09-2015, 09:59 AM
#13
11-29-2015, 05:33 PM
After doing it again today I'd say the one closest to the firewall was easier for me than the front two on the passenger side. You just crank your steering wheel all the way to the left and you can slide a long extension right in to remove the plug from the wheel well. None of them were too bad though. I wouldn't want to do it without a long extension (2' is what I used) a regular 4" one and a 2" one. That gives you reach to do whatever you need to without being up against anything - though I could more or less make due without the 2".
#14
12-01-2015, 01:29 PM

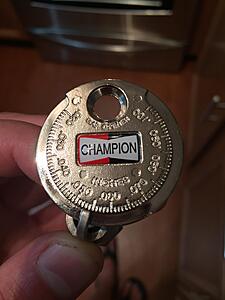
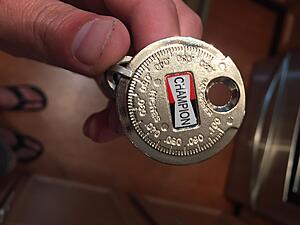
Look at your pictures, see on your tool for measuring gap -- it says "Gap Opener". You use that circular piece to carefully make the gap larger. If you go too far, just find a clean solid piece of metal, and "slightly", and I mean slightly tap the plug to close the gap. Repeat those steps until you measure out the correct gap.
If you are like me, it might take a couple tries until it is dead on.
#15
12-01-2015, 01:56 PM
Don't pull anything with pliers!
Look at your pictures, see on your tool for measuring gap -- it says "Gap Opener". You use that circular piece to carefully make the gap larger. If you go too far, just find a clean solid piece of metal, and "slightly", and I mean slightly tap the plug to close the gap. Repeat those steps until you measure out the correct gap.
If you are like me, it might take a couple tries until it is dead on.
I figured it out. The plug change was months ago and successful as I haven't had a problem.