How-To: Spark Plug change for 1997-2008 4.2L V6
#1
 11-15-2012, 03:14 PM


How-To: Spark Plug change for 1997-2008 4.2L V6
This is a deadly simple process. Really there shouldn't be any reason for me to post this because its so easy, but I haven't contributed to the site in a while so I figured why not make the V8 boys jelly of how quick we can do this:
Estimated time: 5 minutes
Tools required:
6x new spark plugs (OEMs are Motorcraft SP-504s platinum, pre-gapped to .054")
1/2" ratchet
6-8" extension
5/8" spark plug socket
One bottled beer
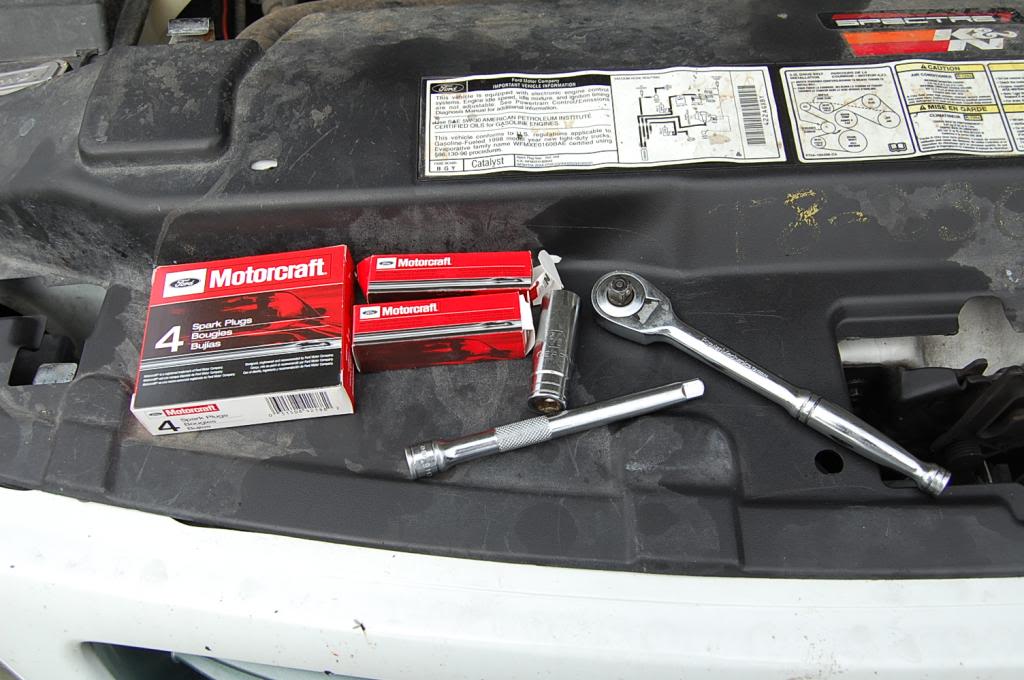
1.) Start by opening your hood (duh) and retrieving your new spark plugs. The Essex V6 is temperamental about plugs. You really have no reason NOT to go with OEM Motorcrafts. Some people have good experiences with NGK or Bosch, but more than often, you'll get a bad misfire out of them. I bought all 6 of my Motorcraft SP-504s from RockAuto for $3.19 a piece, much better than AutoZone's $4.99.
2.) Locate your six wires and pull them off the plugs. Don't move them far as you do NOT want to cross wires. If this is too much for you, just remove one boot at a time as you change out the plugs. Take a sip from your beer.
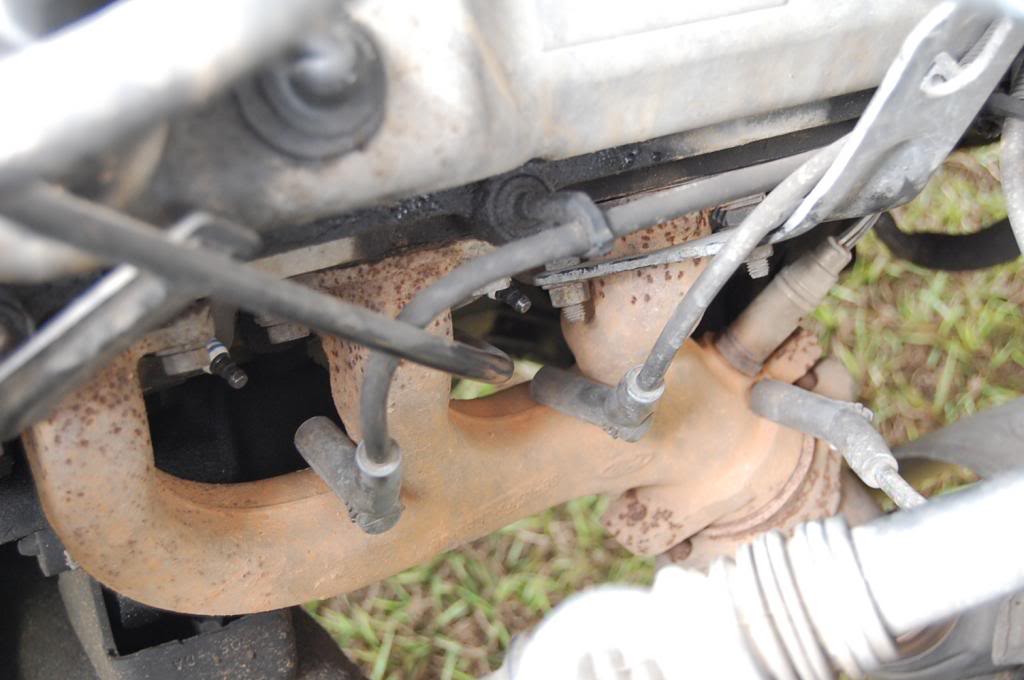
3.) Using your ratchet and socket (leave the extension alone for this part), go ahead and work on Bank 1 first (driver side). You should be able to just break your spark plugs loose with the ratchet and hand-spin them out.

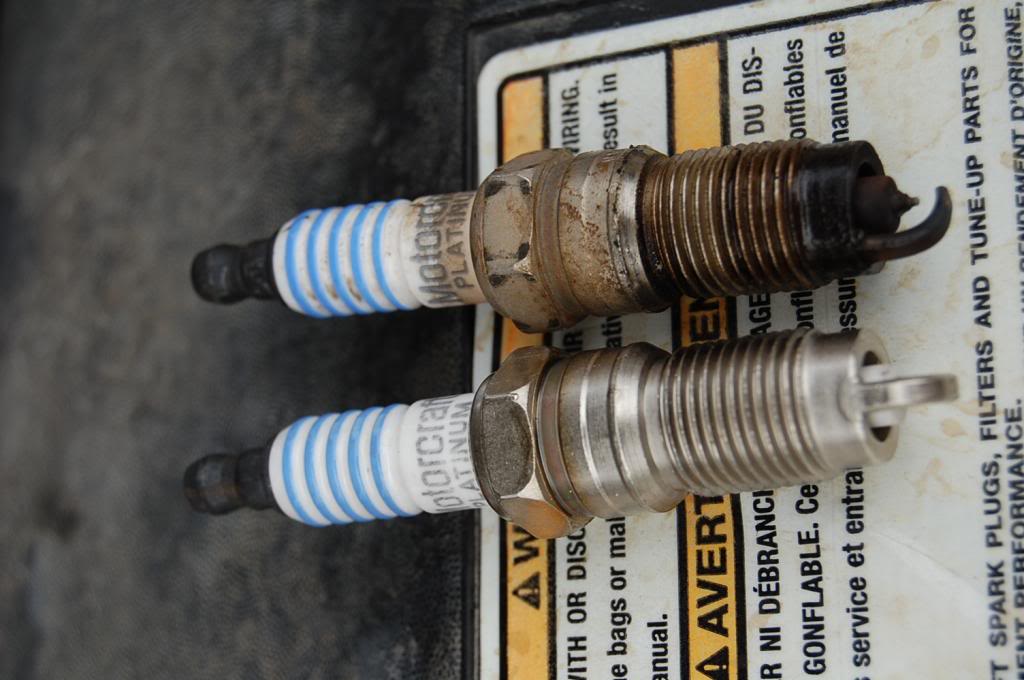
4.) Keep your old spark plugs. Make sure they are all in the same general condition. Save one of them and compare them to what I have typed up on the bottom of this post to determine your engine's running condition. As you can see, I like to go by my owners manual. Nothing but OEM for me. These old spark plugs have about 115,000 miles on them, wayyy past their 60,000-mile lifespan. I had severe bucking and power loss in the lower-RPM band. Have another sip of your beer.
5.) Go ahead and install the new plugs in Bank 1. Start by hand threading (so you don't cross thread) until you cannot anymore and tighten down with your ratchet. Torque specs are 11-14ft-lbs for spark plugs. Unless you have a torque bar, a good hand-tightening procedure is to hand tighten and give it a slow turn 1/16" past that. Take a nice big gulp, you're halfway there.
6.) Reinstall your wires for Bank 1
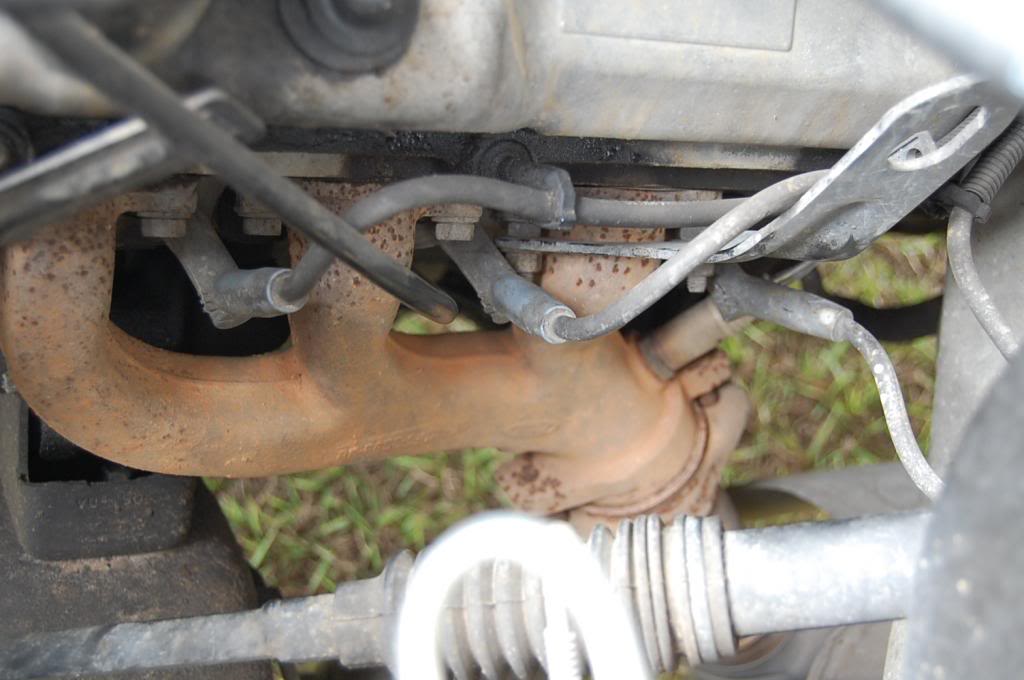
7.) Move to Bank 2. You'll need your 6" extension for this side. Go ahead and break them loose and swap them out for the new ones. Have another sip
8.) Reinstall wires, finish your beer and clean up your mess. Have a non-inebriated bystander take you around the block and verify you don't have any idling or misfiring. Then enjoy the rest of the day.
Random Info:
Engine: 90* Essex V6
Displacement: 4.2L (256ci)
Torque Specifications: 11-14 ft-lbs
Spark Plug Gap: 0.54" (+/- .02")
Firing Order: 1-4-2-5-3-6
Cylinder Numbering (front to rear)
Left (drivers side): 4-5-6
Right (pax side): 1-2-3
Autopsy of your old plugs:
Normal Wear: It should have light tan or gray deposits on the firing tip (see my pictures above).
Carbon-fouled: Will have soft, sooty, black deposits. It may indicate a improper Air/Fuel ratio.
Oil-fouled: Indicates bad piston rings and/or valve seals allowing (excess) oil to enter the combustion chamber.
Excessive gap (see my pictures above!): Is evident for spark plugs left in the engine too long. Extreme gap can lead to misfire, poor engine performance, throttle response, power output, and poor gas mileage
Physical damage: If you have a dented or bent electrode it can be evidence of detonation. Do not run the engine and find the source of the problem ASAP.
Bridged connection: Buildup between the electrodes caused by excess carbon or oil can lead to misfiring or a plug not releasing enough electricity to ignite the A/F mixture, basically giving you a dead cylinder.
Estimated time: 5 minutes
Tools required:
6x new spark plugs (OEMs are Motorcraft SP-504s platinum, pre-gapped to .054")
1/2" ratchet
6-8" extension
5/8" spark plug socket
One bottled beer
1.) Start by opening your hood (duh) and retrieving your new spark plugs. The Essex V6 is temperamental about plugs. You really have no reason NOT to go with OEM Motorcrafts. Some people have good experiences with NGK or Bosch, but more than often, you'll get a bad misfire out of them. I bought all 6 of my Motorcraft SP-504s from RockAuto for $3.19 a piece, much better than AutoZone's $4.99.
2.) Locate your six wires and pull them off the plugs. Don't move them far as you do NOT want to cross wires. If this is too much for you, just remove one boot at a time as you change out the plugs. Take a sip from your beer.
3.) Using your ratchet and socket (leave the extension alone for this part), go ahead and work on Bank 1 first (driver side). You should be able to just break your spark plugs loose with the ratchet and hand-spin them out.
4.) Keep your old spark plugs. Make sure they are all in the same general condition. Save one of them and compare them to what I have typed up on the bottom of this post to determine your engine's running condition. As you can see, I like to go by my owners manual. Nothing but OEM for me. These old spark plugs have about 115,000 miles on them, wayyy past their 60,000-mile lifespan. I had severe bucking and power loss in the lower-RPM band. Have another sip of your beer.
5.) Go ahead and install the new plugs in Bank 1. Start by hand threading (so you don't cross thread) until you cannot anymore and tighten down with your ratchet. Torque specs are 11-14ft-lbs for spark plugs. Unless you have a torque bar, a good hand-tightening procedure is to hand tighten and give it a slow turn 1/16" past that. Take a nice big gulp, you're halfway there.
6.) Reinstall your wires for Bank 1
7.) Move to Bank 2. You'll need your 6" extension for this side. Go ahead and break them loose and swap them out for the new ones. Have another sip
8.) Reinstall wires, finish your beer and clean up your mess. Have a non-inebriated bystander take you around the block and verify you don't have any idling or misfiring. Then enjoy the rest of the day.
Random Info:
Engine: 90* Essex V6
Displacement: 4.2L (256ci)
Torque Specifications: 11-14 ft-lbs
Spark Plug Gap: 0.54" (+/- .02")
Firing Order: 1-4-2-5-3-6
Cylinder Numbering (front to rear)
Left (drivers side): 4-5-6
Right (pax side): 1-2-3
Autopsy of your old plugs:
Normal Wear: It should have light tan or gray deposits on the firing tip (see my pictures above).
Carbon-fouled: Will have soft, sooty, black deposits. It may indicate a improper Air/Fuel ratio.
Oil-fouled: Indicates bad piston rings and/or valve seals allowing (excess) oil to enter the combustion chamber.
Excessive gap (see my pictures above!): Is evident for spark plugs left in the engine too long. Extreme gap can lead to misfire, poor engine performance, throttle response, power output, and poor gas mileage
Physical damage: If you have a dented or bent electrode it can be evidence of detonation. Do not run the engine and find the source of the problem ASAP.
Bridged connection: Buildup between the electrodes caused by excess carbon or oil can lead to misfiring or a plug not releasing enough electricity to ignite the A/F mixture, basically giving you a dead cylinder.
Last edited by Raptor05121; 11-15-2012 at 03:16 PM.
#3
11-15-2012, 11:48 PM

Senior Member
#4
11-16-2012, 01:09 AM

Senior Member
Join Date: Jul 2007
Location: London, ON Canada
Posts: 946
Likes: 0
Received 0 Likes
on
0 Posts
The plug closest to the firewall on the pass side is a major pita to get too. Easiest way I've ever found to get at it is to take off the front right wheel/remove the liner and get at the plug from the side through the wheel well.
#5
11-16-2012, 01:41 AM
2.) okay
3.) I took me no longer than six minutes, including the stopping to take pictures from opening the hood to closing it.
#6
11-18-2012, 12:41 PM
Senior Member

#7
11-18-2012, 12:47 PM
Senior Member
Trending Topics
#8
11-18-2012, 08:58 PM
#10
08-26-2021, 09:51 AM

Umm, Houston we have a problem
This is a deadly simple process. Really there shouldn't be any reason for me to post this because its so easy, but I haven't contributed to the site in a while so I figured why not make the V8 boys jelly of how quick we can do this:
Estimated time: 5 minutes
Tools required:
6x new spark plugs (OEMs are Motorcraft SP-504s platinum, pre-gapped to .054")
1/2" ratchet
6-8" extension
5/8" spark plug socket
One bottled beer
Attachment 19613
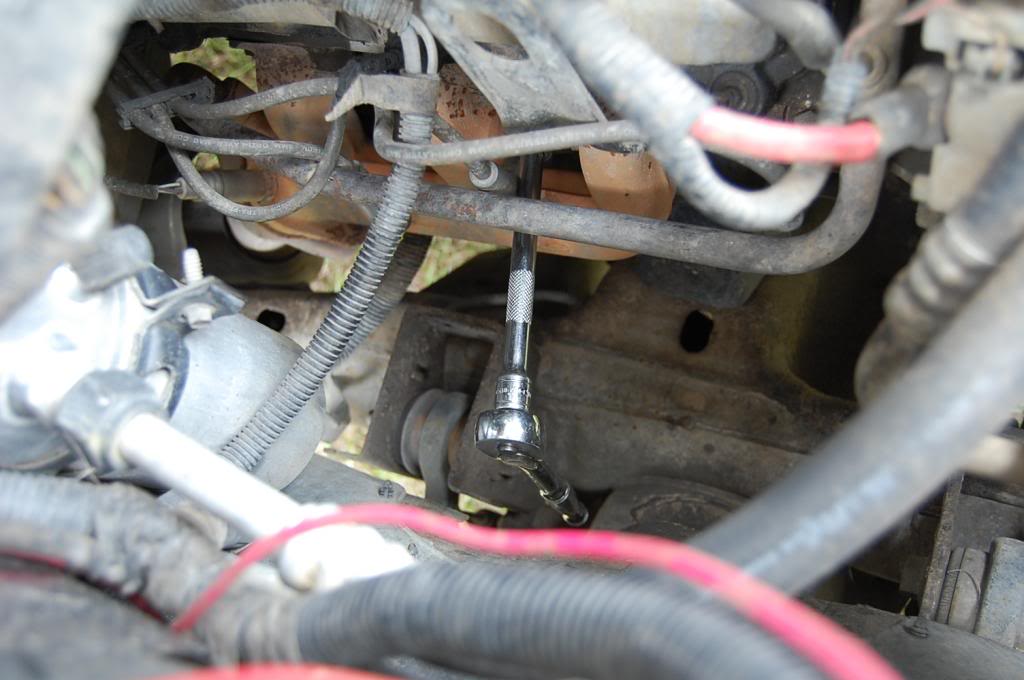
1.) Start by opening your hood (duh) and retrieving your new spark plugs. The Essex V6 is temperamental about plugs. You really have no reason NOT to go with OEM Motorcrafts. Some people have good experiences with NGK or Bosch, but more than often, you'll get a bad misfire out of them. I bought all 6 of my Motorcraft SP-504s from RockAuto for $3.19 a piece, much better than AutoZone's $4.99.
2.) Locate your six wires and pull them off the plugs. Don't move them far as you do NOT want to cross wires. If this is too much for you, just remove one boot at a time as you change out the plugs. Take a sip from your beer.
Attachment 19614
3.) Using your ratchet and socket (leave the extension alone for this part), go ahead and work on Bank 1 first (driver side). You should be able to just break your spark plugs loose with the ratchet and hand-spin them out.
Attachment 19615
4.) Keep your old spark plugs. Make sure they are all in the same general condition. Save one of them and compare them to what I have typed up on the bottom of this post to determine your engine's running condition. As you can see, I like to go by my owners manual. Nothing but OEM for me. These old spark plugs have about 115,000 miles on them, wayyy past their 60,000-mile lifespan. I had severe bucking and power loss in the lower-RPM band. Have another sip of your beer.
Attachment 19616
5.) Go ahead and install the new plugs in Bank 1. Start by hand threading (so you don't cross thread) until you cannot anymore and tighten down with your ratchet. Torque specs are 11-14ft-lbs for spark plugs. Unless you have a torque bar, a good hand-tightening procedure is to hand tighten and give it a slow turn 1/16" past that. Take a nice big gulp, you're halfway there.
Attachment 19617
6.) Reinstall your wires for Bank 1
7.) Move to Bank 2. You'll need your 6" extension for this side. Go ahead and break them loose and swap them out for the new ones. Have another sip
Attachment 19618
8.) Reinstall wires, finish your beer and clean up your mess. Have a non-inebriated bystander take you around the block and verify you don't have any idling or misfiring. Then enjoy the rest of the day.
Random Info:
Engine: 90* Essex V6
Displacement: 4.2L (256ci)
Torque Specifications: 11-14 ft-lbs
Spark Plug Gap: 0.54" (+/- .02")
Firing Order: 1-4-2-5-3-6
Cylinder Numbering (front to rear)
Left (drivers side): 4-5-6
Right (pax side): 1-2-3
Autopsy of your old plugs:
Normal Wear: It should have light tan or gray deposits on the firing tip (see my pictures above).
Carbon-fouled: Will have soft, sooty, black deposits. It may indicate a improper Air/Fuel ratio.
Oil-fouled: Indicates bad piston rings and/or valve seals allowing (excess) oil to enter the combustion chamber.
Excessive gap (see my pictures above!): Is evident for spark plugs left in the engine too long. Extreme gap can lead to misfire, poor engine performance, throttle response, power output, and poor gas mileage
Physical damage: If you have a dented or bent electrode it can be evidence of detonation. Do not run the engine and find the source of the problem ASAP.
Bridged connection: Buildup between the electrodes caused by excess carbon or oil can lead to misfiring or a plug not releasing enough electricity to ignite the A/F mixture, basically giving you a dead cylinder.
Estimated time: 5 minutes
Tools required:
6x new spark plugs (OEMs are Motorcraft SP-504s platinum, pre-gapped to .054")
1/2" ratchet
6-8" extension
5/8" spark plug socket
One bottled beer
Attachment 19613
1.) Start by opening your hood (duh) and retrieving your new spark plugs. The Essex V6 is temperamental about plugs. You really have no reason NOT to go with OEM Motorcrafts. Some people have good experiences with NGK or Bosch, but more than often, you'll get a bad misfire out of them. I bought all 6 of my Motorcraft SP-504s from RockAuto for $3.19 a piece, much better than AutoZone's $4.99.
2.) Locate your six wires and pull them off the plugs. Don't move them far as you do NOT want to cross wires. If this is too much for you, just remove one boot at a time as you change out the plugs. Take a sip from your beer.
Attachment 19614
3.) Using your ratchet and socket (leave the extension alone for this part), go ahead and work on Bank 1 first (driver side). You should be able to just break your spark plugs loose with the ratchet and hand-spin them out.
Attachment 19615
4.) Keep your old spark plugs. Make sure they are all in the same general condition. Save one of them and compare them to what I have typed up on the bottom of this post to determine your engine's running condition. As you can see, I like to go by my owners manual. Nothing but OEM for me. These old spark plugs have about 115,000 miles on them, wayyy past their 60,000-mile lifespan. I had severe bucking and power loss in the lower-RPM band. Have another sip of your beer.
Attachment 19616
5.) Go ahead and install the new plugs in Bank 1. Start by hand threading (so you don't cross thread) until you cannot anymore and tighten down with your ratchet. Torque specs are 11-14ft-lbs for spark plugs. Unless you have a torque bar, a good hand-tightening procedure is to hand tighten and give it a slow turn 1/16" past that. Take a nice big gulp, you're halfway there.
Attachment 19617
6.) Reinstall your wires for Bank 1
7.) Move to Bank 2. You'll need your 6" extension for this side. Go ahead and break them loose and swap them out for the new ones. Have another sip
Attachment 19618
8.) Reinstall wires, finish your beer and clean up your mess. Have a non-inebriated bystander take you around the block and verify you don't have any idling or misfiring. Then enjoy the rest of the day.
Random Info:
Engine: 90* Essex V6
Displacement: 4.2L (256ci)
Torque Specifications: 11-14 ft-lbs
Spark Plug Gap: 0.54" (+/- .02")
Firing Order: 1-4-2-5-3-6
Cylinder Numbering (front to rear)
Left (drivers side): 4-5-6
Right (pax side): 1-2-3
Autopsy of your old plugs:
Normal Wear: It should have light tan or gray deposits on the firing tip (see my pictures above).
Carbon-fouled: Will have soft, sooty, black deposits. It may indicate a improper Air/Fuel ratio.
Oil-fouled: Indicates bad piston rings and/or valve seals allowing (excess) oil to enter the combustion chamber.
Excessive gap (see my pictures above!): Is evident for spark plugs left in the engine too long. Extreme gap can lead to misfire, poor engine performance, throttle response, power output, and poor gas mileage
Physical damage: If you have a dented or bent electrode it can be evidence of detonation. Do not run the engine and find the source of the problem ASAP.
Bridged connection: Buildup between the electrodes caused by excess carbon or oil can lead to misfiring or a plug not releasing enough electricity to ignite the A/F mixture, basically giving you a dead cylinder.
The following users liked this post: