
 04-13-2015, 02:24 PM
Last edit by: IB Advertising
Find out how to make this difficult task manageable with more information about the following:
• Tool and parts needed
• Step-by-step directions
• Helpful picture and video guides
Read full discussion for further information
• Tool and parts needed
• Step-by-step directions
• Helpful picture and video guides
Read full discussion for further information

Rebuild Your Own Transmission For Less Than $500! With Pictures!
#1
12-11-2012, 03:55 PM


Join Date: Dec 2008
Location: Los Angeles
Posts: 15
Likes: 0
Received 0 Likes
on
0 Posts
Rebuild Your Own Transmission For Less Than $500! With Pictures!
Let me begin this write-up by saying that I was just as terrified to tear into an automatic transmission as you probably are. I’ve been wrenching on cars for 17 years and have done everything that can be done, from repairs to upgrades to mods…except for working on an auto tranny. In fact, I was so scared of automatics that, when the auto went out in my ’74 Scout II, I converted it to a manual rather than attempting to work on the auto. We, as home mechanics, are taught from our first hood opening that the automatic transmission is the single component of any vehicle that MUST be left to professional shops; they’re just too sensitive, complex, and delicate for a privateer to handle. Well, after 3 days in the garage (one pulling the tranny, one rebuilding, one reinstalling) and $550 worth of parts (only $320 of which were necessary), I successfully rebuilt my 4R75W transmission and have been driving it all over Los Angeles county for the past two days. There was no voodoo, no incredibly complex or next-to-impossible steps, and no surprises. Below is the write up along with little things I learned that may be helpful. I also should let you know that I needed exactly zero special tools for this project.
First, I purchased a master rebuild kit from Oregon Performance Transmission:
http://www.oregonperformancetransmis...de=ORE-AODE-RB
They package their own kits and accidentally sent me Raybestos Stage 1 performance frictions instead of the stock Borg Warners. I’m not going to complain about the upgrade
I also bought from them the Sonnax Sure Cure kit (it corrects some factory design flaws and wear problems in the valve body- not absolutely necessary but, if you’ve already gone to the trouble of pulling your trans you might as well spend an extra bill and a couple hours upgrading the valve body, right?
http://www.oregonperformancetransmis...=SNX-SC-AODE-1
And the final part from OPT, a massive transmission fluid cooler. Again, not absolutely necessary but the number one killer of an automatic is heat buildup and I work my truck pretty hard.
http://www.oregonperformancetransmis...t_Code=HAY-405
Total cost so far: $240 for the rebuild kit, $100 for the Sonnax kit, and $52 for the cooler.
I then purchased a rebuilt torque converter from a local supplier that happens to also sell on eBay and ship across the nation. You will not beat their prices even when you add $40-$50 to have it shipped. I paid $120 for my converter and picked it up from their plant:
http://www.torqueconverter1.com/
The last part purchased (aside from $120 worth of Mercon V transmission fluid) was a front pump off of eBay for $50. However, if I had seen one of these pumps in person I would not have bought another one- they are simple and sturdy and virtually nothing on them can fail other than the seals, which are included in the OPT rebuild kit.
Now we’re ready to rebuild! The first step is to remove your transmission which basically means removing nearly everything with a bolt through it on the underside of your rig. I did this after work on a Monday- started around 4:30 and got the 4R75 out from under the truck right at 11:30. My truck is a 4x4 so there are a few more steps like removing the front driveshaft and the transfer case so, if yours is 2 wheel drive, it’ll take less time. You’ll need lots of extensions for your ratchets and either a kung fu grip or some air tools. My compressor died a couple years ago and my 18v cordless impact didn’t have enough power to break most of these bolts loose so I had to use the brute force method. If you’ve ever pulled a tranny before, please keep in mind that this torque converter has to come off with the transmission- it can’t hang on the flex plate like the old school designs. Just remember to unbolt it and it will stay seated in the transmission when you pull it, no drama here. This actually makes it a helluvalot easier to reinstall because there’s no input shaft splines to line up.
Once you’ve spent X number of hours pulling your trans, stand up, stretch out, wash your hands/arms/face, grab a beer, and watch these three videos. The first two are less than 10 minutes long but the third is over an hour (you’ll need to grab another beer before you start that one).
Complete 4R70W Transmission Disassembly (Part 1)
Complete 4R70W Transmission Disassembly (Part 2)
4R75W Full Rebuild
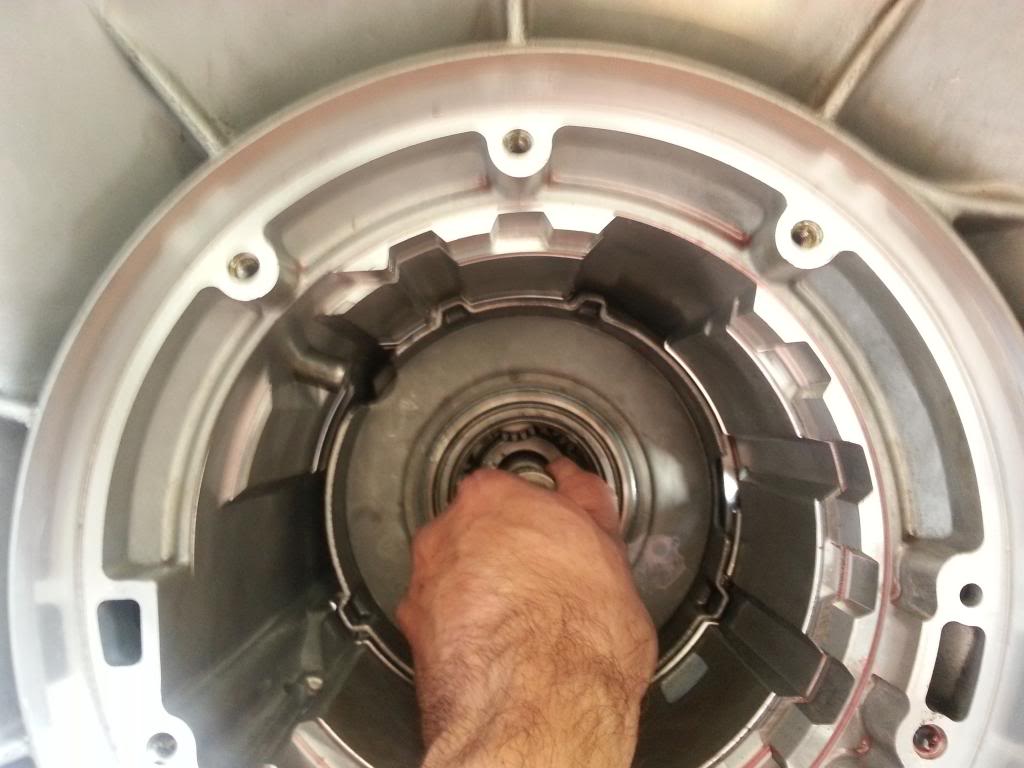
Now, let’s open ‘er up! The first thing I did was stand the tranny up vertically on its tail, sitting on 4x4 wood blocks to clear the output shaft, and strapped it to my heavy work bench.
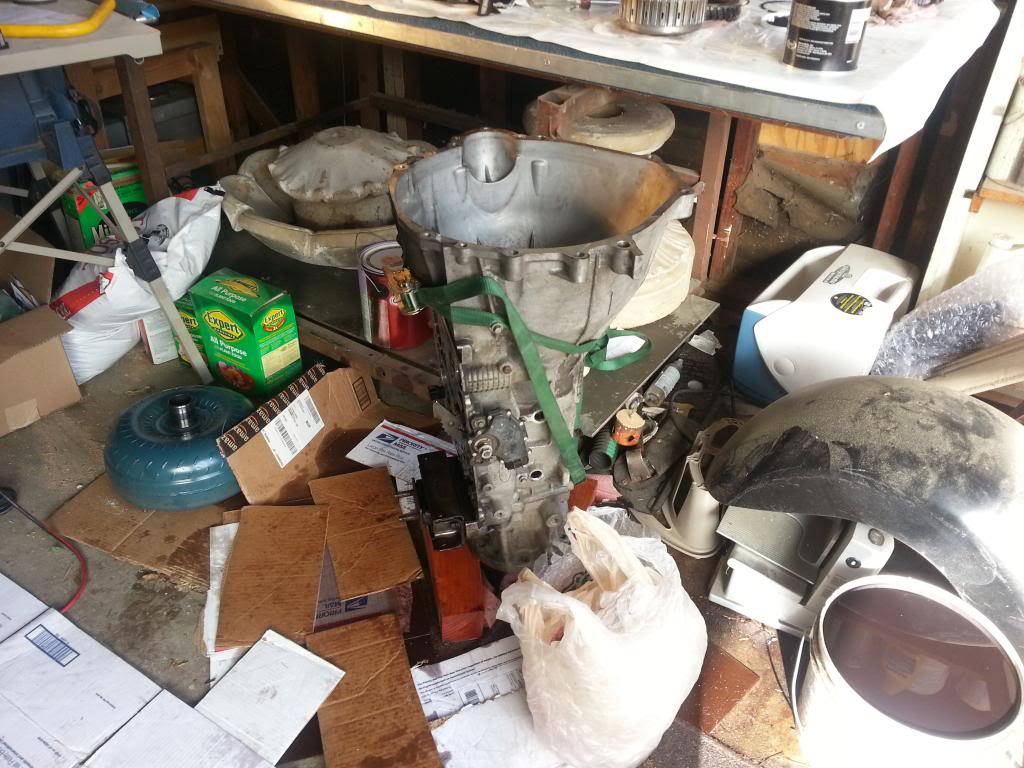
Then pull the torque converter (converter is already out and sitting on the floor to the left of the tranny in the picture above). To get it out, I threaded two of the mounting nuts back onto it so that I had something to grip and pulled it straight up out of the case. It will still be full of fluid so it’ll make a mess and it’s pretty heavy. I had stopped caring about tranny fluid on the floor by this point…
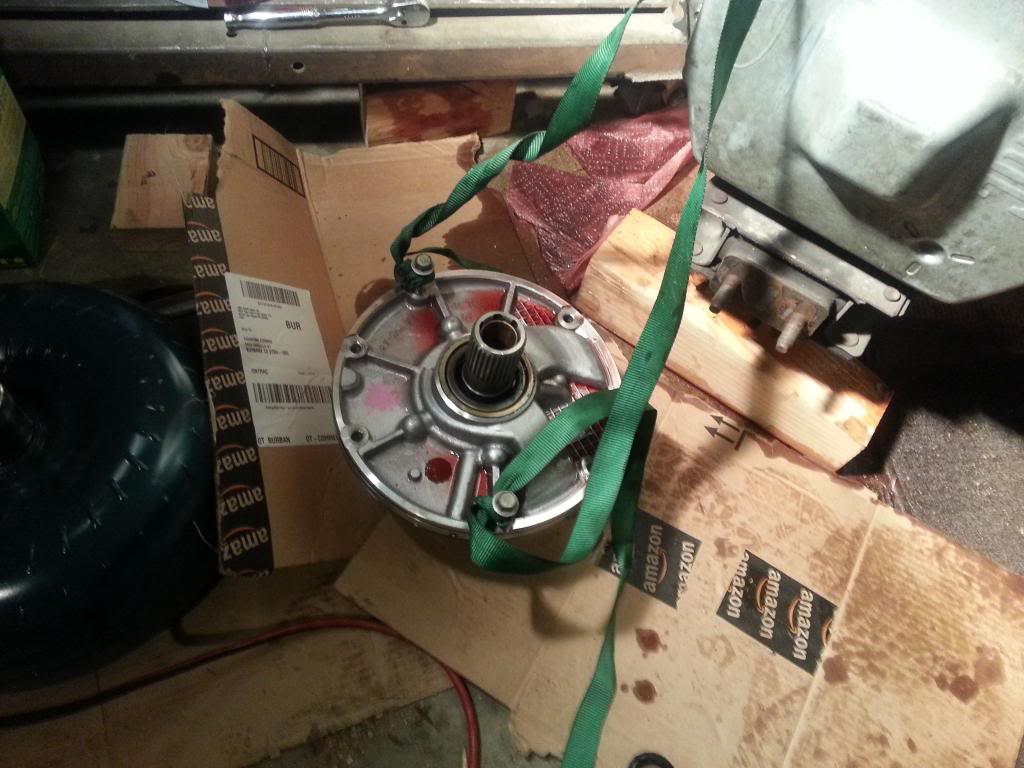
Next is the front pump. Remove the 10mm mounting bolts and yank that sucker! I don’t have slide hammers so I rigged up my own “puller” by threading two of the transfer case-to-transmission mounting bolts into the two threaded holes in the pump and tying a nylon strap from one of my ratchet tie downs to both of them, leaving a three foot length of strap loose between them so I’d have something to pull on. I then slid my 5lb sledge through the loop, holding the hammer head in one hand and the handle in the other, and pulled it sharply straight up against the strap to break the pump loose. I only had to do this once and the pump came free. And, this is where I found my first problem- the spring clip that holds the intermediate clutch pack together had popped off and broken the plastic spacer ring on the back of the pump so everything was just loose and flopping around in there. The Sonnax kit includes a new spiral spring and retainer to prevent this from happening again.
I must mention that this is the one and only time you will use any sort of brute force during the rebuild process. Everything else is held in with snap rings and slides out and back in easily. If you have to force, shove, or hammer something, you’re doing it wrong. Also, make sure you have removed the two sensors on the driver’s side of the case. These pass through to the inside and WILL be damaged if left installed. The videos will help you tremendously at this point as everything starts looking the same however, even without the videos, it’s fairly easy to keep track of the components. I cleared an area of my bench and covered it with white shelf paper that we had laying around to protect the carpet underneath from transmission fluid and then laid out all of the trans guts on the bench in the order that they came out of the case. Do yourself a huge favor and KEEP THEM IN ORDER. Make room to line everything up, even if you have to spread cardboard out in the driveway.
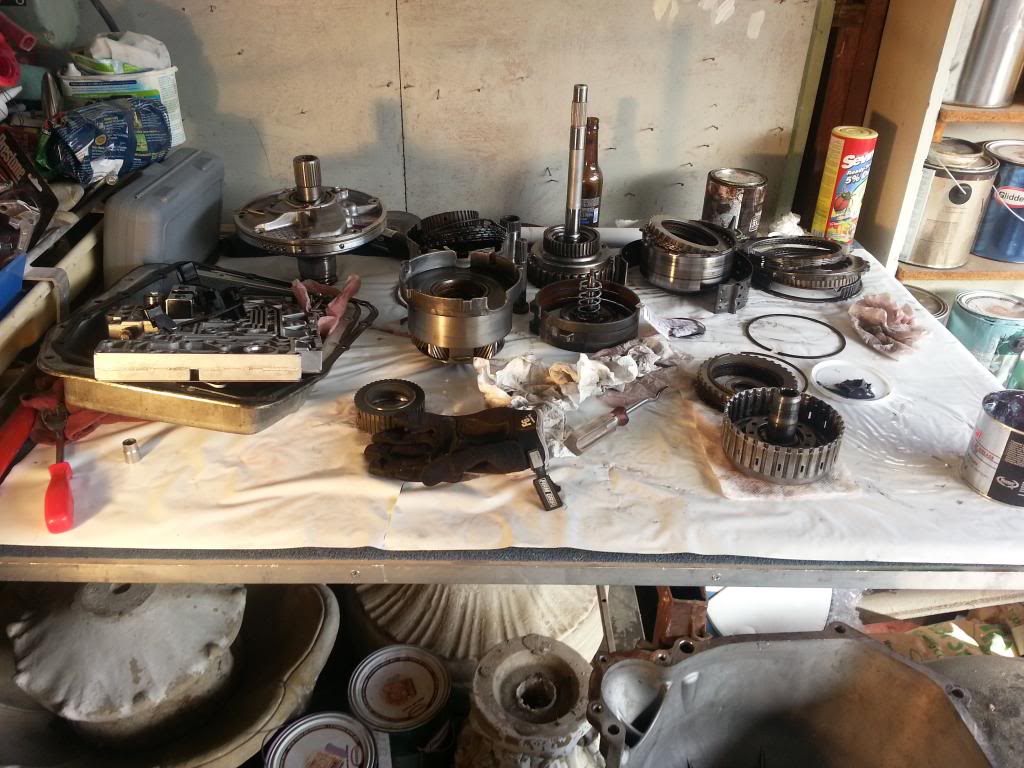
The pump is at the top left, the pan and valve body below it, and all of the clutch packs and gears lined up to the left of the pump.
Here is a parts diagram that’s nice for reference but don’t rely on it completely as it’s not 4R70/75 specific:
http://www.transmissioncenter.org/AO...Up_Diagram.htm
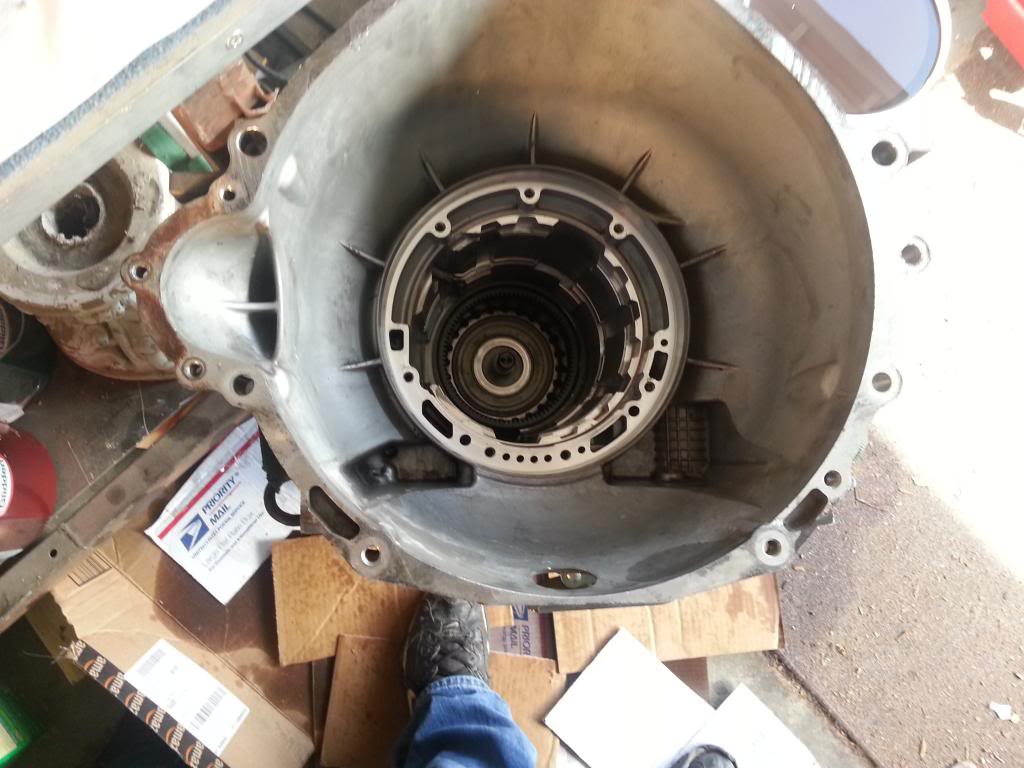
And here is what the case looks like mostly empty. I had already replaced the seals in the output shaft assembly and reinstalled it before I remember to take a picture. It just slides out and right back down into position.
At this point it’s a simple matter of rebuilding the individual clutch packs and replacing all of their seals. I found my main problem in my forward clutch – the lip seal on the piston was torn in several places so it had pressure loss and couldn’t engage the clutches fully. All of the friction discs were burned down to the steel and the drum was discolored from the heat buildup but it didn’t warp so I reused it.
All of the clutch packs have an actuator piston like this one underneath the friction/steel stacks that must be removed in order to replace the lip seals. One of my pistons was stuck so I slammed it down onto a block of wood, open side down, a few times to knock it out of the drum; it didn’t do any damage. The lip seals have to be seated into the drum so that you can push the piston in all the way and there is a thin plastic disc in the rebuild kit to be used for this. I put it into the drum and then slid the piston down so the plastic piece was between the piston seal and drum, then slowly worked it up and down and around the circumference of the drum to compress the seal and seat the piston. You’re working with rubber here so take your time and exercise your patience. Walk away and pop another top if you start getting frustrated- there are no extra parts in the kit if you mess this up.
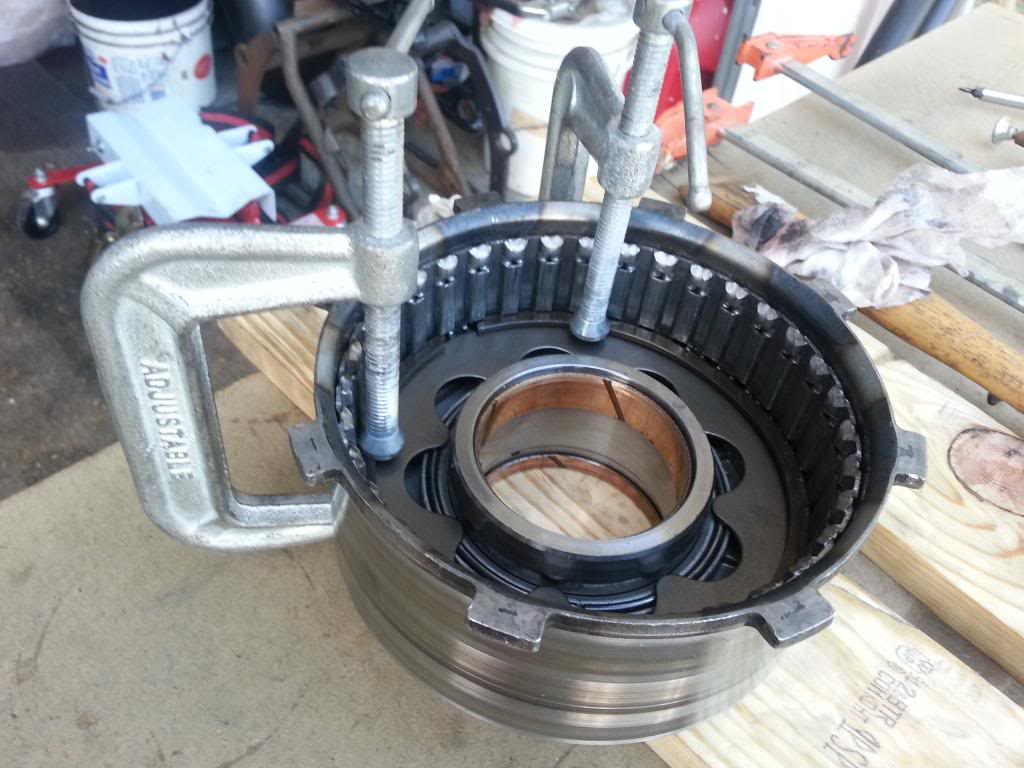
Replacing the steels and frictions is easy, just match the new stack to the old- they’re all different sizes and counts. All of the clutch packs are held into the drums via snap rings but a couple of them require that you compress a spring to remove and reinstall the snap ring. I used bar clamps that I typically use for woodworking.

Since I laid everything out on the bench in the order that it came out of the case, I simply rebuild the components in reverse order and reinstalled them in the case as I completed them, leaving me nothing on the bench that was finished. the only tricky part I found during reassembly was installing the center support, which must be seated into the roller clutch but the support has lugs that fit into notches in the transmission case so it can’t be turned in place to work it into the rollers. To install the center support, I splined the stub shaft back into the direct clutch and used it to spin the whole assembly clockwise in order to open up the rollers and seat the center support. Again, no amount of force is required here- the direct clutch spins freely and only light pressure on the center support is required to get it to drop into place.
You’ll know you have it seated correctly when it’s below the groove in the case for the snap ring. Don’t forget to put in the anti-clunk spring once the center support is set. There’s only one place it will fit.

Don’t worry about pushing it down flush- mine just kept popping back out. The perimeter snap/retaining ring holds it in place so just set it in the hole and install the retaining ring. Good to go.
The final part that gave me trouble was the wave snap ring in the reverse input drum. It was just a pita to get it to seat so I used a couple C clamps to help.
And that’s pretty much it. Stack all of the drums and shafts in the way you took them out until you run out of components Replace the seals and bushings on your front pump using the new ones in the rebuild kit and slide it into place, then torque the mounting bolts and slip the torque converter back into the case. There are two sets of splines that the torque converter engages so you will have to wiggle it back and forth to seat it all the way. When it’s in correctly, you will have ~3/4” between the top of its mounting studs and the top of the bell housing.
One thing to watch out for is the mechanical diode or one way clutch- it is the only piece that can be put in backwards and, since it spins freely one way and locks the other, I’m assuming it would do some serious damage if put in wrong. To check it if you took it off or it fell off on its own, it should spin counterclockwise and lock clockwise when looking at the back of the drum where it sits. Also, the bearings are very thin and fairly lightweight so they have a tendency to stick to whatever component was riding on them because of thin layers of transmission fluid. Keep track of these bearings and where they came from as they get virtually no wear and can be reused.
Ok, this post is incredibly long but I’m still sure I glossed over something. I’m more than happy to answer any questions I have the knowledge to answer and happy automatic transmission rebuilding!
First, I purchased a master rebuild kit from Oregon Performance Transmission:
http://www.oregonperformancetransmis...de=ORE-AODE-RB
They package their own kits and accidentally sent me Raybestos Stage 1 performance frictions instead of the stock Borg Warners. I’m not going to complain about the upgrade
I also bought from them the Sonnax Sure Cure kit (it corrects some factory design flaws and wear problems in the valve body- not absolutely necessary but, if you’ve already gone to the trouble of pulling your trans you might as well spend an extra bill and a couple hours upgrading the valve body, right?
http://www.oregonperformancetransmis...=SNX-SC-AODE-1
And the final part from OPT, a massive transmission fluid cooler. Again, not absolutely necessary but the number one killer of an automatic is heat buildup and I work my truck pretty hard.
http://www.oregonperformancetransmis...t_Code=HAY-405
Total cost so far: $240 for the rebuild kit, $100 for the Sonnax kit, and $52 for the cooler.
I then purchased a rebuilt torque converter from a local supplier that happens to also sell on eBay and ship across the nation. You will not beat their prices even when you add $40-$50 to have it shipped. I paid $120 for my converter and picked it up from their plant:
http://www.torqueconverter1.com/
The last part purchased (aside from $120 worth of Mercon V transmission fluid) was a front pump off of eBay for $50. However, if I had seen one of these pumps in person I would not have bought another one- they are simple and sturdy and virtually nothing on them can fail other than the seals, which are included in the OPT rebuild kit.
Now we’re ready to rebuild! The first step is to remove your transmission which basically means removing nearly everything with a bolt through it on the underside of your rig. I did this after work on a Monday- started around 4:30 and got the 4R75 out from under the truck right at 11:30. My truck is a 4x4 so there are a few more steps like removing the front driveshaft and the transfer case so, if yours is 2 wheel drive, it’ll take less time. You’ll need lots of extensions for your ratchets and either a kung fu grip or some air tools. My compressor died a couple years ago and my 18v cordless impact didn’t have enough power to break most of these bolts loose so I had to use the brute force method. If you’ve ever pulled a tranny before, please keep in mind that this torque converter has to come off with the transmission- it can’t hang on the flex plate like the old school designs. Just remember to unbolt it and it will stay seated in the transmission when you pull it, no drama here. This actually makes it a helluvalot easier to reinstall because there’s no input shaft splines to line up.
Once you’ve spent X number of hours pulling your trans, stand up, stretch out, wash your hands/arms/face, grab a beer, and watch these three videos. The first two are less than 10 minutes long but the third is over an hour (you’ll need to grab another beer before you start that one).
Complete 4R70W Transmission Disassembly (Part 1)
Complete 4R70W Transmission Disassembly (Part 2)
4R75W Full Rebuild
Now, let’s open ‘er up! The first thing I did was stand the tranny up vertically on its tail, sitting on 4x4 wood blocks to clear the output shaft, and strapped it to my heavy work bench.
Then pull the torque converter (converter is already out and sitting on the floor to the left of the tranny in the picture above). To get it out, I threaded two of the mounting nuts back onto it so that I had something to grip and pulled it straight up out of the case. It will still be full of fluid so it’ll make a mess and it’s pretty heavy. I had stopped caring about tranny fluid on the floor by this point…
Next is the front pump. Remove the 10mm mounting bolts and yank that sucker! I don’t have slide hammers so I rigged up my own “puller” by threading two of the transfer case-to-transmission mounting bolts into the two threaded holes in the pump and tying a nylon strap from one of my ratchet tie downs to both of them, leaving a three foot length of strap loose between them so I’d have something to pull on. I then slid my 5lb sledge through the loop, holding the hammer head in one hand and the handle in the other, and pulled it sharply straight up against the strap to break the pump loose. I only had to do this once and the pump came free. And, this is where I found my first problem- the spring clip that holds the intermediate clutch pack together had popped off and broken the plastic spacer ring on the back of the pump so everything was just loose and flopping around in there. The Sonnax kit includes a new spiral spring and retainer to prevent this from happening again.
I must mention that this is the one and only time you will use any sort of brute force during the rebuild process. Everything else is held in with snap rings and slides out and back in easily. If you have to force, shove, or hammer something, you’re doing it wrong. Also, make sure you have removed the two sensors on the driver’s side of the case. These pass through to the inside and WILL be damaged if left installed. The videos will help you tremendously at this point as everything starts looking the same however, even without the videos, it’s fairly easy to keep track of the components. I cleared an area of my bench and covered it with white shelf paper that we had laying around to protect the carpet underneath from transmission fluid and then laid out all of the trans guts on the bench in the order that they came out of the case. Do yourself a huge favor and KEEP THEM IN ORDER. Make room to line everything up, even if you have to spread cardboard out in the driveway.
The pump is at the top left, the pan and valve body below it, and all of the clutch packs and gears lined up to the left of the pump.
Here is a parts diagram that’s nice for reference but don’t rely on it completely as it’s not 4R70/75 specific:
http://www.transmissioncenter.org/AO...Up_Diagram.htm
And here is what the case looks like mostly empty. I had already replaced the seals in the output shaft assembly and reinstalled it before I remember to take a picture. It just slides out and right back down into position.
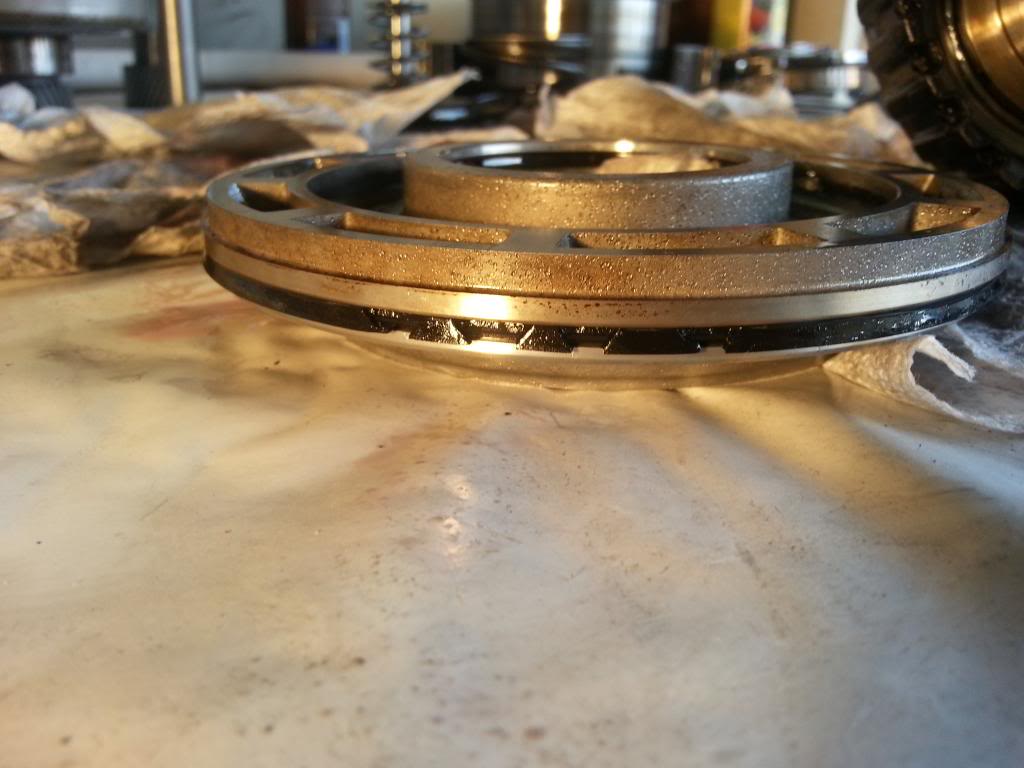
At this point it’s a simple matter of rebuilding the individual clutch packs and replacing all of their seals. I found my main problem in my forward clutch – the lip seal on the piston was torn in several places so it had pressure loss and couldn’t engage the clutches fully. All of the friction discs were burned down to the steel and the drum was discolored from the heat buildup but it didn’t warp so I reused it.
All of the clutch packs have an actuator piston like this one underneath the friction/steel stacks that must be removed in order to replace the lip seals. One of my pistons was stuck so I slammed it down onto a block of wood, open side down, a few times to knock it out of the drum; it didn’t do any damage. The lip seals have to be seated into the drum so that you can push the piston in all the way and there is a thin plastic disc in the rebuild kit to be used for this. I put it into the drum and then slid the piston down so the plastic piece was between the piston seal and drum, then slowly worked it up and down and around the circumference of the drum to compress the seal and seat the piston. You’re working with rubber here so take your time and exercise your patience. Walk away and pop another top if you start getting frustrated- there are no extra parts in the kit if you mess this up.
Replacing the steels and frictions is easy, just match the new stack to the old- they’re all different sizes and counts. All of the clutch packs are held into the drums via snap rings but a couple of them require that you compress a spring to remove and reinstall the snap ring. I used bar clamps that I typically use for woodworking.
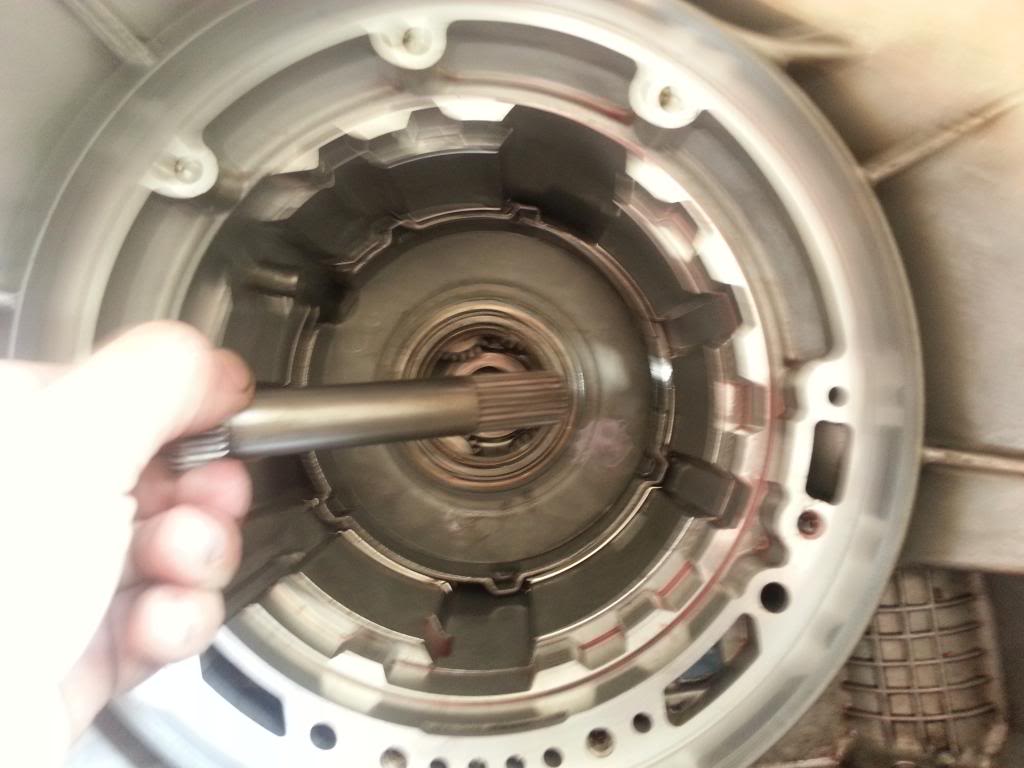
Since I laid everything out on the bench in the order that it came out of the case, I simply rebuild the components in reverse order and reinstalled them in the case as I completed them, leaving me nothing on the bench that was finished. the only tricky part I found during reassembly was installing the center support, which must be seated into the roller clutch but the support has lugs that fit into notches in the transmission case so it can’t be turned in place to work it into the rollers. To install the center support, I splined the stub shaft back into the direct clutch and used it to spin the whole assembly clockwise in order to open up the rollers and seat the center support. Again, no amount of force is required here- the direct clutch spins freely and only light pressure on the center support is required to get it to drop into place.
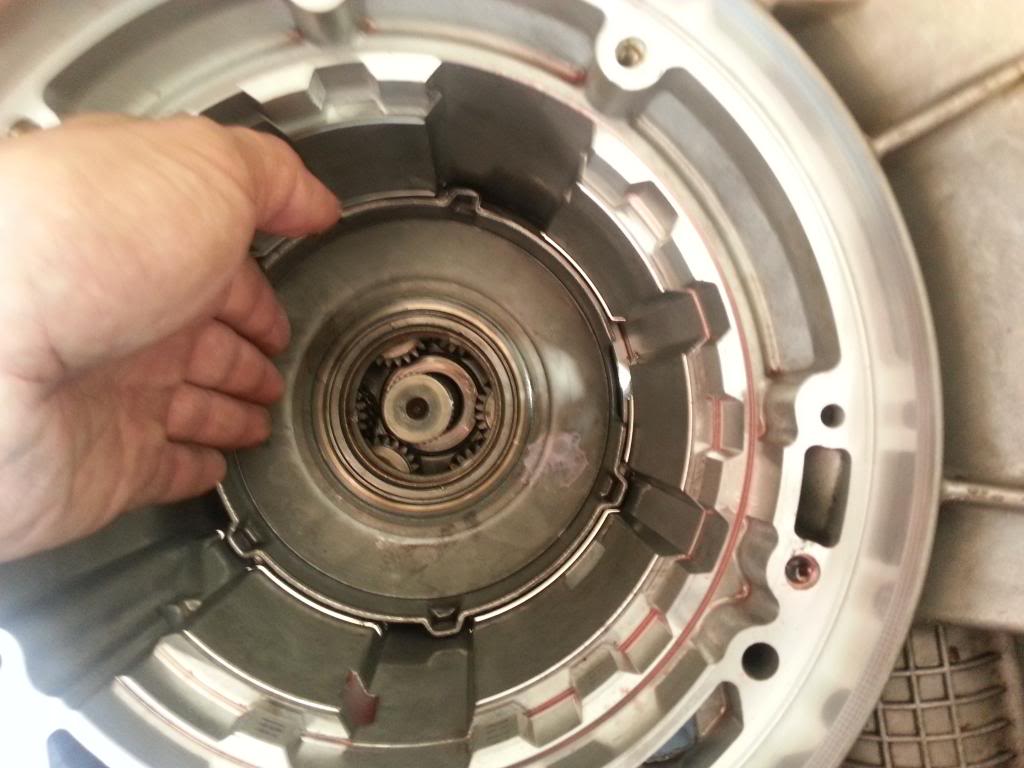
You’ll know you have it seated correctly when it’s below the groove in the case for the snap ring. Don’t forget to put in the anti-clunk spring once the center support is set. There’s only one place it will fit.
Don’t worry about pushing it down flush- mine just kept popping back out. The perimeter snap/retaining ring holds it in place so just set it in the hole and install the retaining ring. Good to go.
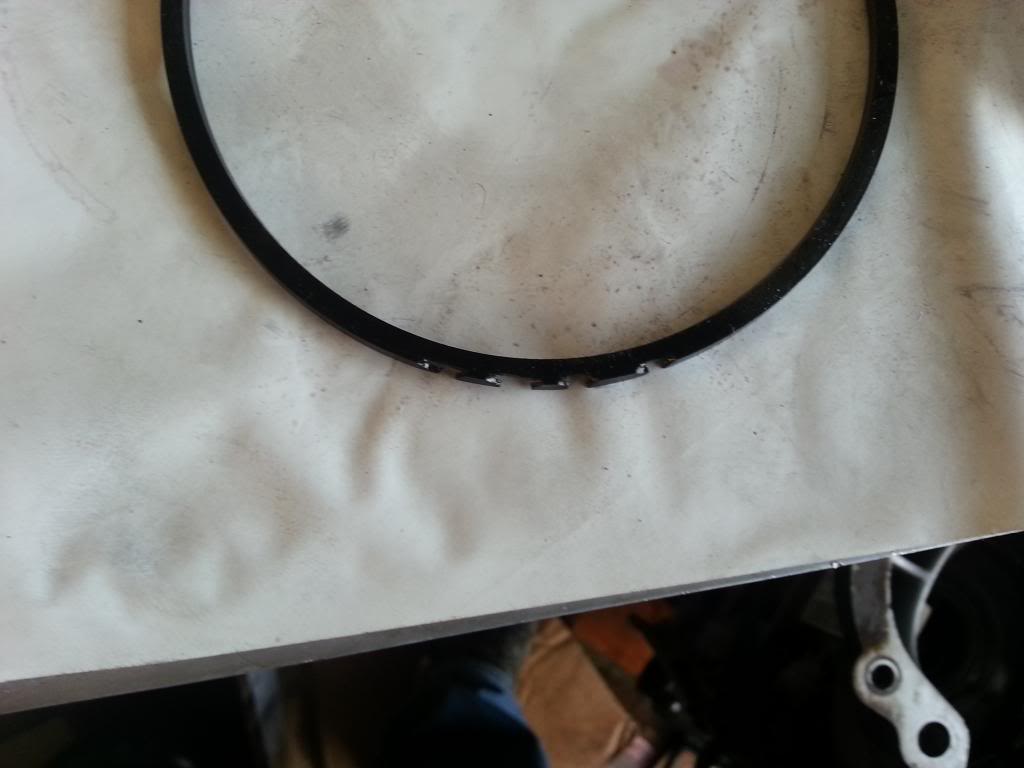
The final part that gave me trouble was the wave snap ring in the reverse input drum. It was just a pita to get it to seat so I used a couple C clamps to help.
And that’s pretty much it. Stack all of the drums and shafts in the way you took them out until you run out of components
Replace the seals and bushings on your front pump using the new ones in the rebuild kit and slide it into place, then torque the mounting bolts and slip the torque converter back into the case. There are two sets of splines that the torque converter engages so you will have to wiggle it back and forth to seat it all the way. When it’s in correctly, you will have ~3/4” between the top of its mounting studs and the top of the bell housing. One thing to watch out for is the mechanical diode or one way clutch- it is the only piece that can be put in backwards and, since it spins freely one way and locks the other, I’m assuming it would do some serious damage if put in wrong. To check it if you took it off or it fell off on its own, it should spin counterclockwise and lock clockwise when looking at the back of the drum where it sits. Also, the bearings are very thin and fairly lightweight so they have a tendency to stick to whatever component was riding on them because of thin layers of transmission fluid. Keep track of these bearings and where they came from as they get virtually no wear and can be reused.
Ok, this post is incredibly long but I’m still sure I glossed over something. I’m more than happy to answer any questions I have the knowledge to answer and happy automatic transmission rebuilding!
#2
12-11-2012, 09:11 PM

Member
Join Date: Dec 2009
Location: Hill Country, TX
Posts: 95
Likes: 0
Received 0 Likes
on
0 Posts
#3
12-11-2012, 10:37 PM


#5
12-12-2012, 02:20 PM
Join Date: Dec 2008
Location: Los Angeles
Posts: 15
Likes: 0
Received 0 Likes
on
0 Posts

#7
12-21-2012, 11:26 PM

Trending Topics
#8
12-22-2012, 04:15 AM
Senior Member
Join Date: Oct 2003
Location: Sparta, IL
Posts: 1,017
Likes: 0
Received 0 Likes
on
0 Posts

#9
12-22-2012, 02:37 PM

Senior Member
Join Date: Nov 2007
Location: STC, MN
Posts: 227
Likes: 0
Received 0 Likes
on
0 Posts
since it wasnt mentioned in your post op, and i dont want to watch those videos.
ait test all clutch packs, then assemble, then air test at the valve body when its assemebled. i work at a trans shop. did you measure the clutch pack clearances? go though the valvebody to make sure valve werent sticking? check for end play to make sure everything is seated properly? flush the cooler out so all the stuff from the burned up trans wont wreak this one?
ait test all clutch packs, then assemble, then air test at the valve body when its assemebled. i work at a trans shop. did you measure the clutch pack clearances? go though the valvebody to make sure valve werent sticking? check for end play to make sure everything is seated properly? flush the cooler out so all the stuff from the burned up trans wont wreak this one?
#10
12-22-2012, 05:01 PM

Senior Member
#12
12-23-2012, 11:09 PM

I love working on autos, they are so interesting. Manuals are boring and a toddler could fix one if need be.
Transmission with fluid is roughly 130-190lbs maybe? I've always been able to pick it up by myself or at least slide it around on cardboard no problem. They are more awkward then heavy.
Transmission with fluid is roughly 130-190lbs maybe? I've always been able to pick it up by myself or at least slide it around on cardboard no problem. They are more awkward then heavy.
#13
12-24-2012, 11:39 AM
Join Date: Dec 2008
Location: Los Angeles
Posts: 15
Likes: 0
Received 0 Likes
on
0 Posts
My truck is also an '06 FX4 so I can confirm that you have the 4R75W; it's nearly identical to the 4R70W's used in earlier F150's.
I have the Haynes manual for this truck and it outlines the steps involved with pulling the trans- there's not a lot of detail given but it's all pretty easy to figure out once you get under there.
#14
12-24-2012, 11:43 AM
Join Date: Dec 2008
Location: Los Angeles
Posts: 15
Likes: 0
Received 0 Likes
on
0 Posts
since it wasnt mentioned in your post op, and i dont want to watch those videos.
ait test all clutch packs, then assemble, then air test at the valve body when its assemebled. i work at a trans shop. did you measure the clutch pack clearances? go though the valvebody to make sure valve werent sticking? check for end play to make sure everything is seated properly? flush the cooler out so all the stuff from the burned up trans wont wreak this one?
ait test all clutch packs, then assemble, then air test at the valve body when its assemebled. i work at a trans shop. did you measure the clutch pack clearances? go though the valvebody to make sure valve werent sticking? check for end play to make sure everything is seated properly? flush the cooler out so all the stuff from the burned up trans wont wreak this one?
#15
06-20-2014, 01:04 AM

Thanks for the write-up, it helped give me the courage to rebuild my 4R75E. It's been about 2 weeks and I've driven hundreds of miles and it works perfectly. Minus tools that I had to buy, like a floor jack, transmission jack, jack stands, etc, this job cost me $785. That includes an internal "hard part" that you didn't replace called a forward clutch cylinder for $100. That was the cause of my failure, it cracked, which is a common problem with these transmissions.
Again, thanks! This was a fun project with a huge sense of accomplishment at the end.
Again, thanks! This was a fun project with a huge sense of accomplishment at the end.
