Lowering kits
#1
 05-24-2005, 08:32 PM


Join Date: Apr 2005
Location: Vancouver, BC
Posts: 103
Likes: 0
Received 0 Likes
on
0 Posts
Has anyone ever used a Suspension Max lowering kit? I see them on E-bay cheap. I have a SuperCrew and I'd like to go to a 3f 4r drop. I have used Eibach before on my Supercoupe and was happy but wondered about the 'other' companies out there. Has anyone done a 3" drop on the front with springs only? How is the ride? I was considering the control arm method but wasn't sure if that was worth the cost. Oh yea, some guys say to change the shocks and others say the stock ones work fine... Anybody have any good info on the subject? Many thanks!
#2
05-25-2005, 12:08 AM

Senior Member
As far as suspension mods......I have installed a larger Helwigg front swaybar ( with urethane bushing end links), added rear Helwigg swaybar (with urethane bushing end links), DJM 3/4 lowering kit, 2 sets of low profile tires (Kumo then Toyo), Checker Pro hard bed cover, Energy Suspension front control arm urethane bushings, Moog inner and outter tie rods, center link, idler arm, pitman arm, 2 replacement steering gear boxes including 03' re-valved Lightning box and multiple tension adjustments, 1 steering gear lower shaft/coupler and 1 upper/lower shaft/ coupler combo, power steering pump, steering gear box hydr. hose, replaced upper and lower control arms and all ball joints, 3 sets of front lowering coil springs (DJM, Spring Tech and mine-best but harsh), Rancho steering stabilizer (no steering improvement and slow steering) , 3 sets of front and rear shocks (DJM, Bilstine, Doschtec), 2 rear add-a-leafs per side (far too harsh and no steering change), clamps on original rear leafs, replaced rear 3 leaf packs for 4 leaf packs, replaced front wheel bearings, and 4 or 5 alignments (this list does not include replacing normal wear parts). I did all of the work myself, except for the alignments and bought most of the parts used. Having stated all that....
Yes, I have their 3 inch lowering front coil springs right now. I hate them. Too soft and bouncy. However, if you liked Eibachs progressive rate springs, you might like them, since Eibachs are soft. I think the best are BellTechs.
Yes, I have tried several types of front coil and shock lowerings and installed other types on another F150. Ride is bumpy. Much more control, but bumpy. I should have got Belltech lowering springs and BellTech Nitro Active shocks or Edelbrock shocks.
The control arm method prevents bumpsteer and reduces the bumpy ride. But only get Western Chassis or DJM and its expensive. I am waiting for Belltech to release their lowering spindles and I am going to try those with their springs.
Stock shocks will work for several months max. then fail. Also, install a front upper control arm camber kit and avoid removing the rear hanger rivets yourself if possible.
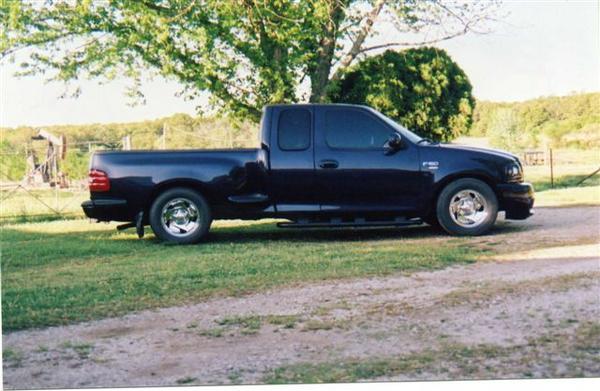
My 3/4 lowering
More photos at https://www.f150online.com/galleries....cfm?gnum=5792
Yes, I have their 3 inch lowering front coil springs right now. I hate them. Too soft and bouncy. However, if you liked Eibachs progressive rate springs, you might like them, since Eibachs are soft. I think the best are BellTechs.
Yes, I have tried several types of front coil and shock lowerings and installed other types on another F150. Ride is bumpy. Much more control, but bumpy. I should have got Belltech lowering springs and BellTech Nitro Active shocks or Edelbrock shocks.
The control arm method prevents bumpsteer and reduces the bumpy ride. But only get Western Chassis or DJM and its expensive. I am waiting for Belltech to release their lowering spindles and I am going to try those with their springs.
Stock shocks will work for several months max. then fail. Also, install a front upper control arm camber kit and avoid removing the rear hanger rivets yourself if possible.
My 3/4 lowering
More photos at https://www.f150online.com/galleries....cfm?gnum=5792
Last edited by iron horse; 05-25-2005 at 04:34 PM.
#3
05-27-2005, 07:42 PM

Member
Join Date: May 2005
Location: Ann Arbor, MI
Posts: 15
Likes: 0
Received 0 Likes
on
0 Posts
When it comes to lowering, you get what you pay for. That said, don't be cheap. BellTech, DJM, Western Chassis, or Ground Force are the way to go. I've had my GF 2/4 kit on for 3 years, and never had a single problem with the hardware. Control arms/spindles are a MUST if you want to keep your ride quality. I'd go BellTech Nitro or Toxic for shocks.
If you're doing it yourself:
I've got 30 hours of labor wrapped up into the rear hanger rivets! Reason being, I didn't have a hoist to work on the truck, nor any welding equipment to remove the rivets. If you don't have that, pay someone else to do it! I had to use an air chisel and 1/2" drill bit to do the work. You REALLY don't want to do that, trust me!
If you're doing it yourself:
avoid removing the rear hanger rivets yourself if possible
Last edited by KC8NIY; 05-27-2005 at 07:51 PM.
#4
05-28-2005, 11:12 AM
Join Date: Apr 2005
Location: Vancouver, BC
Posts: 103
Likes: 0
Received 0 Likes
on
0 Posts
Got WC control arms
Thanks a lot for your opinions. Your truck looks great!
I went with a Western Chassis 4" drop kit (lower control arms and springs) but haven't installed it yet. (bought it used) I want to go with only a 4" drop in the back and I'm guessing that the whole 4" drop on the front would be too much and would look too jacked up on the back. Any thoughts? Maybe I'll use the stock springs with the WC Control Arms?? So Doetsch Tech shocks are worthwhile?
I will definitely get someone else to do the shackles after reading your replies!
Thank you.
#5
05-28-2005, 02:58 PM
Senior Member
Thanks and your welcome.
The rear 2 inch lowering shackles are easy to install. It is the rear hangers that are very difficult to remove. Each hanger is mounted to the frame by four huge rivets for a total of 8 rivets to remove. I have lowered two F150s for a total of 16 rivets.
I did not have air tools at the time. I figured out a system that allowed my to knock them out. I used a grinder to grind them flat to the frame. I was not worried about trying to save my stock hangers. Then within 10 seconds of grinding on them, I used a socket held by visegrips as a center punch and knocked them out with a shorthandled large sledge hammer (not much room to get a good swing under fenders). If I waited more than 10 seconds, I could beat on the rivet for an hour and not remove it! The key for me was, having the rivet VERY hot. Then it just popped out after 3 to 7 hits. If it cooled down, I just grinded on it some more to heat it up, then hurry and hit it.
But, I made sure the truck jack AND jackstands were secure, since I was hitting on the rivets and shaking the whole truck. I was also very careful heating up the rivets, since the driver side hanger is so close to the FUEL TANK!
If I lower another truck, and need 3 inchs or more of lowering, I am using an impact chisel/hammer on the rivets or choose lowering leafsprings (do not remove hangers).
#6
05-28-2005, 10:10 PM
Member
Join Date: May 2005
Location: Ann Arbor, MI
Posts: 15
Likes: 0
Received 0 Likes
on
0 Posts
Originally Posted by iron horse
If I lower another truck, and need 3 inchs or more of lowering, I am using an impact chisel/hammer on the rivets or choose lowering leafsprings (do not remove hangers).
Regardless of the method, I think it can pretty much be summed up that you have to get those rivets HOT before you stand a chance of popping them out.
What a PITA!!
Good tips IH
#7
05-28-2005, 11:42 PM

Member
Join Date: Aug 2004
Location: Las Vegas
Posts: 31
Likes: 0
Received 0 Likes
on
0 Posts
Trending Topics
#8
05-29-2005, 12:23 AM
Senior Member
#9
05-29-2005, 01:26 AM
Senior Member
Originally Posted by xnewyorker
Iron Horse how do you replace the rear 2 inch lowering shackles, just ordered some and want to know just how long this install is going to take me. 
TIA
Otis
TIA
Otis
Also remember that, if you have a rearsway bar, unscrew the nuts holding the endlinks to the frame bracket before you begin. You are trying to jack the rear of the truck up to release tension off the axle/leafsprings. If the swaybar is bolted down, you may not get enough frame from rear axle seperation to release the tension.
You want the rearaxle to "hang" with the tires slightly off the ground. This releases tension on leafsprings, thereby releasing tension on shackle bolts. Then remove and replace shackles.
It takes a 13/16 socket to remove the shackle bolts. You do not need a backup wrench. The bolt heads have an ear that catches and allows the nut to be loosened or tightened. Because of the postion, I remove the lower shackle to bracket bolt first, then the top shackle to leafspring one. You may have to move the leafspring a little to slide the top bolt out. With no tension, no big deal. Tension and its hard to do.
The hole closest to the end, is the 2 inch lowering hole. The hole next to it is the 1 inch lowering hole (there may be other holes on some brands but forget them). The DJM versions have nice bushings, but the Belltech versions look more durable.
The key to an easy install is, the frame needs to be up with wheels or wheel hubs off the ground enough to release the tension on the rear axle leafsprings.
The first time I did it, I still had tension on the leafsprings (did not unbolt swaybar end links) and it took me 2 exhaustive hours to do one side! After doing it about about 12 times, my simple and dangerous method takes me 30 min. max. to do both sides. The correct and safer, not-get-smashed-like-a-bug-and-not-damage-truck-method will take you about an hour.

Last edited by iron horse; 05-29-2005 at 01:47 AM.
#10
06-01-2005, 08:56 PM

Member
Join Date: Jun 2005
Location: San Antonio
Posts: 16
Likes: 0
Received 0 Likes
on
0 Posts
hi. newbie here. was wonderin if all I needed to lower my F 150 was the shackles and hanger and front springs. Do I need any kind of "bushings" or "hardware"? The belltech front springs I'm looking at say "no bushings included". Do I really need any thing else, like shocks etc.?
Also what should I expect to pay for labor for this, anyone have a rough guess? Thanks for any help.
Also what should I expect to pay for labor for this, anyone have a rough guess? Thanks for any help.
#11
06-01-2005, 11:53 PM
Senior Member
For a typical spring/hanger/shackle 3/4 inch lowering you need:
In the Front:
front lowering coil springs
camber kit for upper control arms
Sooner than later, will need lowering shocks
May or may not need shorter BUSHING for front swaybar endlinks
May or may not need to reduce or replace bumpstop
In the Rear:
2 inch lowering hanger (very difficult to do)
1-2 inch lowering shackle
4 or 6 degree pinion shim
Sooner than later, will need lowering shocks
May or may not need shorter BUSHING for rear aftermarket swaybar endlinks
May or may not need to reduce or replace bumpstop.
You will need to get an alignment after installing lowering kit or you can destroy the tire tread within several hundred miles.
Alternatives:
Front lowering control arms for even more lowering OR the same lowering but with reduced bumpsteer, smoother ride and better tire wear.
Rear lowering leafspring packs for same lowering but does not require the replacement of the hangers. Very easy to install compared to hangers, but will reduce payload.
Can go lower in the rear, but requires a "C" notch in frame and a "flipkit"
Can also use airbags for lowering as well.
Pending:
Belltech is suppose to release lowering front spindles for our F150s! I plan on getting these.
Most importantly, be safe and make sure the truck is secure before working under it!!!!!!! Good luck!
Last edited by iron horse; 06-03-2005 at 12:23 AM.
#12
06-02-2005, 09:39 PM
Member
Join Date: Jun 2005
Location: San Antonio
Posts: 16
Likes: 0
Received 0 Likes
on
0 Posts
#13
06-03-2005, 12:21 AM
Senior Member
Camber kit is a bolt and offset washer kit that you replace your existing upper control arm bolts/washer with. It allows you to put more camber or caster in your wheel alignment after installing shorter coil springs. When you install shorter coil springs your steering geometry and alignment settings are changed. The alignment after the lowering is to bring your alignment settings (camber, caster, toe, etc.) back into specs. You can install it yourself. It will save you $40 or $50 bucks in labor. OR you can have them installed when you get your alignment.
Lowering shocks are shorter in overall lenght, but the main reason is the valving action of the shock. The lowering shock valving action works in the height range of the lowered vehicle. Your stock shocks are not designed to work in the lower valving action height and the stress causes the shock to fail within weeks or several months max.
Lowering shocks are shorter in overall lenght, but the main reason is the valving action of the shock. The lowering shock valving action works in the height range of the lowered vehicle. Your stock shocks are not designed to work in the lower valving action height and the stress causes the shock to fail within weeks or several months max.
#14
06-05-2005, 02:17 AM
Senior Member
Originally Posted by Johnny340
I want to go with only a 4" drop in the back and I'm guessing that the whole 4" drop on the front would be too much and would look too jacked up on the back. Any thoughts? Maybe I'll use the stock springs with the WC Control Arms?? So Doetsch Tech shocks are worthwhile?
I will definitely get someone else to do the shackles after reading your replies!
Thank you.
I will definitely get someone else to do the shackles after reading your replies!
Thank you.
Yeah a 4/4 drop would give the appearance of a lot of rake in back (jacked up). The WC control arms themselves provide a 2 inch lowering and if you use 2 inch lowering springs, you get the 4 inch lowering.
You could use the WC control arms and 1 inch lowering springs for a 3 inch drop in front and go 4 in the back. This will give a very slight rake in back (if rear leafs are not worn).
If you want a level lowering, you could use the WC control arms with stock height springs for a 2/4 drop.
I do not like the Doetsch Tech shocks. They are far too harsh, at least they are too harsh with a soft spring like Suspension Max's Spring Tech coil springs.
Remember, the Western Chassis (WC) control arms are only the lower control arms, but they are the best built. The DJM control arms include the top and lower control arms.
....and of course as stated previously, the shackles are easy, it is the hangers that are insane.
Good luck!
Last edited by iron horse; 06-05-2005 at 02:21 AM.
#15
06-08-2005, 09:00 PM
Join Date: Apr 2005
Location: Vancouver, BC
Posts: 103
Likes: 0
Received 0 Likes
on
0 Posts
3" drop up front...
Thanks for the info Ironhorse. I have a Bell Tech kit ready to install for the rear which will give a 4" drop. My dilemma is the front now. I have the WC control arms (2") and their springs (2") (still in boxes) but as you mention, I don't want to go 4"/4". I like the look of 3"/4" but my options with what I currently have are either 2" or 4" up front. What do you recommend for a 3" drop up front:
1. WC control arms and WC springs with some kind of 1" spacer or 1" coil??
2. WC control arms and the stock springs with part of a coil cut off. How much cut off?
Thanks in advance for your well thought out replies. I'm hoping to have my plan finalized for installation on Friday.
1. WC control arms and WC springs with some kind of 1" spacer or 1" coil??
2. WC control arms and the stock springs with part of a coil cut off. How much cut off?
Thanks in advance for your well thought out replies. I'm hoping to have my plan finalized for installation on Friday.