
How to change SuperCrew black door moulding.
#1
 08-18-2003, 01:44 PM


After doing battle with a Hail Storm, the SCREW needed a few parts replaced. Besides the hood and roof, the black door trim got dented up pretty good on all four doors, although barely visible in the picture.
I searched through the e-maintenance manual, but it didn't list any procedures on how to remove the 5 trim peices as show in the below picture.
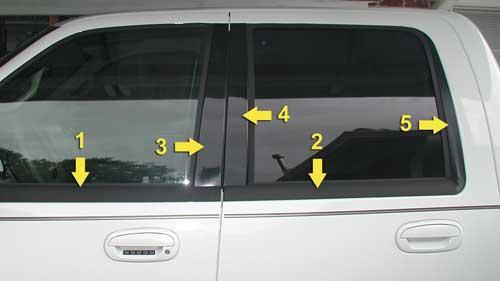
The part numbers are as follows:
#1
LH front outer belt moulding YL3Z1621453AA $27
RH front outer belt moulding YL3Z1621452AA $27
#2
LH rear outer belt moulding YL3Z1625597AA $31
RH rear outer belt moulding YL3Z1625596AA $31
#3
L FRT Door Rear Garnish Moulding 1L1Z7820983AA $40
R FRT Door Rear Garnish Moulding 1L1Z7820982AA $40
#4
L Rear Door Garnish Moulding YL1Z78290A67AA $35
R Rear Door Garnish Moulding YL1Z78290A66AA $35
#5
R Rear Door Rear Window Moulding YL3Z16254A04AA $33
Left Front Door Removal Moulding Removal:
Lower the door window all the way down. The front belt moulding (#1) has one plastic retainer, appx 4 inches from the aft edge of the door. This retainer pops straight up. I used a trim removal tool (a VERY flat head screw driver) to pop it up. I placed some protective tape on the tool prior to prying the trim piece up. Next pull the rubber window seal out of the track in the upper aft track exposing the leading edge of the garnish moulding (#3) . The garnish moulding has two pop rivets securing it to the door. You will need to drill those out. I used a 3/16th drill bit and carefully drilled the rivets out. After the moulding is removed simply slide the new garnish moulding on, aligning the top with the top of the garnish moulding on the rear door. Insert pop rivets in the upper and lower holes. Re-seat the window seal. Install the lower belt moulding, popping the retainer into the whole. Appx time - 10 minutes.
The other three doors can be done using the same basic procedures listed above. The rear door window moulding (#5) just simply pops outward after the belt moulding has been removed, no rivets used on this peice.
I searched through the e-maintenance manual, but it didn't list any procedures on how to remove the 5 trim peices as show in the below picture.
The part numbers are as follows:
#1
LH front outer belt moulding YL3Z1621453AA $27
RH front outer belt moulding YL3Z1621452AA $27
#2
LH rear outer belt moulding YL3Z1625597AA $31
RH rear outer belt moulding YL3Z1625596AA $31
#3
L FRT Door Rear Garnish Moulding 1L1Z7820983AA $40
R FRT Door Rear Garnish Moulding 1L1Z7820982AA $40
#4
L Rear Door Garnish Moulding YL1Z78290A67AA $35
R Rear Door Garnish Moulding YL1Z78290A66AA $35
#5
R Rear Door Rear Window Moulding YL3Z16254A04AA $33
Left Front Door Removal Moulding Removal:
Lower the door window all the way down. The front belt moulding (#1) has one plastic retainer, appx 4 inches from the aft edge of the door. This retainer pops straight up. I used a trim removal tool (a VERY flat head screw driver) to pop it up. I placed some protective tape on the tool prior to prying the trim piece up. Next pull the rubber window seal out of the track in the upper aft track exposing the leading edge of the garnish moulding (#3) . The garnish moulding has two pop rivets securing it to the door. You will need to drill those out. I used a 3/16th drill bit and carefully drilled the rivets out. After the moulding is removed simply slide the new garnish moulding on, aligning the top with the top of the garnish moulding on the rear door. Insert pop rivets in the upper and lower holes. Re-seat the window seal. Install the lower belt moulding, popping the retainer into the whole. Appx time - 10 minutes.
The other three doors can be done using the same basic procedures listed above. The rear door window moulding (#5) just simply pops outward after the belt moulding has been removed, no rivets used on this peice.
Last edited by H13; 08-18-2003 at 01:51 PM.

#3
08-18-2003, 03:23 PM

#4
08-18-2003, 10:27 PM

Senior Member
Join Date: Apr 2001
Location: Anderson. South Carolina, CSA
Posts: 682
Likes: 0
Received 0 Likes
on
0 Posts
Did you consider replacing the black belt molding with the chrome molding like the Lincoln BlackWood?
I have been thinking about doing that myself....but have done no researching to see if it is possible. if I do it, it will be down the road , so I haven't invested the time into that project yet.
I would bet that the Lincoln belt molding would be exactly the same in dimension and fastening.
Just a thought.
#5
08-18-2003, 10:42 PM
RebelYell
I never though about that until after I had already purchsed the replacements. However, I think they do look good on some SCREW's, just not mine, as I have less chrome than others.
Below is a picture of "BigDeal's" SCREW

Email him for hints and part numbers.
Link to related thread
BigDeal's email
I never though about that until after I had already purchsed the replacements. However, I think they do look good on some SCREW's, just not mine, as I have less chrome than others.
Below is a picture of "BigDeal's" SCREW
Email him for hints and part numbers.
Link to related thread
BigDeal's email
Last edited by H13; 08-18-2003 at 11:00 PM.
The following users liked this post:
#6
08-20-2003, 09:43 AM
Senior Member
Join Date: Apr 2001
Location: Anderson. South Carolina, CSA
Posts: 682
Likes: 0
Received 0 Likes
on
0 Posts
Thanks for the reply, H13.
I understand what you are saying. Adding chrome sometimes doesn't look good on some trucks.
I will bookmark the links you provided for later when/if I decide to do this mod. My available cash/time is being used for another project at the moment, so this truck mod is going to be on the back burner for now.
Thanks for the help
#7
09-12-2012, 07:05 PM

Trending Topics
#8
05-29-2013, 02:31 PM

H13,
Recent hail storm here in Jackson, Ms and I need these pieces. Where did you find such good prices?
The part numbers are as follows:
#1
LH front outer belt moulding YL3Z1621453AA $27
RH front outer belt moulding YL3Z1621452AA $27
#2
LH rear outer belt moulding YL3Z1625597AA $31
RH rear outer belt moulding YL3Z1625596AA $31
#3
L FRT Door Rear Garnish Moulding 1L1Z7820983AA $40
R FRT Door Rear Garnish Moulding 1L1Z7820982AA $40
#4
L Rear Door Garnish Moulding YL1Z78290A67AA $35
R Rear Door Garnish Moulding YL1Z78290A66AA $35
#5
R Rear Door Rear Window Moulding YL3Z16254A04AA $33

#10
02-10-2014, 10:11 AM

