My new "SS cat back install" '07 F-side .....
#1
 04-30-2016, 08:25 PM


My new "SS cat back install" '07 F-side .....
Background .... I bought the truck in August 2009, it already had a few minor mods including a near new shop bent cat back someone did using aluminized tubing that was a mix of oem 2.5" & cobbled on 2.25" in front and 2.25" OD for both rears. Muffler was a Flowmaster SI / DO, maybe 14" long .... and while I did like the tone of a FM, I did not like the loudness or drone so a couple days later I was at my muffler guy's shop. He priced out a new quieter muffler and then told me a cheaper bet since all was near new, was to add a glass pack ahead of the FM. I added a 28" long 2.5" core Cherry Bomb that night and it was OK.
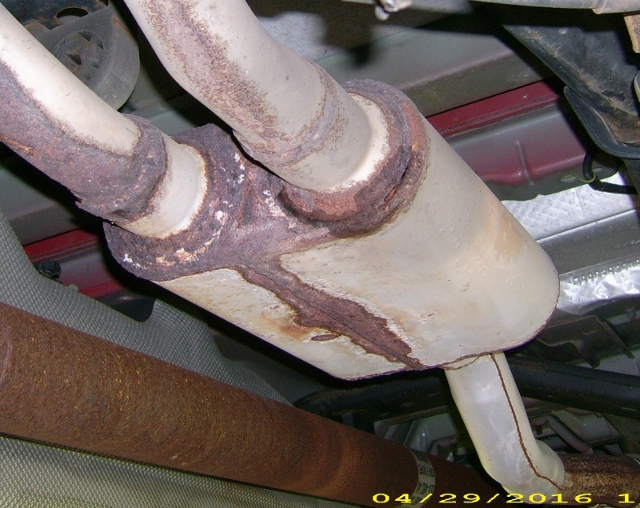
Well, recently I was under the truck looking as I heard a PFT_PFT_PFT noise. Found a hole in the rusty now FM at a seam, I knew it was a matter of time.
I posted about it:
https://www.f150online.com/forums/20...e-muffler.html.
Well, last week I ordered a whole new Stainless Steel Cat Back system. It arrived yesterday morning. It's marketed by "Legato Performance" and it seams to be a new line they are venturing into? I knew I was taking a chance, but the savings were good and from what I could see, browsing the net .... I took the chance.
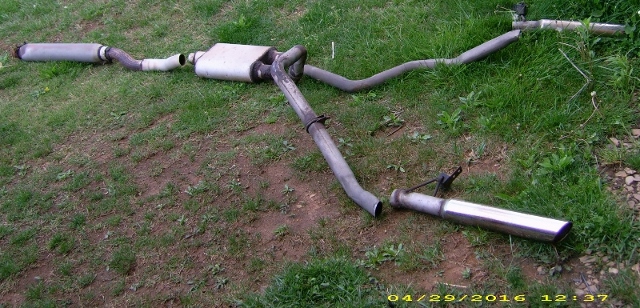
On swap day, once I had it cut apart and looking at it laying on the ground, I thought "what a mess" ..... could not believe this mess was under my truck the last 6 years!
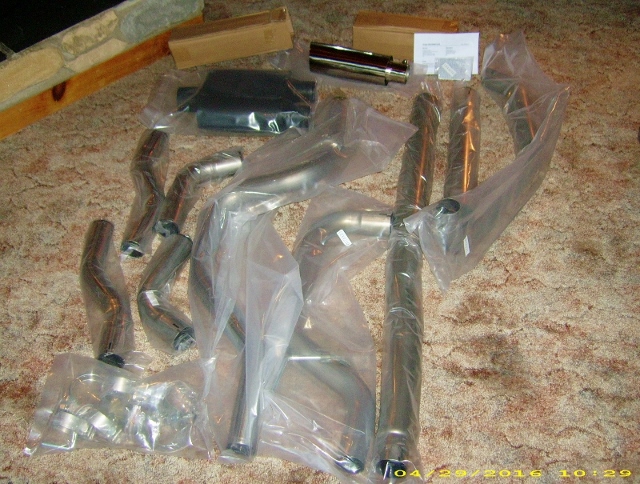
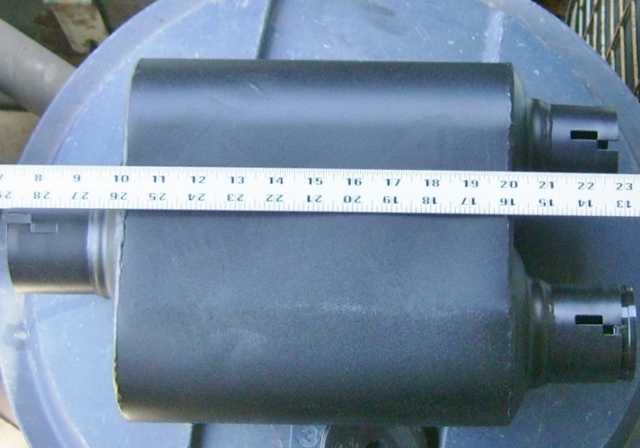
Everything arrived in one big box, the muffler is similar to what was on the truck but it's a couple inches shorter and when weighed, it's maybe a pound heavier. We are talking near 9 pounds each. All pipe ends and those of the muffler had plastic plugs in them and everything was bagged. Included were 6 2.5" clamps, 2 3.0" clamps, 3.0" OD head pipe swaged down to 2.5" ID at one end for mating at OEM Y pipe, a headpipe extension, a 2 part left side tail and 1 piece right side tail pipe of 2.5" OD, instructions, lifetime warranty, extra hanger for left rear.
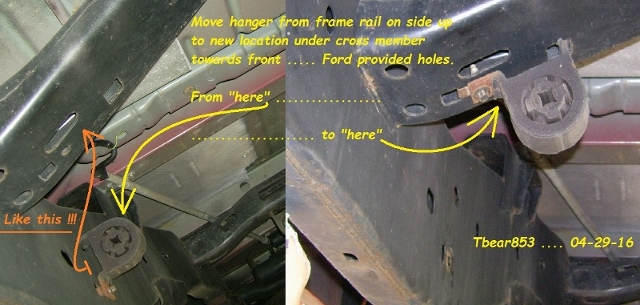
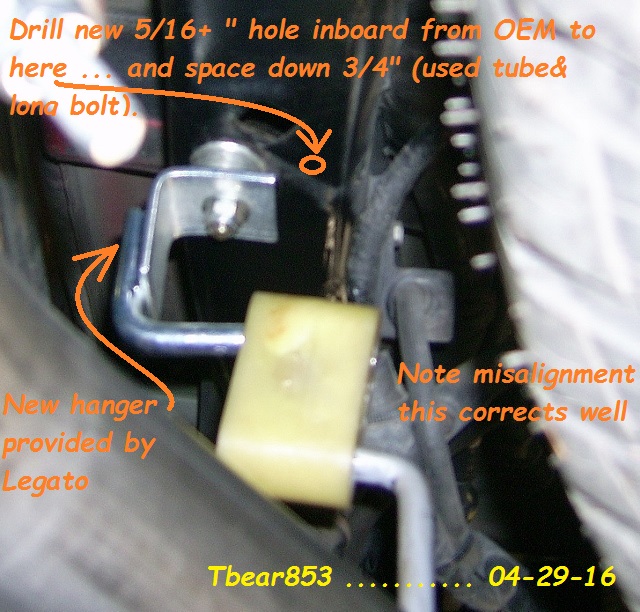
Once I had the old system off the truck, instructions said to move one factory hanger. When whomever did the old system they used their own hangers ..... but thankfully they left the OEM ones in place.
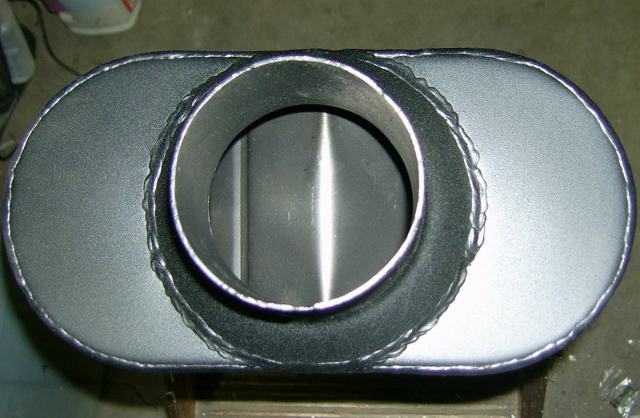
New muffler from rear looking inwards:
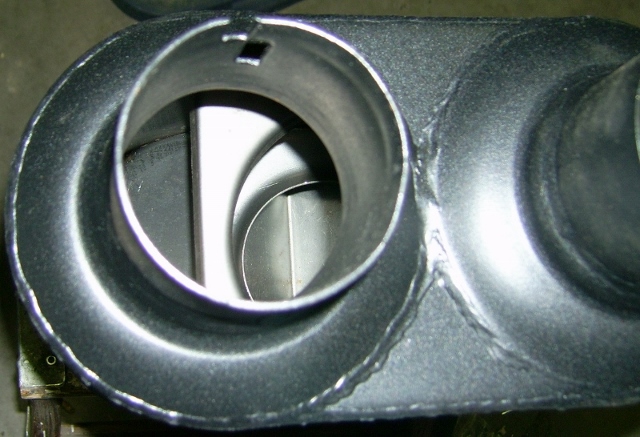
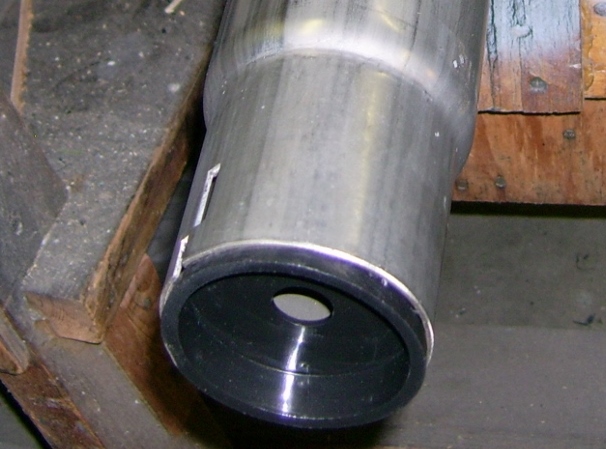
New muffler looking in "inlet":
As I installed parts and worked on alignments, I found it a great tool to take a sharpie and mark the ends of each pipe where it goes into another or the muffler about 3" or 4" from end so that you can tell how far you have it inserted into the other without pulling it back out. A little thinner or 2plus2 will wipe it off.
I do need to drop that spare and clean and paint the wheel I see .......
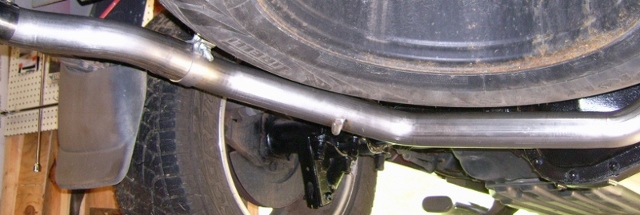
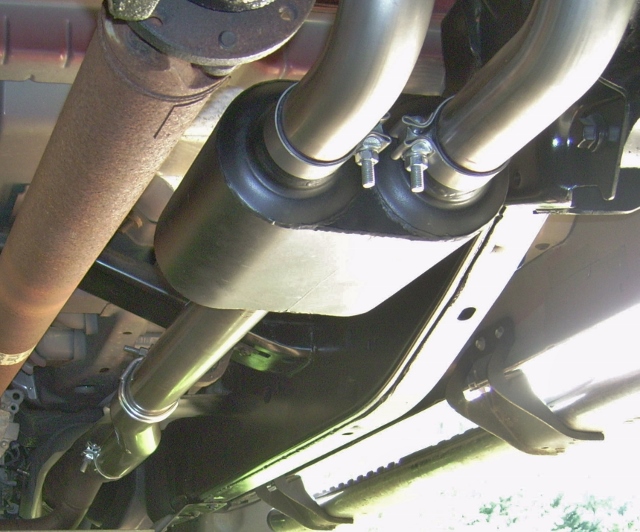
You can see the left rear pipe is routed over the axle alongside the right rear pipe and then turns in it's second part to go around the spare. There is room to get the rear axle cover off by taking it to the right if need arrises ... or one can loosen a couple clamps and move the pipe. It does not hang down below the spare much as it seams from this angle.
I did find that the below modification to instructions provided helped line up my tips better and get's that isolator all the way on both stubs.
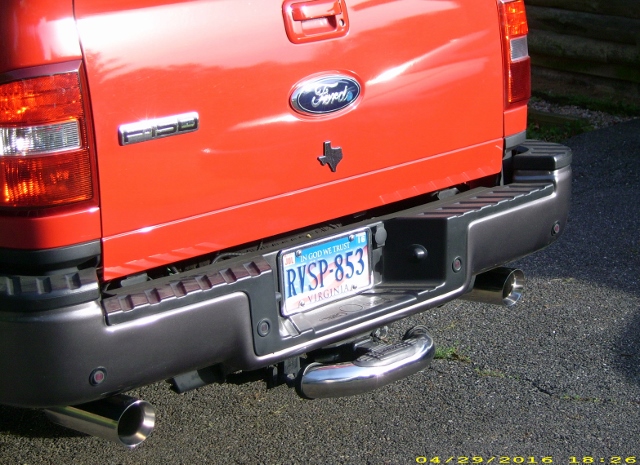
When I went to put the included 4" OD polished stainless steel tips on (double walled, about 3" ID except at rear where they clamp on to the 2.5" OD pipes) .... after choosing the straight back look (they also include turn out pieces so tips can be aimed out to side if you like .... but I used the end s to do a gentle "S" to aim the tips rearwards .... as you can see in picture) ..... I thought about the very small bolts used to tighten them up. They do the job .... but instructions mention a spot weld to prevent unintended loss. I don't weld stainless ..... but I have a air operated pop riveter and 3/16" stainless steel pop rivets. They can be removed easy enough but they will prevent loss.
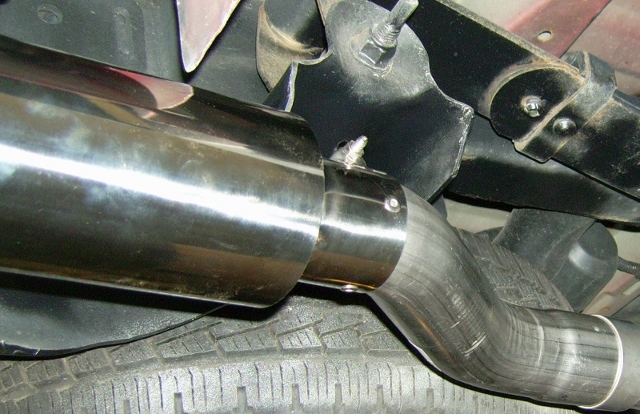
Pardon the hand / palm / smudges .... the tips really have a nice finish.
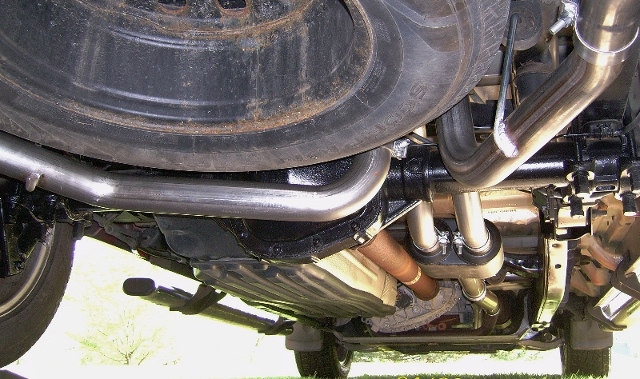
I played a lot with the head pipe in front of the muffler. I did not need to cut it or add the extension provided for different wheel base trucks .... but I wasn't sure about that "dog leg". It is a full 3" OD whole length except very end where it clamps to OEM "Y".
Over a period of some time, trying it out with muffler and tail pipes for affect on the truck, watching those "Sharpie" marks, I finally settled on that dog leg angled to about 10:00 o'clock from front when you look towards the front of the truck. I even used a angle grinder and cut a gentle notch on my final position that engages the little lock tab on the factory Y pipe outlet to index it so it would stay put as I wrestled with muffler and tail pipes without final tightening of clamps.
Well, recently I was under the truck looking as I heard a PFT_PFT_PFT noise. Found a hole in the rusty now FM at a seam, I knew it was a matter of time.
I posted about it:
https://www.f150online.com/forums/20...e-muffler.html.
Well, last week I ordered a whole new Stainless Steel Cat Back system. It arrived yesterday morning. It's marketed by "Legato Performance" and it seams to be a new line they are venturing into? I knew I was taking a chance, but the savings were good and from what I could see, browsing the net .... I took the chance.
On swap day, once I had it cut apart and looking at it laying on the ground, I thought "what a mess" ..... could not believe this mess was under my truck the last 6 years!
Everything arrived in one big box, the muffler is similar to what was on the truck but it's a couple inches shorter and when weighed, it's maybe a pound heavier. We are talking near 9 pounds each. All pipe ends and those of the muffler had plastic plugs in them and everything was bagged. Included were 6 2.5" clamps, 2 3.0" clamps, 3.0" OD head pipe swaged down to 2.5" ID at one end for mating at OEM Y pipe, a headpipe extension, a 2 part left side tail and 1 piece right side tail pipe of 2.5" OD, instructions, lifetime warranty, extra hanger for left rear.
Once I had the old system off the truck, instructions said to move one factory hanger. When whomever did the old system they used their own hangers ..... but thankfully they left the OEM ones in place.
New muffler from rear looking inwards:
New muffler looking in "inlet":
As I installed parts and worked on alignments, I found it a great tool to take a sharpie and mark the ends of each pipe where it goes into another or the muffler about 3" or 4" from end so that you can tell how far you have it inserted into the other without pulling it back out. A little thinner or 2plus2 will wipe it off.
I do need to drop that spare and clean and paint the wheel I see .......
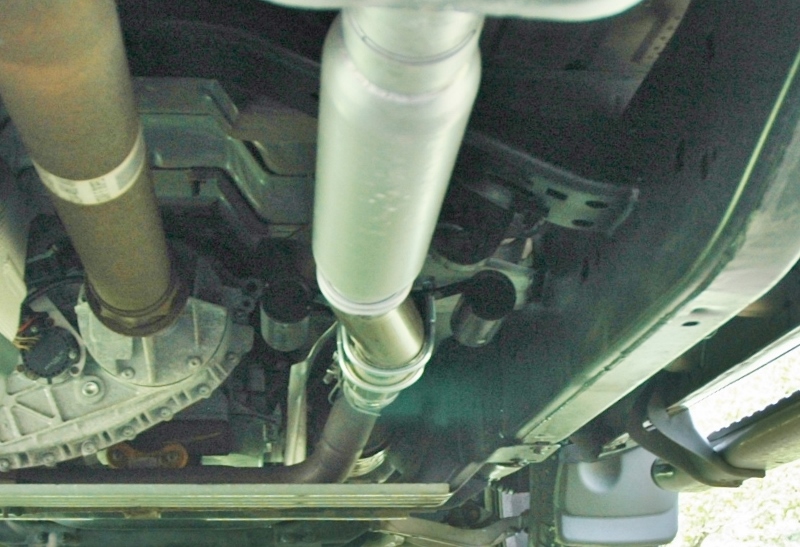
You can see the left rear pipe is routed over the axle alongside the right rear pipe and then turns in it's second part to go around the spare. There is room to get the rear axle cover off by taking it to the right if need arrises ... or one can loosen a couple clamps and move the pipe. It does not hang down below the spare much as it seams from this angle.
I did find that the below modification to instructions provided helped line up my tips better and get's that isolator all the way on both stubs.
When I went to put the included 4" OD polished stainless steel tips on (double walled, about 3" ID except at rear where they clamp on to the 2.5" OD pipes) .... after choosing the straight back look (they also include turn out pieces so tips can be aimed out to side if you like .... but I used the end s to do a gentle "S" to aim the tips rearwards .... as you can see in picture) ..... I thought about the very small bolts used to tighten them up. They do the job .... but instructions mention a spot weld to prevent unintended loss. I don't weld stainless ..... but I have a air operated pop riveter and 3/16" stainless steel pop rivets. They can be removed easy enough but they will prevent loss.
Pardon the hand / palm / smudges .... the tips really have a nice finish.
I played a lot with the head pipe in front of the muffler. I did not need to cut it or add the extension provided for different wheel base trucks .... but I wasn't sure about that "dog leg". It is a full 3" OD whole length except very end where it clamps to OEM "Y".
Over a period of some time, trying it out with muffler and tail pipes for affect on the truck, watching those "Sharpie" marks, I finally settled on that dog leg angled to about 10:00 o'clock from front when you look towards the front of the truck. I even used a angle grinder and cut a gentle notch on my final position that engages the little lock tab on the factory Y pipe outlet to index it so it would stay put as I wrestled with muffler and tail pipes without final tightening of clamps.
Last edited by tbear853; 05-27-2016 at 10:12 AM.
#2
04-30-2016, 08:54 PM
So .... to continue ..... seeing as the new muffler was a couple inches or so shorter than the old one, I was concerned as to noise. I do not want a loud, obnoxious, "in your face" noise maker. I hear them and I don't like them. I like a nice tone, a low rumble, but a lot of what I hear at car shows, cruise ins, etc .... is just loud crap. As I said elsewhere .... this muffler is shorter, but it's as heavy, even a little heavier than the old FM (I hung them both on a scale, the new SS one is a couple pounds heavier? Is stainless heavier?).
It was a pleasant surprise when I started the truck the first time afterwards then. We took it to supper last night, at highway speed it seems a little quieter than the FM alone was and the only a bit of drone at about 1700-1800 rpm in 2nd or 3rd light cruise. Shift up or down, it goes away. Get it to 1900 and it's "better". I can even just "let off" and it goes away. (Sadly, 1700-1800 is my "cruise" RPM in OD on I-81 ..... so I added a 25" long glass pack ..... scroll down to last post)
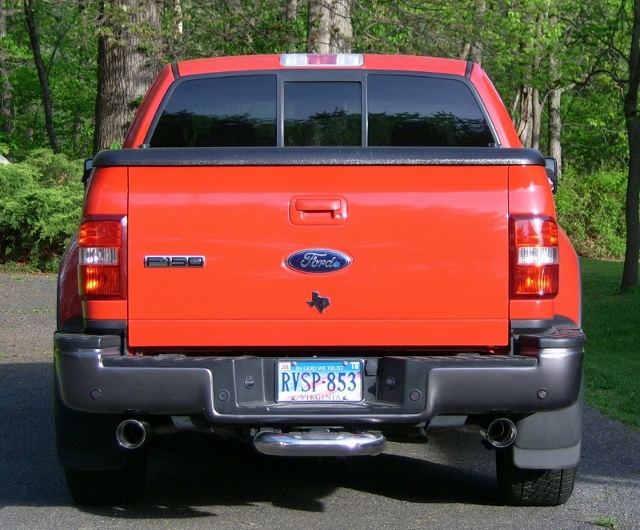
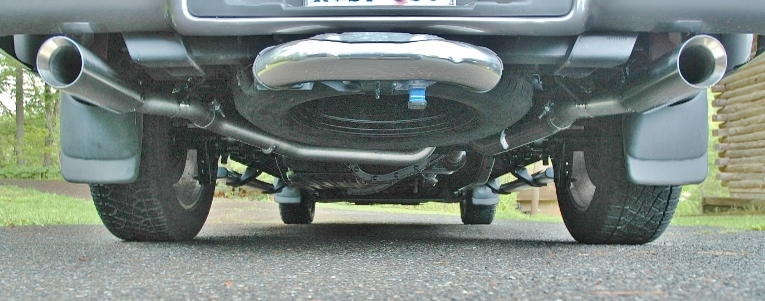
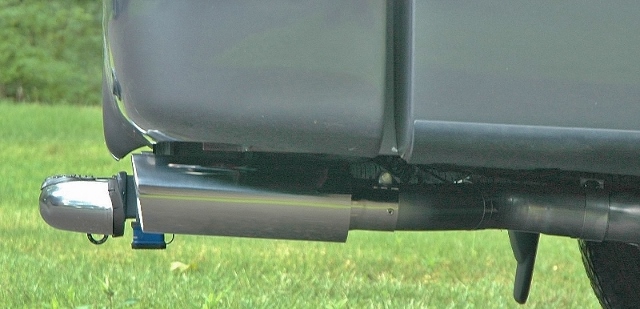
I am getting to be more "at ease" with the larger tips. I was not sure if I would like the larger OD, it seems to change the looks from the rear.
"Do these tips make my tail look too little?" .... LOL
(And I did move the left side tip / end a good 3/4" over towards center after we got home last night ....
.... but you can see it's a hair off here in this "before supper" pic.)
Anyway .... must be OK ..... last night up near W-boro on a gentle upgrade from a stop light I noticed a new Dodge PU hanging back at the rear in the lane beside me .... and after we topped over the crest, after maybe 1/4 mile total .... he eased on past me and flashed me a big thumbs up? I don't know if it was the truck, the tips, or the sound he liked???

They did a great job all things considered ..... I didn't even have to bend a hanger rod though 3 are welded on. Just that mild mod to the bolt on hanger at the frame. They suggest in the instructions to maybe have all seams welded for a more finished look, but these clamps work great without crushing the pipe and it remains "removable" in case needed to in order to service some other part of the truck.
I did notice that I need to slightly relocate the rear brake line steel tubing and parking brake cable stay where both run over the axle and under these pipes. If the truck wasn't lowered to 2WD height it wouldn't be worth a thought. The system is advertised as for a 2wd or 4wd .... but I have a little more travel at the bump stops available than between those two lines and the pipes. If I pull the lines down some, it'll be OK .... and likely would be anyway as I'm not likely to bottom this truck's suspension.
It was a pleasant surprise when I started the truck the first time afterwards then. We took it to supper last night, at highway speed it seems a little quieter than the FM alone was and the only a bit of drone at about 1700-1800 rpm in 2nd or 3rd light cruise. Shift up or down, it goes away. Get it to 1900 and it's "better". I can even just "let off" and it goes away. (Sadly, 1700-1800 is my "cruise" RPM in OD on I-81 ..... so I added a 25" long glass pack ..... scroll down to last post)
I am getting to be more "at ease" with the larger tips. I was not sure if I would like the larger OD, it seems to change the looks from the rear.
"Do these tips make my tail look too little?" .... LOL
(And I did move the left side tip / end a good 3/4" over towards center after we got home last night ....
.... but you can see it's a hair off here in this "before supper" pic.)
Anyway .... must be OK ..... last night up near W-boro on a gentle upgrade from a stop light I noticed a new Dodge PU hanging back at the rear in the lane beside me .... and after we topped over the crest, after maybe 1/4 mile total .... he eased on past me and flashed me a big thumbs up? I don't know if it was the truck, the tips, or the sound he liked???
They did a great job all things considered ..... I didn't even have to bend a hanger rod though 3 are welded on. Just that mild mod to the bolt on hanger at the frame. They suggest in the instructions to maybe have all seams welded for a more finished look, but these clamps work great without crushing the pipe and it remains "removable" in case needed to in order to service some other part of the truck.
I did notice that I need to slightly relocate the rear brake line steel tubing and parking brake cable stay where both run over the axle and under these pipes. If the truck wasn't lowered to 2WD height it wouldn't be worth a thought. The system is advertised as for a 2wd or 4wd .... but I have a little more travel at the bump stops available than between those two lines and the pipes. If I pull the lines down some, it'll be OK .... and likely would be anyway as I'm not likely to bottom this truck's suspension.
Last edited by tbear853; 05-27-2016 at 10:52 AM.
#3
04-30-2016, 10:16 PM


#4
04-30-2016, 10:58 PM
Couple of minor tweaks to tend to .... and the tips are growing on me.
I'm very pleased.
EDITED 050916:
Well, we've put some miles on it, no change in sound, still quieter than a stand alone FM40 that was on it when purchased ..... but after a longer drive on the Interstate at 65-70 mph, right where the tach rests at 1700-1800 rpm ..... on a slight grade ..... the drone I spoke of above ..... well, it does "get old". Our other drives were on 55 mph or slower roads.
So I decided yesterday to add a Dynomax 25" long 3" ID glasspack ahead of the muffler like I did with the old system (it used a 2.5" front pipe where this one is 3" OD) .... and after pricing out the # 24242 "Red" Cherrybomb and the same muffler in stainless steel # 24241 at work today, figuring in my employee discount .... I went with the 24241 which will keep my whole system SS. All added up, the system as installed and the additional stainless steel glasspack which will mellow it out ...... I'll still be under $500 total for total SS system..
Last edited by tbear853; 10-11-2019 at 12:29 AM.
#5
05-10-2016, 10:40 PM
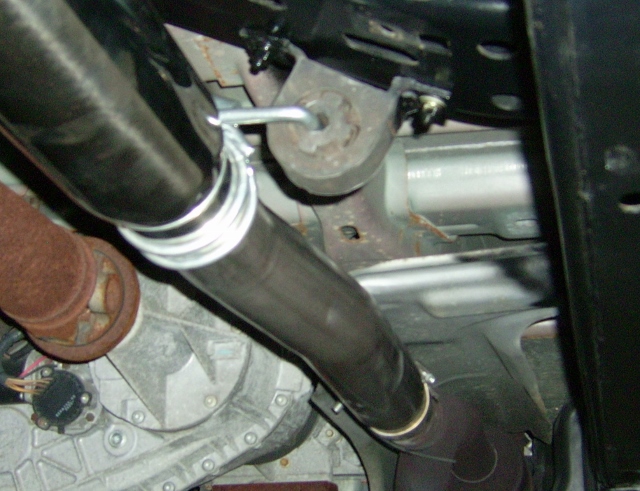
New additional glasspack is 25" overall, I removed a single section 20.5" long after cutting a 6.5" off the rear to use between the mufflers. I did use a cut-off disc in my angle grinder, makes fast work cutting stainless. Smoothed the edges, put back together using the extra band clamp supplied with a extension from Legato, and at front of glasspack I used the wire clamp with hanger hook on it ....
I did move my OEM hanger block to forward edge of that crossmember after straightening the one leg, drilling a hole in the tab and drilling two 5/16" holes in crossmember. A little paint as assembling should prevent rusting. Assembled using my marks and found that my tips were still within 1/16" of being in the same location side to side and out the back. Did not have to adjust much using my marks.
After I finished, while "Wife Unit" fixed supper, I took a test drive .... just like back in 2009 when I added that 2.5" glasspack ahead of the FM ..... this new 3.0" glasspack killed some, not all .... of the annoying drone mentioned above. The truck has a deep but clear tone, a nice purr under load, .... but still some drone that I can hear at 1800 - 1900 rpms. I know, I could have had a red one with silver paint a little cheaper (about $35 cheaper) .... but I figured this way ..... no rusty looking exhaust parts to replace in 5-6 years again. I came home from my test drive to supper, was gonna wipe my greasy finger prints and rain spotting off ..... but I just took a few pics and had supper.
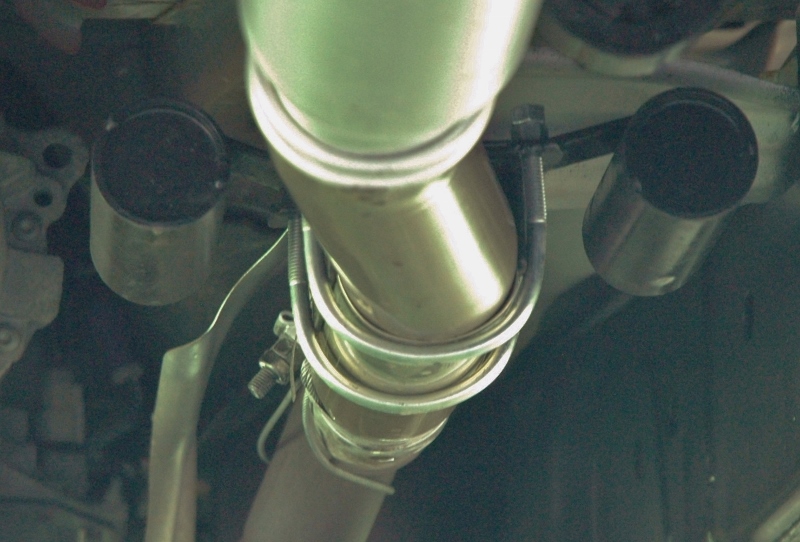
It is pretty.

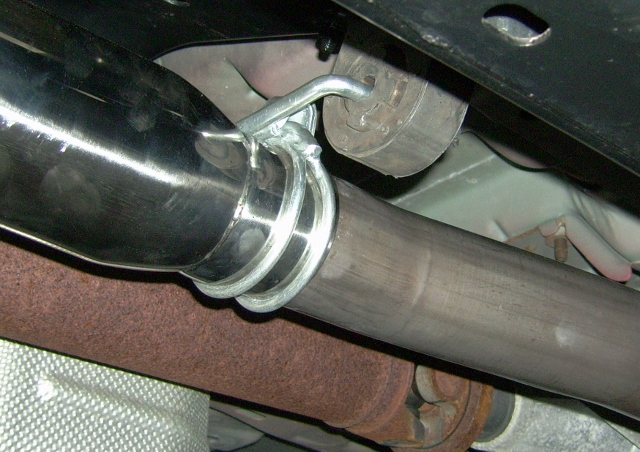

There's that "Off Set" or "dog-leg" to watch .... which is why I marked and notched the very front to lock in position once I had it all aligned a few days ago.
And lastly ..... a view showing pipes how they run over axle, etc .... in case someone else is "looking" ....

Last edited by tbear853; 12-23-2016 at 10:12 PM.
#6
05-27-2016, 10:28 AM
Just a follow up after several drives both over to Lynchburg over the mountain and some up the Shenandoah Valley .... some drives on Interstate .... much happier with it after adding that 25" long SS bullet ahead of the other muffler. There is still a hint of drone remaining at 1800-1900 under load like cruising up grade at 67-68 mph on Interstate. Not really so objectionable, but just the same .... I think I am gonna try attaching some old left over Ford exhaust weights on the front pipe next. To change the exhaust pipe's resonant frequency is, after all, why Ford had 9 pounds of steel weight welded to the oem 2.5" OD head pipe between Y pipe junction and muffler under the cab .... and why my Mercury Grand Marquis has those two weights hanging off the front exhaust H-pipe to muffler pipe junctions. I have a spare set of those weights too .... I just need to "configure clamping details".
I was just looking back through here and see that I neglected to follow up on the weights thing?
So, a bit of cutting, welding, and some U-bolts later I had a clamp on weight set up that would fit my new 3" intermediate pipe nicely, wire brushing, paint, and I used a piece of stainless wrapped between to not stain the SS pipe with rust in time. Mounted the new weight using just enough torque on nuts to secure it snuggle, not deform my expensive 3" pipe. Locked them with a second nut .... and this mod really killed the last bit of objectionable drone at 1700-1950 rpm area.
I thought I had posted pics already?
In several drives up to and back from H-burg I pass through a 14.6 mile long section where I have been resetting my SGII to zero and checking mileage on my vehicles. Been doing so off-n-on since shortly after I bought the SGII in 2010. Since this swap now it's easy to see the SGII read 21+ mpg average over that section. Before, I was doing well to see 20.0. It's maybe arguable that the SGII isn't "dead on accurate" but I know it's always been well within 1/2 mpg or closer on longer trips tank to tank when no resets between ..... and in this case above, my purpose is to compare same vehicle over same section with or without changes (like my '95 T-bird 4.6 is doing it's best at 30, the Mercury at 26, etc on same section same direction) .... just as a yardstick looking for signs of MPG drops indicative of performance deterioration. In this case, looks like maybe I picked up some little bit of MPG? Everything behind the "Y" is some little bigger.
If I had it to do over, maybe I would have separated the two muffflers more by putting the bullet at the end of the Y and a longer pipe between the two mufflers ..... but it's at most an 18" change so not worth "redoing" now.
Still ..... I am not 100% sure I'll keep these 4" double walled tips on the truck. I'm just not really liking the sudden appearant pipe increase viewed from the side from 2.5 to 4.0 inches of these double walled tips .... I like a "blended" look. I'm still thinking the 3" OD rolled edge angle end tips looked more at home there. They cleaned up well, would take some adapters .... or just new tips?
But then ....the question becomes "what to do with these?"
Last edited by tbear853; 08-12-2016 at 04:45 PM. Reason: Added exhaust weight info
#7
05-27-2016, 01:35 PM
Trending Topics


#9
05-28-2016, 10:26 AM
I have some 3.5" double wall tips and I think it's the "just right" size, IMO.
http://cimg0.ibsrv.net/gimg/www.f150...f321411bbc.jpg
http://cimg0.ibsrv.net/gimg/www.f150...f321411bbc.jpg

It's just when hanging singly under a rear bumper with the step up to 4.0" .... just look too big under my rear bumper and that size "step up" just screams at me.

Last edited by tbear853; 05-28-2016 at 11:33 PM.
#10
07-21-2016, 09:40 PM
Put 4" OD tips back on
Well, I am going through some medical issues and have had time to "just chilin' be just looking at pics .... etc .... and "wife unit" mentioned that red truck sounded different with smaller tips when I was moving it in the drive way than when big tips were first on it but she tought the big change was the weight added .... I had been reviewing old posts and [B]maybe some result of I guess .... boredom .... that I (yesterday early AM) thinking of putting the shipped tips back on, they only seemed OK on this truck and the 3.5" rolled lip slash cuts would be equally at home on the Merc while the left over ones were just too big for use on it.
Yesterday while it was cool & clear, I swapped back to the 4" OD Legato Tips, painstakingly positioning them "just so" ..... after our "company" left (wife's brother and his wife who is a killer cook (good way)... came and spent a few short hours leaving me with fresh home made pecan pie & a big fresh banana pudding. I listened really close, I think the larger tips do have a different tone, just not hugely different.
So I guess in looking at pics over again they just 'grew on me ...... so short version is 'they're back.

Besides, I could not get the two 3" tip's and their angles the same, the left tip just always seemed to be skewed somehow?

Yesterday while it was cool & clear, I swapped back to the 4" OD Legato Tips, painstakingly positioning them "just so" ..... after our "company" left (wife's brother and his wife who is a killer cook (good way)... came and spent a few short hours leaving me with fresh home made pecan pie & a big fresh banana pudding. I listened really close, I think the larger tips do have a different tone, just not hugely different.
So I guess in looking at pics over again they just 'grew on me ...... so short version is 'they're back.
Besides, I could not get the two 3" tip's and their angles the same, the left tip just always seemed to be skewed somehow?
Last edited by tbear853; 08-07-2017 at 07:47 AM.

#12
07-22-2016, 11:57 AM
Well, all in all I came out OK on the $$$ part and it is all SS.
Thanks ....... Love Texas. A bit of Texas can fix anything ..... even a small dent.
Thanks ....... Love Texas. A bit of Texas can fix anything ..... even a small dent.
Last edited by tbear853; 08-07-2017 at 07:49 AM.
#14
07-24-2016, 11:10 AM
Well, all in all I came out OK on the $$$ part and it is all SS. If I was doing it over I would have not installed them big tips straight away, would have sold them instead. Might still find a buyer locally ..... LOL. They probably look better on a wider styleside's rear end, "more in proportion" like?
#15
07-24-2016, 01:23 PM
I totally get you there. An exhaust exit is like the dotted 'i' and punctuation when it comes to a vehicle. Just a nice proper finish. My truck being the regular box and up in the air a couple more inches my 4"x18"s look right at home. But certainly isn't suited for all.

I liked the "dotted "i" part
..... like the saying "If you park it and walk away without looking back, you bought the wrong one"
Last edited by tbear853; 07-24-2016 at 01:28 PM.