When you click on links to various merchants on this site and make a purchase, this can result in this site earning a commission. Affiliate programs and affiliations include, but are not limited to, the eBay Partner Network.
Note that the third column representing modified 4X4 struts / shocks / whatever compressed length is longer than 2WD shocks by a hair and that the extended length is just a hair shorter which means the total range of travel is still 4.610" as with a stock 4X4, but just lower and within limits established by the 2WD shocks so it's safe for the front end angles at ball joints, etc.
The 4X4 front shocks have a solid steel "stalk" several inches long at the bottum. The shock body does not go all the way to the lower eye on the 4X4 front shocks on 04-08 trucks. I jacked her up, set my 6 ton jack stands under the frame, removed the wheels and undid the sway bar links and upper ball joints and had small floor jacks under LCA. The lower shock bolt is "tight" @ 351 ft lbs.
Anyway, got the shocks off with springs the regular way. Then I marked a straight scribe up front side of each, marked the lower eye and body with two punches or a single punnch mark so my scribes would be correct. Then I marked a line at the point where that stalk steps down from 15/16 to 13/16" diameter. I assembled a jig before I cut the shock eye off, mocking up against the uncut shock body / eye.
I marked a second point exactly 1-1/4" below that which is pretty close to the bottum where the stalk is welded to the eyes. I used a piece of 1-1/4" OD steel pipe from my scrap drawer that made a good gage, I lined it up so I could see one saw mark, and made the second. 2 saw marks easily account for another 1/16" so I removed 1-5/16"
I made square cuts. 1-5/16" is 1.3125" hence my figures. Also, any change at the shock body is 75% of the change out at the ball joint. This is because the shock doesn't mount at the ball joint, it further in towards the inner pivot at the bushings.
The 1.31 inch that I removed devided by 0.75 is nearer 1.75 inch drop at the ball joint. The inverse of 0.75 is 1.00 / 0.75=1.33 and 1.31X1.33=1.7423 ... near 1.75" and that's just about what I find in post lowering measureing (looks like 1-3/4 to 1-7/8"?).
I beveled my cut ends, and then used the jig I had previosly rigged up with channel locks and scraps to position the eyes with marks aligned. I used 3/32" E7014 rod at 120 amps. I kept a 5 gallon bucket of water near me. I would make a short duration weld, and then douse the shock in the water eye end first .... I did NOT want to heat the shock body itself.
Short duratiion welds alternating from one to the next, brush and cleaning the weld and inspecting and doing it again .... alternating while one was cooling. The shock body themselves never gor hot, never even warm. I have them welded on better than original now, as original is only welded on two sides at eye. I also welded the lower end to the eye on the other sides not originally welded so now the stalks are welded 360 degrees to the eyes. I never got the shock itself "hot" at all.
I kept the eye square to the shock in my initial mock up, I did the welds with the eye end up about 45 degrees, the spring end down. Once tacked and cooled with first two welds I stopped using the jig, just position shock eye end up resting on bench in partially open vise jaws, weld clamp to stalk. I wasted little time between welding and cooling.
Reinstall the shock / spring units, torque all to spec.
Did I say "DO NOT DO THIS UNLESS YOU ARE ABSOLUTELY SURE ABOUT IT !" ?
Shocks are under high pressure and heat increases pressure and you do not want to overheat shock internals. Also, do not strike an arc near / on the shock body itself. I would never have done this with regular style shocks that are gas pressurized where shock body is welded to the eye itself as they are just too thin and any welding would instantly heat the internals. I only did it this time after much study and knowing the several inches of large solid steel would allow me to do so safely if great care was taken. The reason for all my "cautioning" is I don't want someone to cut and weld and either destroy a shock, have a un-planned "pyrotechnic event", or maybe a defective weld snap on them in use.
And it's not that I'm a tight wad, I just like how my truck rides and I figure the stock FX4 Premium Off Road shocks on it have some good life yet seeing as her miles are mostly "road" miles and only 37K of them at that. Pardon the shiney black paint on the lowers, all I had was that and some grey primer. Needed something after welding and all that brushing between. Next year, I may put a set of 2WD Bilstein HDs on it.
In measuring at top of front fenders I see I got right at 1-3/4 ".... maybe 1-7/8" up front(corrected).
The REAR:
The rear was simple, simply remove the rear blocks which on my 2007 FX4, are 2" tall. I jacked her up, plaxced my two 6 ton stands under the leaf spring at fromt side of axle, then I loosened the nuts for the U bolts a little on both sides, then I placed a jack under the axle on one side, took weight on jack, removed the too long Ubolts, eased the axle down and pulled the block, jacked the axle back, and reinstalled my new shorter 2WD U Bolts. (Stengel Bros.U-Bolt Kits - Square Bend Ubolts U-bolt kits that include two square bend Ubolts, four deep nuts and four hard washers. Click Ubolt kit part number to find out pricing, shipping costs, and to order online. I used # 361-434http://stengelbros.com/U-boltKits.htm __ Square Bend 9/16 x 3.0625 inside x 8.375 long Grade 5 (2 U-bolts per kit with nuts and washers 9/16-18 X 3-1/16 X 8-3/8 ). Ford OEM Reference: D7TZ5455A or E7TZ5455A also: ( 361-435 9/16-18 X 3-1/16 X 9-3/8 is longer 4x4 U-bolts 5D3TZ5455A ) )
With both sides loosened some, no problem at all getting pins to line up. Then I did the other side, then I snugged the 8 ubolt nuts. I then got a small gage and adjusted it to the longest one, and tightened until all 4 had same amount of thread showing. Did this for all 8 .... I then reset my gage and snugged up, I tighten until all 8 again were equal in exposed threads.
Then with all 8 good and snug and equal, I broke out torque wrench againsing short pulls at each nut, gradually tightened them all in equal steps criss crossing until the wrech clicked at 40 FtLbs, then I set it for 60 and did this again and again at about the same time, all 8 started clicking. I did the final torquing at 100 ft lbs. I figured being 9/16" diameter U bolts, they'ld want more but I looked at the book, it said 98 ft lbs.
Later I added 8 more 9/16-18 nuts as lock nuts.
So now, she's 2" closer to earth in the rear.
Sunday we took a drive and I swear, something about what I did seems to suit the truck's steering 'cause she steers better now .... and she was good before I did this. I'll take it next week or so for a quick alignment check.
Monday I retorqued the U-bolts. I did not back them off, I just set the wrench and pulled each until it clicked. Didn't take much at all. I don't believe they backed off, I think the spring leaves and all settled in that drive.
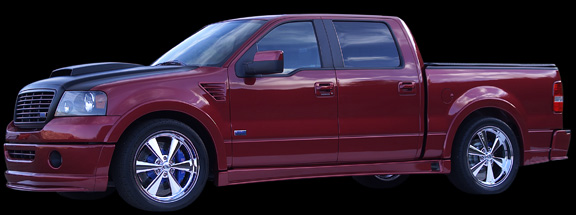
Older pic below when totally stock. Ain't but a couple inches, but I like the look of the tires up in the fenders more.
Again, I am not recommending anyone to do what I did with the front shocks.
I appoligize, I got so wrapped up in what I was doing, concentrating so, I plumb forgot to take any pics as I worked until afterwards and as I was putting my sockets, wrenches, etc up and I saw my camera hanging where I had hung it just so it would be handy .... "Oooops!"
Here's a picture with a yellow line added at the crease in the side, those are stock 20" wheels.
:-wink
Last edited by tbear853; 10-04-2020 at 01:55 PM.
Reason: Found a 1/4" mistake in frt figures today
Thanks, I have been wanting to do it for a year now, just putting it off and yesterday the weather was about as good as it's gonna be until maybe Spring again and my shop only let's me get half the vehicle in, not enough to close the doors .... haha.
I love the look.
Originally Posted by Patman
pics of said 6 ton stands? you mean 6000lbs stands?
I used the reddish orange ones on the right. I picked them up a few years ago on sale.
The short black ones are 3 ton stands that came in a set with my biggest floor jack.
The older tallest, dusty ... one in center .... I believe they are 12 ton each (and seems they are a hair bent from some stress test of the past) and I have never needed them both at same time, pretty tall even all the way down. They are hand me downs from my Father in Law, he worked on some heavy stuff.
I also have some light weight 1-1/2 ton ones that I bought over 40 years ago.
I just pulled them up for the picture, I only had about 6 notches visable on the reddish orange ones when under my springs.
Originally Posted by Patman
I think it would be safer, and less work to just swap 2wd shocks on it, but thats just me
Actually, as to easier .... I didn't need a wall mounted spring compressor this way and I get some more use before I shell out $300 more .... maybe next year as I said.
As to safety, I tried to cover that. At 57 soon to be 58, I weighed the pros and cons, I like the ride as is, welding is like "free" to me, I do it because I find I enjoy it, and I like to stay proficient at it. 35 years ago I would not have welded them. I really love my new auto darkening face shield, have 4 older regular ones just hanging unused now.
That look really good!
It really brought it all together!
I think the rake on our step sides looked worse than a regular bed.
Now its time to update that sig pic!!
Thanks! I think the flareside bed being smaller and shrinking away from you as you look at it emphasizes the large gap above the tire. I love the flaresides, but I like a little rake in my PUs. Level is fine if I have a load in back to show for it.
I have a new sig pic ... but I'm gonna try and get a better one here soon. I just snapped a few yesterday in a car wash lot (didn't wash the truck, just used the lot at Verona, wanted the light back ground and it's semi almost level?)
Originally Posted by 4.6 Punisher
Looks good, just need some sexy new wheels!
Thanks .... there was a time .... but then I had only a PU and a car .... now, with two PUs and two TBirds and the Merc and Scoobie .... I guess I'll keep these. Yesterday, a felow walked over when he saw me taking pics at the car wash, he thought I was taking pics to sell it .... when I told him no, he offered me a scary number. I tried to interest him in a '77 F150 4X4. Glad the wife was there to help run him off!
What is a sexy wheel these days anyway? It'ld have to look some "old school" for me.
I like both of these, maybe 20X9 and keep my tires? Wonder what factory offset is?
I really love the 22" HD wheels like Stealth has on his truck. I saw that eBay has tons of "replica" HD wheels but not sure of their quality. Anyway, great job!
Thanks! I think the flareside bed being smaller and shrinking away from you as tyou look at it emphasizes the large gap above the tire. I love the flaresides, but I like a little rake in my PUs. Level is fine if I have a load in back to show for it.
I have a new sig pic ... but I'm gonna try and get a better one here soon. I just snapped a few yesterday in a car wash lot (didn't wash the truck, just used the lot at Verona, wanted the light back ground and it's semi almost level?)
I would have to agree with that. Our bed does give that narrowing look. I wouldn't trade my truck for the world. lol. I had to do something with mine too. 2" Quicklifts and problem solved, plus there is still a little rake for when I get on it and load it up.
Originally Posted by avfrog
Get some slick 22" wheels on there, and you got a keeper!
HD 22's would be AWESOME on that truck. With all the PTM, they would look amazing.
 11-13-2011, 10:30 PM