
Relocated PCV hose 1993 F150 *a must do project?*
#1
 11-01-2009, 03:51 PM


Join Date: Jun 2001
Location: Warner Robins, GA
Posts: 134
Likes: 0
Received 0 Likes
on
0 Posts
Relocated PCV hose 1993 F150 *a must do project?*
Hi guys,
I think i remember reading that, up to a certain year, there was a TSB or something saying to relocate your PCV hose because it was causing issues with #8 cylinder/piston.
I *think* the fix for this was to remove the upper intake and drill a new hole and insert the PCV there with the exhaust going to the backside of the intake (where the brake booster connects).
But I also thought you could simply buy 3/8" length of hose and a T-fitting. You then cut your brake booster hose, insert T-fitting and the 3/8" hose coming off the PCV........this i remember worked quite well for many who tried.
Any success stories on this? I am changing my PCV tomorrow and would like to do this mod.
Oh yea........what do you use to plug the drivers side (#8) once this is done???
-Glade
Last edited by GLADESTEEN; 11-01-2009 at 07:51 PM.
#2
11-01-2009, 07:36 PM

Senior Member
Join Date: Apr 2009
Location: st. pete, fl
Posts: 383
Likes: 0
Received 0 Likes
on
0 Posts
#3
11-01-2009, 07:58 PM
Join Date: Jun 2001
Location: Warner Robins, GA
Posts: 134
Likes: 0
Received 0 Likes
on
0 Posts
aswaff400,
Yes, i was referring also to the piston. I found a few threads on a different forum and saw *both* repairs for this. The recommended (Ford) TSB is to remove the intake, drill it and relocated the PCV and hose.
There were also several users who simply bought some 3/8" hose, cut the brake booster, installed a T, and then routed the exhaust end (3/8" hose) of the PCV to the open end of the T. It dumps right into the throttle body. This supposed *fix* cured many a idle issue and definitely resolved dumping crud into the #8 cylinder/piston area.........you cap that off once you perform this procedure.
-Glade
#4
11-02-2009, 06:14 PM

Senior Member
Join Date: Jul 2007
Location: California
Posts: 175
Likes: 0
Received 0 Likes
on
0 Posts
I didn't cut or splice anything. I just ran the pcv line to an available port on the vacuum "tree". Then i plugged the port in the back of the plenum with a vacuum cap.
Doing this also makes changing the pcv valve a breeze as you won't have that hard elbow to deal with.
This should be a "must do".
Doing this also makes changing the pcv valve a breeze as you won't have that hard elbow to deal with.
This should be a "must do".
#5
11-02-2009, 08:33 PM
Join Date: Jun 2001
Location: Warner Robins, GA
Posts: 134
Likes: 0
Received 0 Likes
on
0 Posts
Skaterbro,
Thanks for replying. You said you just plugged right in to the plenum....what hose did you use? Was it 3/8" tubing also? I have a spot on the 3 prong that had a plug on it...maybe thats what u used.
You also said that this made the changing of the PCV easier. Did you put a different type in or something? I am going with the Motorcraft e140 (or something like that).
What type of plug did you get to fix the driver side #8? Is there a way to get them from autozone/advance, etc..
Thanks!
Glade
#6
11-03-2009, 12:30 PM
Senior Member
Join Date: Jul 2007
Location: California
Posts: 175
Likes: 0
Received 0 Likes
on
0 Posts
 Only thing i had to plug was the port in the back of the intake plenum.
#7
11-04-2009, 06:47 PM
Join Date: Jun 2001
Location: Warner Robins, GA
Posts: 134
Likes: 0
Received 0 Likes
on
0 Posts
Oh , ok thanks for clearing things up.
I guess that must be the port where the existing system used to run to (the other end from the PCV. Some were saying because of that location, it was causing #8 piston to fail prematurely.
I've not yet looked at it to see where the original ended up, but it has to be the plenum location like you said.
Thanks for the tip, will be changing this over Saturday.
-Glade
Trending Topics
#8
11-04-2009, 07:44 PM

Senior Member
Join Date: Nov 2007
Location: whaleyville, MD
Posts: 3,271
Likes: 0
Received 0 Likes
on
0 Posts
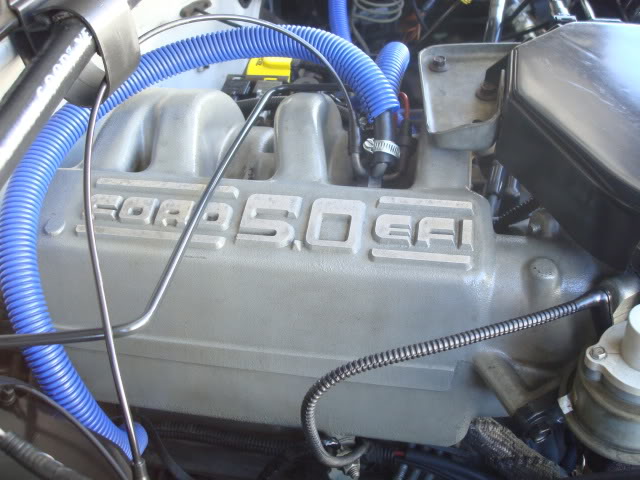
and skatebro- is that plastic wire loom there for a reason or just for looks? reason i ask is i didnt use one
Last edited by Matts ford; 11-04-2009 at 07:52 PM.
#9
11-04-2009, 09:28 PM
Senior Member
Join Date: Jul 2007
Location: California
Posts: 175
Likes: 0
Received 0 Likes
on
0 Posts
 But yeah, mainly for looks. It's not all over the place either, just here and there.
#10
11-04-2009, 09:33 PM
Senior Member
Join Date: Nov 2007
Location: whaleyville, MD
Posts: 3,271
Likes: 0
Received 0 Likes
on
0 Posts
 only thing that stands out in my engine comparment is the white wire i ran along the a/c suction line for my fog lights, kinda annoying
Last edited by Matts ford; 11-05-2009 at 02:26 PM. Reason: forgot a word
#11
11-05-2009, 12:56 AM

Member
Join Date: Sep 2009
Location: Alaska
Posts: 88
Likes: 0
Received 0 Likes
on
0 Posts
#12
11-05-2009, 01:27 AM
Senior Member
Join Date: Jul 2007
Location: California
Posts: 175
Likes: 0
Received 0 Likes
on
0 Posts
To keep the job simple in your case, just swap the positions of the brake booster hose and the PCV valve hose. So your new setup will look just like in the pic, but your brake booster hose will be ran to the back of the plenum.
#13
04-02-2013, 07:37 PM

#14
02-23-2015, 09:29 PM

cantfixspit
I've got a 1993 5.0 having the same issue with oil blowing out into the air box, will this swaping the intake end of pcv valve hose with the brake booster hose port on the vacuum tree(or open port and plug intake hole) trick work on my 1993? From what I've seen it may only work up to 1992.
#15
03-18-2015, 07:21 PM
Senior Member
Join Date: May 2002
Location: Pax,WV
Posts: 419
Likes: 0
Received 0 Likes
on
0 Posts

