
Dynatech Headers & Bassani Cat back How To
#31
 07-11-2005, 04:54 AM


Join Date: May 2003
Location: Corpus Christi, TX
Posts: 598
Likes: 0
Received 0 Likes
on
0 Posts
INSTALLATION OF BASSANI CAT BACK
34.Apply coating of high temp anti-seize to all clamp bolt threads and set them aside for now. Leave the bubble wrap on the tips until they are in place and secure.
35.Install single hanger bracket on passenger side front leaf spring hanger as shown in Photo #63. You will need a 14 mm regular socket and back up wrench.

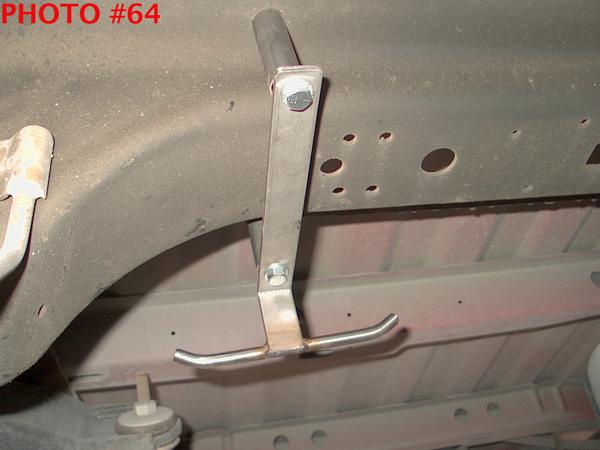
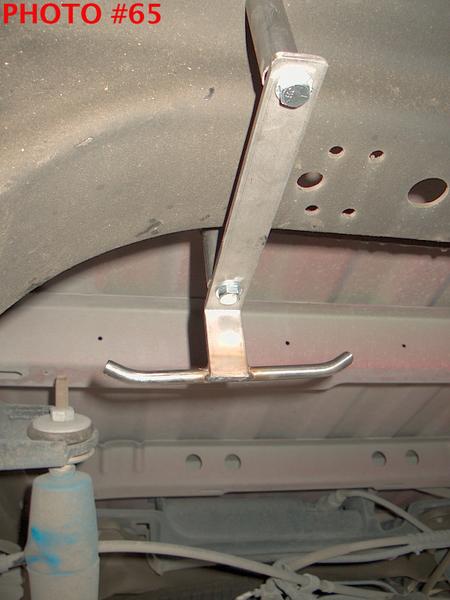
36.Install the double hanger bracket with the 2 - 2˝” spacers on the cross member as shown in Photos #64 and #65. The double hanger section of the bracket mounts towards the rear of the truck. The spacers fit perfectly and required no modification. You will need a 13 mm regular socket and back up wrench.
34.Apply coating of high temp anti-seize to all clamp bolt threads and set them aside for now. Leave the bubble wrap on the tips until they are in place and secure.
35.Install single hanger bracket on passenger side front leaf spring hanger as shown in Photo #63. You will need a 14 mm regular socket and back up wrench.
36.Install the double hanger bracket with the 2 - 2˝” spacers on the cross member as shown in Photos #64 and #65. The double hanger section of the bracket mounts towards the rear of the truck. The spacers fit perfectly and required no modification. You will need a 13 mm regular socket and back up wrench.
#32
07-11-2005, 04:56 AM
Join Date: May 2003
Location: Corpus Christi, TX
Posts: 598
Likes: 0
Received 0 Likes
on
0 Posts
37.Install the Bassani supplied X-Bone urethane hangers onto the hanger brackets at this time. You can either remove the stock donuts from the hangers or you can leave them in place since Bassani supplies all of the needed mounting hardware. I left mine in place just in case one of the Bassani X-Bone urethane hangers tear out. I will have a replacement on the spot. I have read where guys have had a Bassani hanger tear so it’s your choice as to what you want to do here.
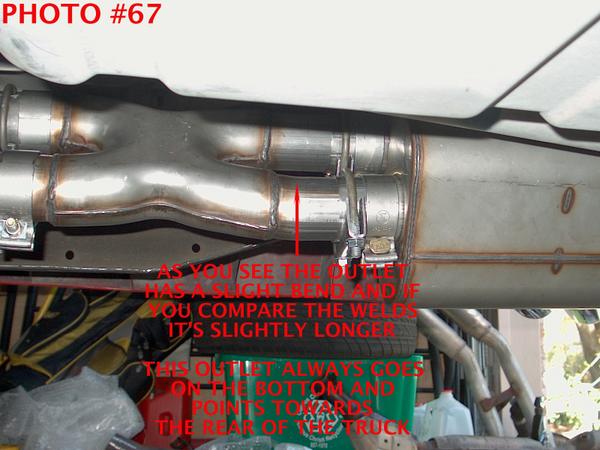
38.Install the X-Pipe on the Dynatech mid pipes (If you use the Bassani supplied band clamps make sure to put them on prior to sliding the X-Pipe over the mid pipes). I experienced a little issue while trying to slide the X-Pipe over the mid pipes. The X-Pipe did not want to go over the mid pipes so I took a small hammer and lightly tapped outward around the inside of the X-Pipe inlets/outlets. I had to do the same thing with the Bassani mufflers. It made the fitment much easier. See Photo #66. Also it gets a little confusing as to how the X-Pipe is supposed to be mounted. The easiest way to remember how the Bassani X-Pipe is mounted is one of the outlets is ever so slightly longer and it has a slight bend as well. That particular outlet always goes on the bottom pointing towards the rear of the truck as shown in Photos #67 and #68.


38.Install the X-Pipe on the Dynatech mid pipes (If you use the Bassani supplied band clamps make sure to put them on prior to sliding the X-Pipe over the mid pipes). I experienced a little issue while trying to slide the X-Pipe over the mid pipes. The X-Pipe did not want to go over the mid pipes so I took a small hammer and lightly tapped outward around the inside of the X-Pipe inlets/outlets. I had to do the same thing with the Bassani mufflers. It made the fitment much easier. See Photo #66. Also it gets a little confusing as to how the X-Pipe is supposed to be mounted. The easiest way to remember how the Bassani X-Pipe is mounted is one of the outlets is ever so slightly longer and it has a slight bend as well. That particular outlet always goes on the bottom pointing towards the rear of the truck as shown in Photos #67 and #68.
Last edited by Txoutlaw; 07-11-2005 at 05:33 AM.
#33
07-11-2005, 04:57 AM
Join Date: May 2003
Location: Corpus Christi, TX
Posts: 598
Likes: 0
Received 0 Likes
on
0 Posts
39.Now install the mufflers on the X-Pipe. Again if you are going to use the Bassani band clamps slide them on the X-Pipe prior to installing the mufflers.
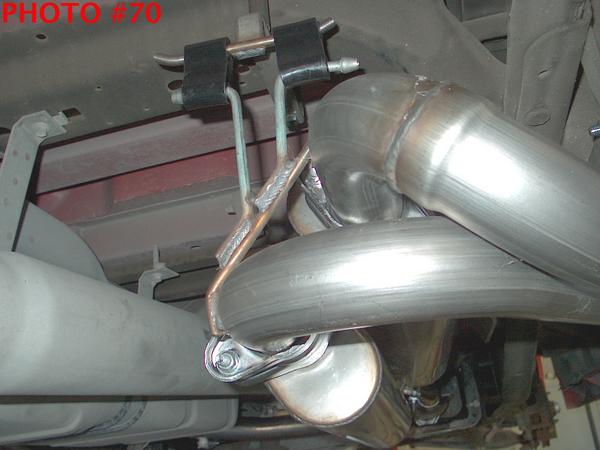
40.Hang the tail pipe assembly on the single hanger and dual hanger as shown in Photos #69 and #70. Flange up the mufflers to the tail pipe assembly and bolt them together as shown in Photo #70 and #71. You will need a 14 mm deep socket and backup wrench.


40.Hang the tail pipe assembly on the single hanger and dual hanger as shown in Photos #69 and #70. Flange up the mufflers to the tail pipe assembly and bolt them together as shown in Photo #70 and #71. You will need a 14 mm deep socket and backup wrench.
#34
07-11-2005, 04:59 AM
Join Date: May 2003
Location: Corpus Christi, TX
Posts: 598
Likes: 0
Received 0 Likes
on
0 Posts
41.If you will be using muffler “C” clamps install them now but do not tighten yet. I used both Bassani band clamps and heavy-duty muffler “C” clamps. Align the tips to your liking and tighten all clamps. As you tighten clamps keep and eye on the tip alignment to make sure they don’t move. When tightening the Bassani band clamps, tighten them to where the metal seats against the spacer. You will need a 15 mm deep socket to tighten the Bassani band clamp bolts. You will also need a long handled ratchet or wrench to properly tighten the Bassani band clamp bolts. I used a 3/8” ratchet with a telescoping handle and that did the trick for me.

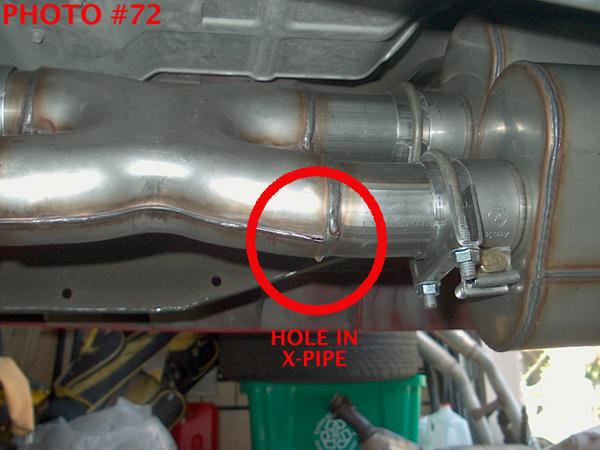
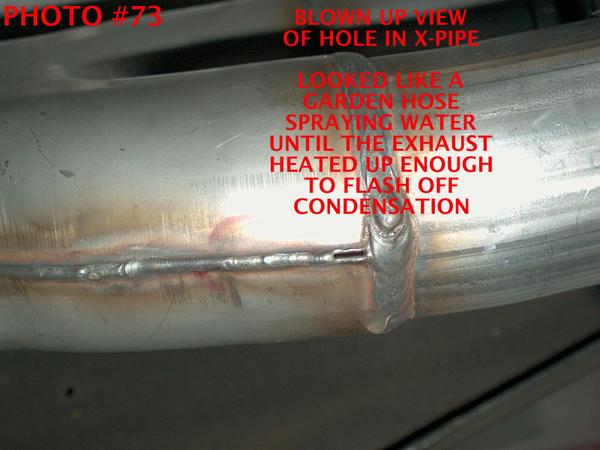
42.CONGRATULATIONS!!!! You have completed the install but your not finished yet. Now make sure there is good ventilation, crank up your beast and check for leaks. I had one leak on my Bassani X-Pipe. It looked like a garden hose spraying water until all of the condensation was burnt off. If you have leaks note the locations so you can repair them. Install the wheels/tires, and go for a casual test drive. No WOT blast just a casual drive for about 15-20 minutes. This will allow the exhaust system to go through a thermal-cycle sequence. After the test drive, allow the exhaust system to cool for a couple of hours and then recheck all bolts for tightness. You will be amazed at how fast the headers cool to the touch. Now reinstall the fender well splash guards and viola your done. Make sure to check the header bolts again in a week or so.
42.CONGRATULATIONS!!!! You have completed the install but your not finished yet. Now make sure there is good ventilation, crank up your beast and check for leaks. I had one leak on my Bassani X-Pipe. It looked like a garden hose spraying water until all of the condensation was burnt off. If you have leaks note the locations so you can repair them. Install the wheels/tires, and go for a casual test drive. No WOT blast just a casual drive for about 15-20 minutes. This will allow the exhaust system to go through a thermal-cycle sequence. After the test drive, allow the exhaust system to cool for a couple of hours and then recheck all bolts for tightness. You will be amazed at how fast the headers cool to the touch. Now reinstall the fender well splash guards and viola your done. Make sure to check the header bolts again in a week or so.
#35
07-11-2005, 05:00 AM
Join Date: May 2003
Location: Corpus Christi, TX
Posts: 598
Likes: 0
Received 0 Likes
on
0 Posts
MY THOUGHTS
I feel the install was pretty much straight forward. If I wouldn’t have been so dead set on doing this write up and I had a cooler place to work I feel I could have completed this install in about 6-8 hours. On a difficulty scale of 1-10 I would rate it as a 7. I think the hardest part was removing the old exhaust. The fitment is great but it does help to know some of the pitfalls that will be encountered during the install and how to deal with them. It also helps to know some of the tips and tricks that can make the install a little easier.
I was a little disappointed that the Bassani X-Pipe had a hole in it because the Bassani cat back seems to be a quality piece. Additionally my tips had numerous tiny scratches that really pissed me off to no end. These are the only two cons that come to mind so I would say that the pros significantly outweigh the cons.
The sound is just unbelievable. My truck sounds like a friggin racecar and I absolutely love it! It will definitely turn heads and my friends are very impressed with the sound. I did loose a little boost as indicated by the stock gauge but the seat of the pants meter is telling me that there is a little more torque.
Overall I am extremely happy with the exhaust system. Was it worth my time and money? ABSOLUTLEY!!!!
I hope this write up will prove useful to those of you that decide to perform your own install. Feel free to contact me with any questions and I will answer them to the best of my ability. I have this write up in Microsoft Word which is 25MB and I also converted it to a PDF file which is 6.25MB. Both files are too big for me to email but I can send either one or both through “send this file .com”. So if you would like a copy just email me through the board and let me know which one you want or if you want both. I do not claim any rights to this write up so modify it, copy it and/or use it however you see fit. In closing I have included a few more photos.
Last edited by Txoutlaw; 07-11-2005 at 05:39 AM.

#37
07-11-2005, 07:31 AM

Senior Member
Join Date: Nov 2003
Location: San Antonio, Texas
Posts: 839
Likes: 0
Received 0 Likes
on
0 Posts
#38
07-11-2005, 08:36 AM

Senior Member
Join Date: Aug 2001
Location: WADING RIVER LI NY
Posts: 444
Likes: 0
Received 0 Likes
on
0 Posts
#39
07-11-2005, 09:29 AM

Senior Member
Join Date: Aug 2003
Location: Waco (Baylor)/ Houston, Tx
Posts: 503
Likes: 0
Received 0 Likes
on
0 Posts
that is an awesome write up.... I did the same thing this weekend.
-Mike
P.S. 2 questions...
1. we completely forgot to put both heat shields back in (set them way away and didn't think about putting them back in!). would this cause a problem? if so, what's the severity of it? (i.e. can I drive like this for a few weeks, and then put it in?)
2. also, I noticed that you mention about the spacer for the dipsticks for both sides. I didn't do this....would this cause a problem? also, once again, what is the severity of it?
thanks!
#40
07-11-2005, 09:51 AM

Senior Member
Join Date: Jan 2003
Location: DETROIT, (formerly Eaton County, Michigan)
Posts: 5,097
Likes: 0
Received 0 Likes
on
0 Posts
Excellent write up.! A few tips to avoid some possible pitfalls.
1. If you are having trouble putting the oil tube back into it's hole, you can have a friend be a spotter and can see exactly where it needs to go and when it is fully seated. It was a PITA to get it in there when i did it.
2. I taped off the ends of the tubes, the headers and the cats. I didn't want anything to fall down there accidentally during the install. I used marking tape so it came off easily.
3.. you didn't have to do it with this install, but I removed the steering shaft. THere is one bolt that connects it to the pump. It can only go on one way as it has flat spots, so your steering wheel will be aligned, just as you took it off. It freed up a lot of room on the drivers side.
#41
07-11-2005, 09:52 AM

Senior Member
Join Date: Aug 2001
Location: Webster, TX
Posts: 1,027
Likes: 0
Received 0 Likes
on
0 Posts
#42
07-11-2005, 11:50 AM
Senior Member
Join Date: Aug 2003
Location: Waco (Baylor)/ Houston, Tx
Posts: 503
Likes: 0
Received 0 Likes
on
0 Posts
Originally Posted by Red03SVT
that is an awesome write up.... I did the same thing this weekend.
-Mike
P.S. 2 questions...
1. we completely forgot to put both heat shields back in (set them way away and didn't think about putting them back in!). would this cause a problem? if so, what's the severity of it? (i.e. can I drive like this for a few weeks, and then put it in?)
2. also, I noticed that you mention about the spacer for the dipsticks for both sides. I didn't do this....would this cause a problem? also, once again, what is the severity of it?
thanks!
-Mike
P.S. 2 questions...
1. we completely forgot to put both heat shields back in (set them way away and didn't think about putting them back in!). would this cause a problem? if so, what's the severity of it? (i.e. can I drive like this for a few weeks, and then put it in?)
2. also, I noticed that you mention about the spacer for the dipsticks for both sides. I didn't do this....would this cause a problem? also, once again, what is the severity of it?
thanks!
TTT, anyone?
#43
07-11-2005, 12:46 PM
Join Date: May 2003
Location: Corpus Christi, TX
Posts: 598
Likes: 0
Received 0 Likes
on
0 Posts
Thanks for the kind words guys.
-Herb101-
The sound is unbelievable! My truck sounds like a racecar when I push the fun pedal. It's not too bad on the highway at least for me. You will absolutley love your new system. It should compliment your built motor nicely not to mention sound like a rampaging beast.
-ARTIE54-
There was plenty of going on for sure. Man I was a happy camper let me tell ya.
-Red03SVT-
To your first question; I don't believe it will hurt to run without the heat shields for a couple of weeks. If you noticed there was actual heat reflective insulation above the heat shields. You may feel a little heat coming from the floor but I don't think it will damage anything especially if it's only going to be a couple of weeks. Maybe someone will chime in here and correct me if I'm off base.
To your second question; It's not a good idea to have anything resting against the headers. Over time the rubbing could cause a weak spot on the header(s) or it could rub a hole in the dipstick tube which is more likely. You definitely don't want an opening in either of the dipsticks as this could allow foreign debris to get into the transmission pan and the oil pan. Plus when you top off fluid levels there is potential for the ATF or oil too run all over the headers which is a good way to cause a fire. Additionally I don't know how the heat will affect the dipstick tubes. I don't think you have anything to worry about in the here and now but in the future it could become an issue. Just keep an eye on where the dipstick tubes are touching the headers. Hope this helps.
-l-menace-
Great tips! I remember reading those in one of your post but with all of the crap running around in my head I forgot too inlcude them. I may go back and add them to the Word and PDF documents. Thanks for adding them to this thread.
-Master Of Pain-
I wasn't able to document an increase in power unfortunatley. The nearest Dyno I know of is in San Antonio and the last time I went there it was a friggin joke! I know that I can break my Nitto 305-45-18 555R's loose now which I couldn't do before so maybe there a little power increase. You hit the nail on the head as far as the reason I installed the headers and cat back. It was partly for sound but I'm getting ready to step up to a 6lber and I wanted the motor to be able to breath a little better.
Thanks again fellas for the kind words.
-Herb101-
The sound is unbelievable! My truck sounds like a racecar when I push the fun pedal. It's not too bad on the highway at least for me. You will absolutley love your new system. It should compliment your built motor nicely not to mention sound like a rampaging beast.
-ARTIE54-
There was plenty of
going on for sure. Man I was a happy camper let me tell ya.-Red03SVT-
To your first question; I don't believe it will hurt to run without the heat shields for a couple of weeks. If you noticed there was actual heat reflective insulation above the heat shields. You may feel a little heat coming from the floor but I don't think it will damage anything especially if it's only going to be a couple of weeks. Maybe someone will chime in here and correct me if I'm off base.
To your second question; It's not a good idea to have anything resting against the headers. Over time the rubbing could cause a weak spot on the header(s) or it could rub a hole in the dipstick tube which is more likely. You definitely don't want an opening in either of the dipsticks as this could allow foreign debris to get into the transmission pan and the oil pan. Plus when you top off fluid levels there is potential for the ATF or oil too run all over the headers which is a good way to cause a fire. Additionally I don't know how the heat will affect the dipstick tubes. I don't think you have anything to worry about in the here and now but in the future it could become an issue. Just keep an eye on where the dipstick tubes are touching the headers. Hope this helps.
-l-menace-
Great tips! I remember reading those in one of your post but with all of the crap running around in my head I forgot too inlcude them. I may go back and add them to the Word and PDF documents. Thanks for adding them to this thread.
-Master Of Pain-
I wasn't able to document an increase in power unfortunatley. The nearest Dyno I know of is in San Antonio and the last time I went there it was a friggin joke! I know that I can break my Nitto 305-45-18 555R's loose now which I couldn't do before so maybe there a little power increase. You hit the nail on the head as far as the reason I installed the headers and cat back. It was partly for sound but I'm getting ready to step up to a 6lber and I wanted the motor to be able to breath a little better.
Thanks again fellas for the kind words.
Last edited by Txoutlaw; 07-11-2005 at 12:51 PM.
#44
07-04-2006, 01:59 PM

Senior Member
Join Date: Jul 2003
Location: Hurricane Central (Florida)
Posts: 244
Likes: 0
Received 0 Likes
on
0 Posts
#45
07-04-2006, 03:02 PM

Senior Member
Join Date: Jul 2004
Location: Fayetteville, NC
Posts: 465
Likes: 0
Received 0 Likes
on
0 Posts