Lights Behind the Grill: 2009-2011 Trucks
#1
 06-09-2011, 06:32 AM


Lights Behind the Grill: 2009-2011 Trucks
My last four F-150 trucks have featured Hella 550 driving lights (with 130 watt bulbs) behind the grill. The ’97, ’99 and ’02 trucks were relatively easy to install these lights in that they all had a factory supplied cross member that allowed easy mounting. My ’05 required the fabrication of a special bracket that is detailed in the link in my signature. All I can say is that I got kind of addicted to all that extra light being available at the touch of a button.
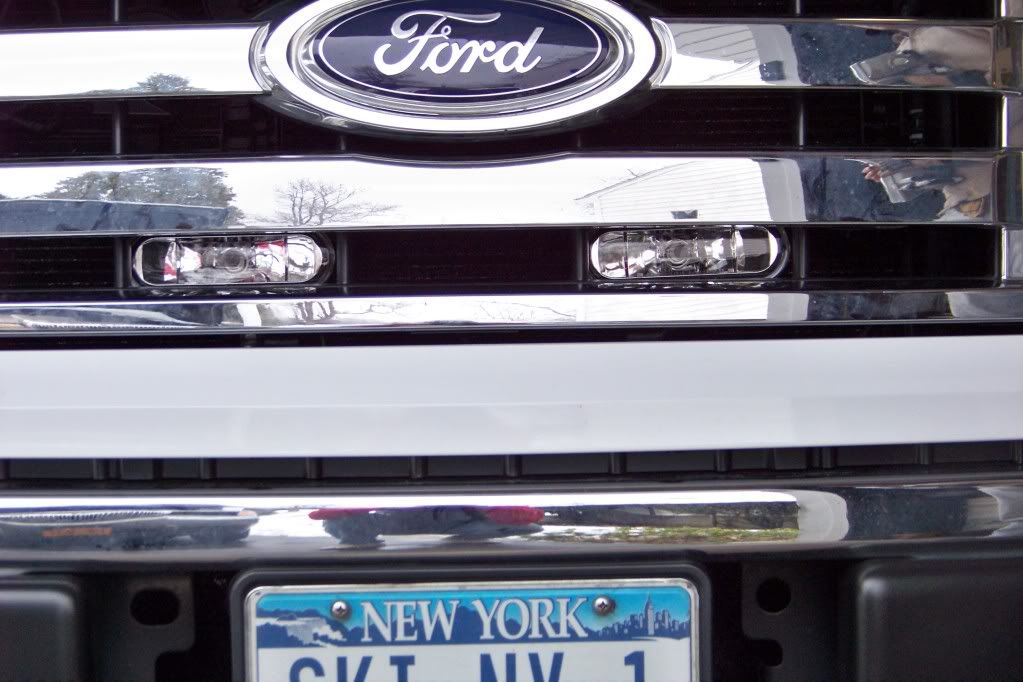
When I bought my 2010, I was pleasantly surprised to find a wide open space behind the grill when I opened the hood. The good news ended there since the grill now featured much smaller openings and the 550’s (if I used them) were going to be mostly shielded. This meant most of the light was never going to make it out to where I need it – on the road. So the 550’s went behind the grill of my son’s Mercury.
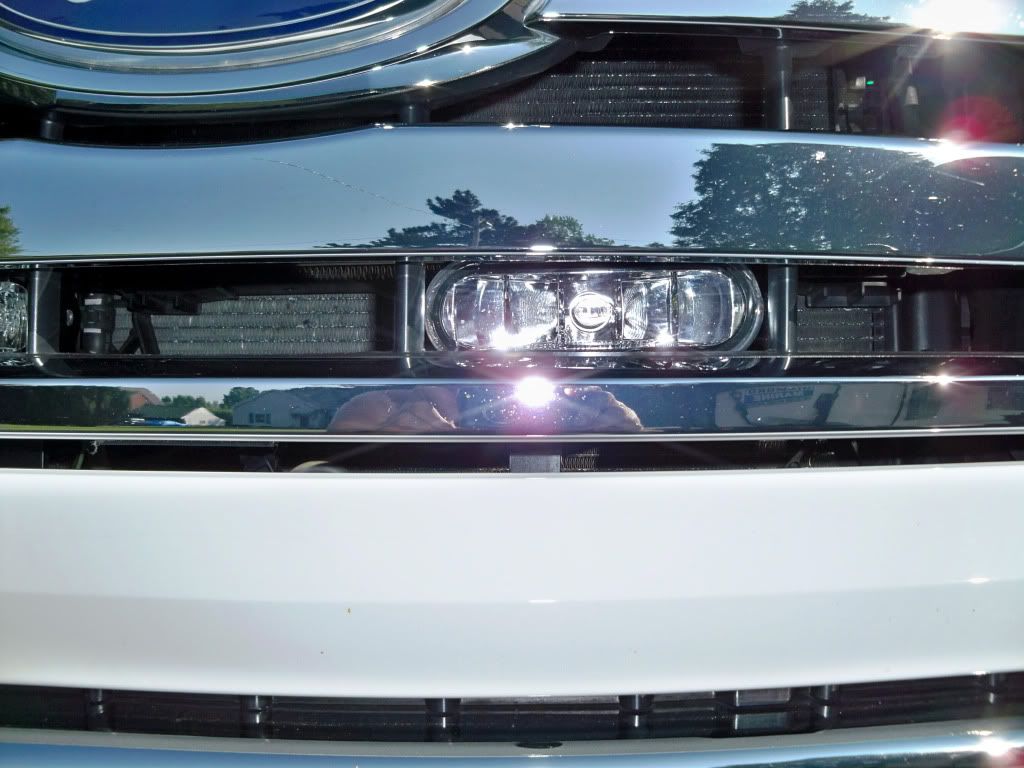
The first thing I did was consult the Hella catalog for a light that might fit in the existing (XLT) grill openings. The only thing I could find was their new 75FF driving lights. Although the lights would physically fit, the smaller size brings some excess baggage with it. First, they use the H7 (55 watt) bulb. Just try to find a higher wattage aftermarket bulb for that application. Even if you could, with the extremely small housing on this light, I’d be real nervous about adding a higher powered bulb anyway. With no room to dissipate the heat, I’m envisioning melted plastic here. But, you use what you can find for the application.
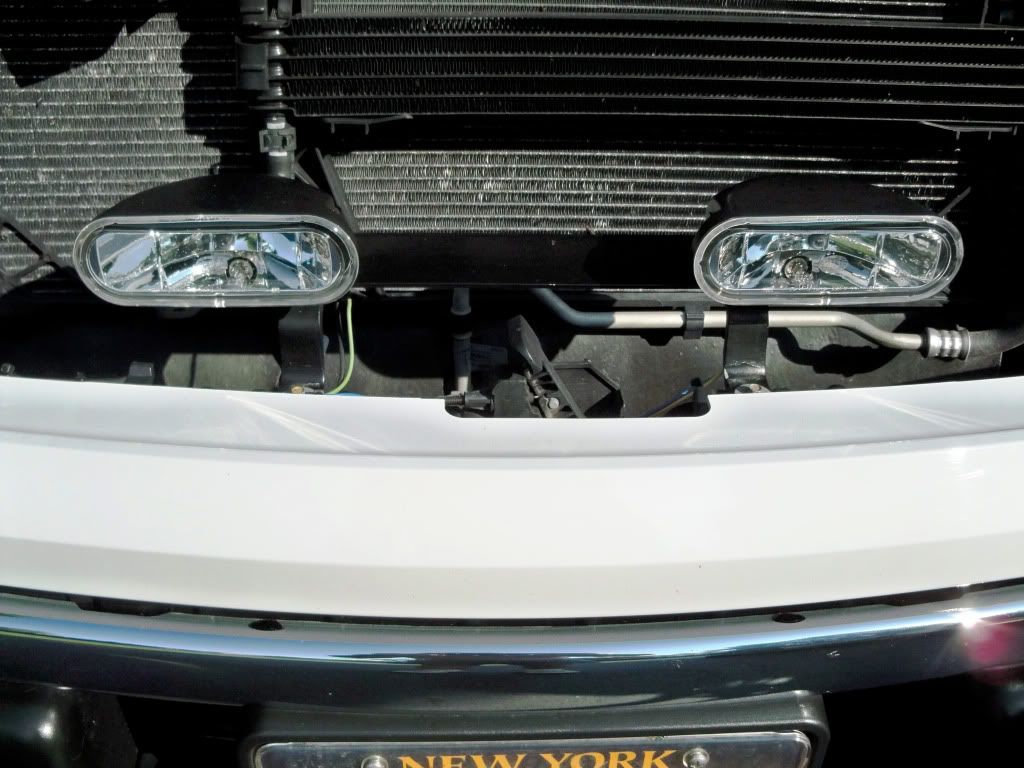
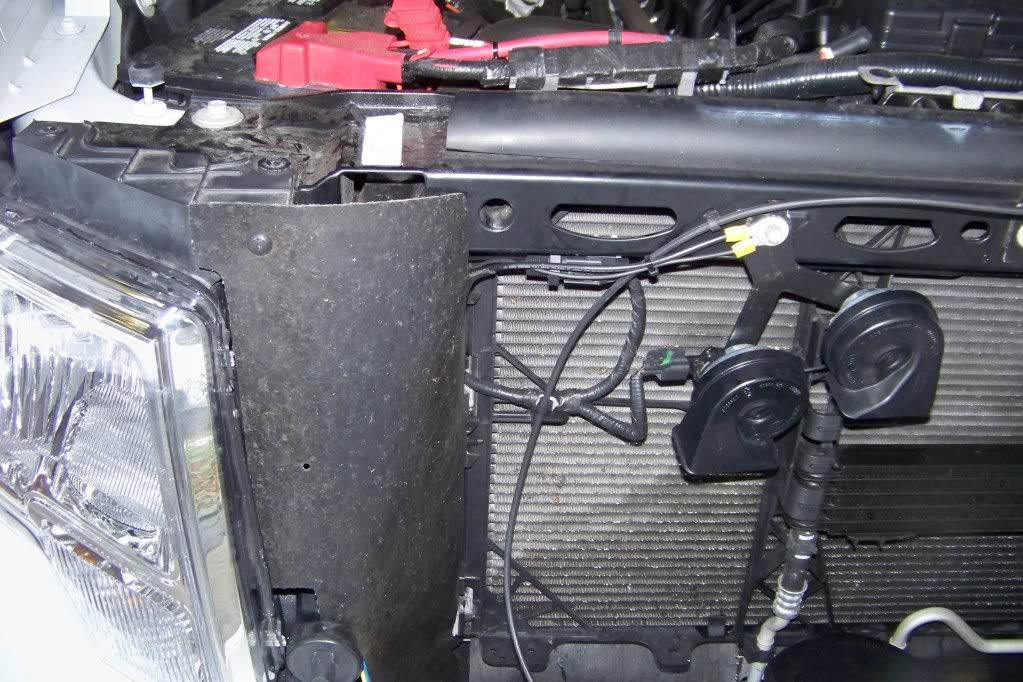
The next challenge was fabricating a suitable bracket to hold the lights both in the exact position allowed by the grill openings and making it stiff enough to reduce bounce of the lights themselves. And remember, this light is almost an exact fit for the opening – so positioning was going to be critical. This is where the much smaller lights actually helped though. They hardly weigh anything at all, so the bracket didn’t have to be made out of Unobtainium. Having lots of experience with the bracket from my ’05 also helped. In fact, I had the old bracket and no use for it. That bracket used Ľ” x ľ” aluminum flat stock.
I started with the same basic concept from my last bracket with a set of Z-shaped braces to raise a cross member up to the correct height for the lights. I actually used the old Z-Brackets, but had to shorten them quite a bit. Since I couldn’t find any more of the same size flat stock locally, I settled for slightly wider material for the cross member. The bottoms of the Z-Brackets are bolted to the support for the hood latch using the factory supplied bolts. If I were to tell you that I measured, mocked up, tested, re-measured, modified and re-tested a dozen times to get the final configuration, I wouldn’t be lying. Getting the lights to peer out exactly where I needed them to was a royal PITA. Here is the final result though after about 4 hours worth of fabrication and fitting:
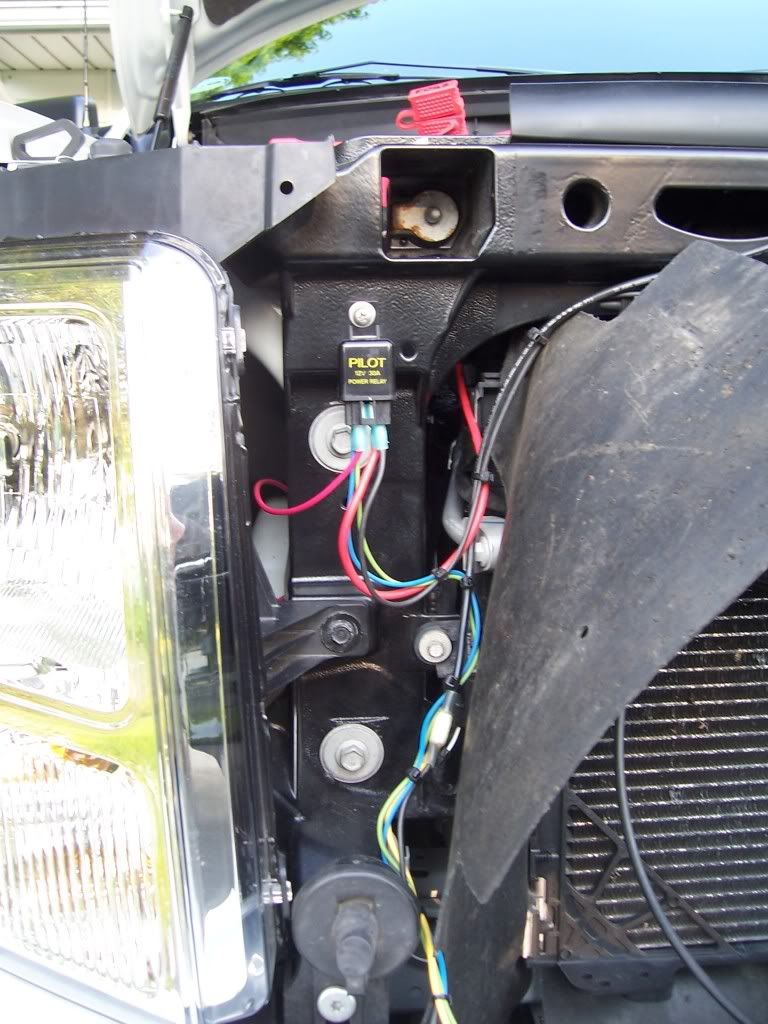
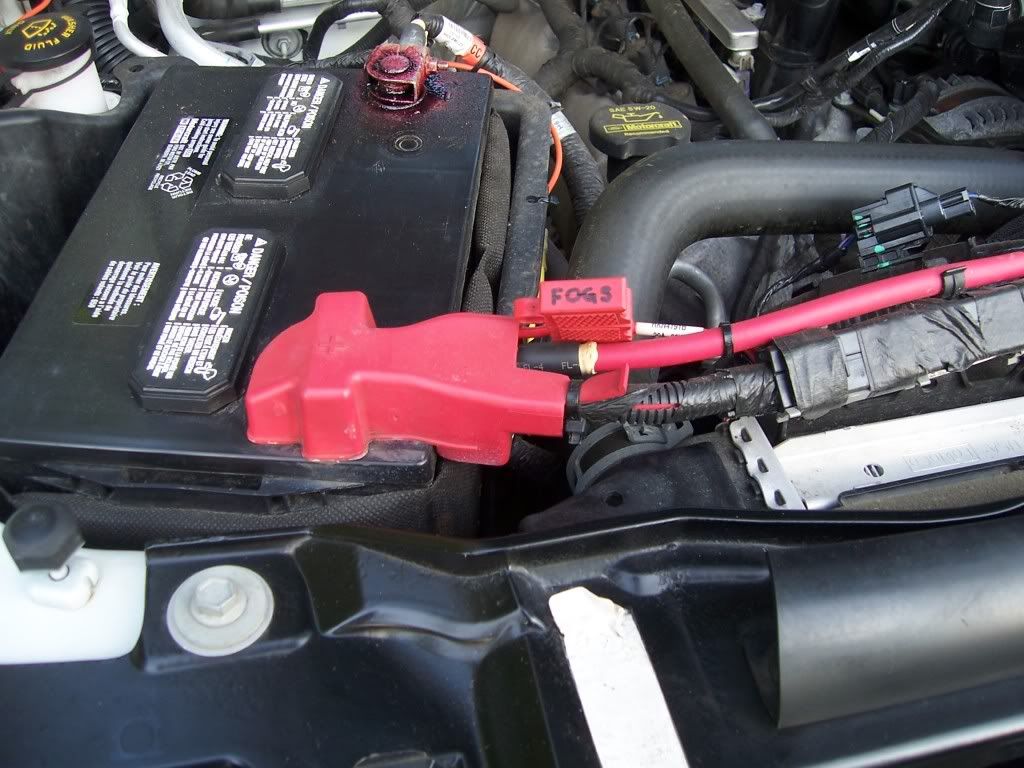
As for wiring, I like a simple system and I’ve always tied my driving lights into the high beams via a relay. This way whenever I flip my high beams on, I get the added power of the driving lights too. In this case, the new body style actually made this pretty easy in that there’s a nifty shielded location for mounting the relay right beside the right headlight housing. Just remove the fastener at the top of the rubber shielding piece and the Radiator Core Support is right there. I used a 30 amp relay and all shrink wrapped connections. I also used dielectric grease on all of the connections to the relay since we use road salt up here like it was free. I found a handy ground at the base of the horn bracket and tied the hot lead for the relay directly to the battery positive side with a weather tight ATO fuse holder in line. The trigger wire for the relay ties into the hot lead for the right side high beam just behind the connector.
So how’s the whole thing work? Well, unfortunately it just isn’t as good as a pair of 130 watt 550’s. That’s mostly because of the size of the lights, the limited wattage of the bulbs as well as the tight location. The lights definitely add some long distance vision though and that’s what I was after. All in all it was worth it. Probably the best part is that the modification is so subtle that most people don’t even notice it – until I flip them on.
When I bought my 2010, I was pleasantly surprised to find a wide open space behind the grill when I opened the hood. The good news ended there since the grill now featured much smaller openings and the 550’s (if I used them) were going to be mostly shielded. This meant most of the light was never going to make it out to where I need it – on the road. So the 550’s went behind the grill of my son’s Mercury.
The first thing I did was consult the Hella catalog for a light that might fit in the existing (XLT) grill openings. The only thing I could find was their new 75FF driving lights. Although the lights would physically fit, the smaller size brings some excess baggage with it. First, they use the H7 (55 watt) bulb. Just try to find a higher wattage aftermarket bulb for that application. Even if you could, with the extremely small housing on this light, I’d be real nervous about adding a higher powered bulb anyway. With no room to dissipate the heat, I’m envisioning melted plastic here. But, you use what you can find for the application.
The next challenge was fabricating a suitable bracket to hold the lights both in the exact position allowed by the grill openings and making it stiff enough to reduce bounce of the lights themselves. And remember, this light is almost an exact fit for the opening – so positioning was going to be critical. This is where the much smaller lights actually helped though. They hardly weigh anything at all, so the bracket didn’t have to be made out of Unobtainium. Having lots of experience with the bracket from my ’05 also helped. In fact, I had the old bracket and no use for it. That bracket used Ľ” x ľ” aluminum flat stock.
I started with the same basic concept from my last bracket with a set of Z-shaped braces to raise a cross member up to the correct height for the lights. I actually used the old Z-Brackets, but had to shorten them quite a bit. Since I couldn’t find any more of the same size flat stock locally, I settled for slightly wider material for the cross member. The bottoms of the Z-Brackets are bolted to the support for the hood latch using the factory supplied bolts. If I were to tell you that I measured, mocked up, tested, re-measured, modified and re-tested a dozen times to get the final configuration, I wouldn’t be lying. Getting the lights to peer out exactly where I needed them to was a royal PITA. Here is the final result though after about 4 hours worth of fabrication and fitting:
As for wiring, I like a simple system and I’ve always tied my driving lights into the high beams via a relay. This way whenever I flip my high beams on, I get the added power of the driving lights too. In this case, the new body style actually made this pretty easy in that there’s a nifty shielded location for mounting the relay right beside the right headlight housing. Just remove the fastener at the top of the rubber shielding piece and the Radiator Core Support is right there. I used a 30 amp relay and all shrink wrapped connections. I also used dielectric grease on all of the connections to the relay since we use road salt up here like it was free. I found a handy ground at the base of the horn bracket and tied the hot lead for the relay directly to the battery positive side with a weather tight ATO fuse holder in line. The trigger wire for the relay ties into the hot lead for the right side high beam just behind the connector.
So how’s the whole thing work? Well, unfortunately it just isn’t as good as a pair of 130 watt 550’s. That’s mostly because of the size of the lights, the limited wattage of the bulbs as well as the tight location. The lights definitely add some long distance vision though and that’s what I was after. All in all it was worth it. Probably the best part is that the modification is so subtle that most people don’t even notice it – until I flip them on.
#2
06-09-2011, 01:35 PM

Senior Member
Join Date: Nov 2007
Location: In a house, in a small town
Posts: 1,845
Likes: 0
Received 0 Likes
on
0 Posts
#3
06-09-2011, 02:07 PM
You've got a sharp eye! I didn't use it because of the orientation of the relay. If I did shrink wrap them, I risked trapping solution within the connector and eventually rotting everything off. Every other connector is shrink wrapped though.
Tom
#4
06-09-2011, 03:05 PM


#7
06-11-2011, 10:19 PM

Trending Topics
#8
06-12-2011, 05:11 AM

Senior Member
Join Date: Jun 2011
Location: Wylie, TX
Posts: 294
Likes: 0
Received 0 Likes
on
0 Posts
#9
06-12-2011, 08:57 AM
#10
09-24-2011, 09:23 PM

Did you happen to take some photos at night with and without added lights on. I need extra light for those very early mornings getting to hunting spots, but do not want to have lights mounted on the exterior.
Thanks for the great write up. Did you consider the PIAA 2100xt's, I saw them at the store the other day and they got me thinking....
Thanks,
Rob
Thanks for the great write up. Did you consider the PIAA 2100xt's, I saw them at the store the other day and they got me thinking....
Thanks,
Rob
#11
09-25-2011, 07:13 AM
Did you happen to take some photos at night with and without added lights on. I need extra light for those very early mornings getting to hunting spots, but do not want to have lights mounted on the exterior.
Thanks for the great write up. Did you consider the PIAA 2100xt's, I saw them at the store the other day and they got me thinking....
Thanks,
Rob
Thanks for the great write up. Did you consider the PIAA 2100xt's, I saw them at the store the other day and they got me thinking....
Thanks,
Rob
#12
09-25-2011, 09:40 AM
Thanks for the reply. Since you confirmed my thought that the smaller lights may not do what I am looking for I am planning to replace my FX4 grill with a billet or hex grill to allow light to pass through.
I have seen guys run 2-4 lights behind the grill and haven't noticed anyone commenting on the impact these lights have on the radiator. Any thoughts on that?
Yes the air will still be able to move around, and maybe that is enough, but surface wise you are definitely blocking a significant portion of the radiator.
Rob
#13
09-25-2011, 05:47 PM
Its a negligible difference. The immense size of the radiator won't tell a difference of a few measly square inches. Plus, as the air builds up in front of it, it will bleed to the side and just shoot into the radiator faster, look up Bernoulli's Principal.
When I was installing my efans, I did a few tests and one of which was to put a cardboard piece the same size as my radiator in front of it to purposely block airflow, causing the temps to go up while driving so my fans would kick on. Even with my engine in closed loop, it took a while to heat up, and even then it only got to about 235* before it stayed constant.
tl;dr- don't worry about it
Last edited by Raptor05121; 09-25-2011 at 05:50 PM.
#14
08-20-2012, 12:09 PM

#15
09-04-2012, 12:26 AM