How to Load Custom Tunes Into the Popular Programmers
#1
 10-19-2009, 04:41 PM


How to Load Custom Tunes Into the Popular Programmers
so you just recieved an SCT Xcal3 or Livewire programmer and want to know how to load an email to tune it so you can program your truck...
#1 - save the .cef file to your computer, by right click and selecting "save as" then save it someplace you will remember it (I use a folder for tunes and datalogs)
#2 - ensure you have the latest drivers and software from sctflash.com and you have the needed USB cable

the Xcal2 is on the left and the Xcal3 is on the right

#3 - plug your device into your computer (the screen should light up)

#4 - open your live link program

and this should open up

#5 - select "load custom tune file"

DO NOT SELECT THIS ONE (it's not for this process)

#6 - select the location on the device (spot 1,2 or 3) hit OK and let it the tune load into the device

then you will see this window

click proceed and the computer and device will do the rest
#7 after it's done, unplug your device from your computer and head out to your truck

I will add onto this tomorrow for the step by step to load the tune into the truck
then we'll get into datalogging
#1 - save the .cef file to your computer, by right click and selecting "save as" then save it someplace you will remember it (I use a folder for tunes and datalogs)
#2 - ensure you have the latest drivers and software from sctflash.com and you have the needed USB cable
the Xcal2 is on the left and the Xcal3 is on the right
#3 - plug your device into your computer (the screen should light up)
#4 - open your live link program
and this should open up
#5 - select "load custom tune file"
DO NOT SELECT THIS ONE (it's not for this process)
#6 - select the location on the device (spot 1,2 or 3) hit OK and let it the tune load into the device
then you will see this window
click proceed and the computer and device will do the rest
#7 after it's done, unplug your device from your computer and head out to your truck
I will add onto this tomorrow for the step by step to load the tune into the truck
then we'll get into datalogging
Last edited by JackandJanet; 04-28-2010 at 06:30 PM. Reason: Changed thread title
#3
11-05-2009, 12:12 AM

How to load custom tunes to a PHP Gryphon Programmer:
1. Make sure Bill from PHP is done with your tunes (he will let you know). If you currently have the Gryphon in the vehicle with canned tunes program the vehicle back to stock before attempting to update it. Failure to do so will cause the updates to fail.
2. From PHP's Support Page download the Pegasus Update Client (the version will be newer than the one shown in this post) and the Pegasus Installation and Quick Start User's Guide from the dropdown box about halfway down the page that's titled: "PEGASUS AND PHOENIX FLASH (FU) SOFTWARE".
3. Read the Pegasus Guide to get familiar with the program. It installs like any regular Windows program. Install it now.
4. Gather your necessary materials: computer, mini-usb cable, and Gryphon programmer.
5. Plug the Gryphon unit into the computer using the mini-usb cable. The screen will light up (in my case, it turned red).
6. Open the Pegasus Update Client that you installed in Step 3. The Gryphon screen will change colors (in my case, it turned green).

7. From the top menu select Updates and from that drop-down menu select Targeted Functions. DO NOT select "Gryphon Update Manager" here.
Edit: In the latest version of Pegasus (V2.01.0640) the selection is: [Updates]->[Custom FIle Download].
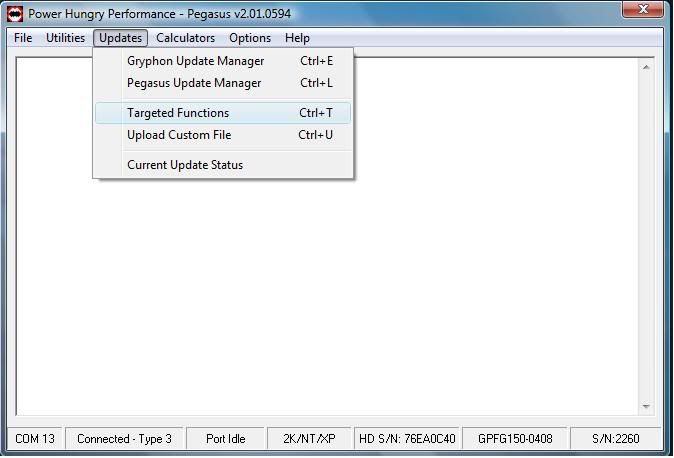
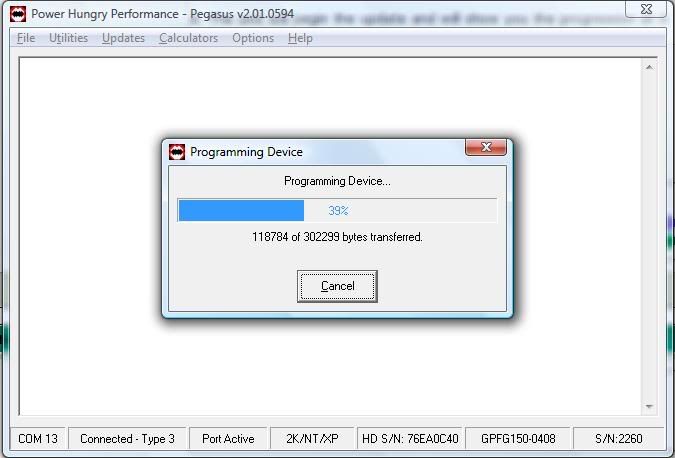
8. The unit will begin the update and will show you the progression as it updates (first picture). After the updates are complete you should see what is in the second picture. At this point, you can simply unplug the Gryphon from your PC. On 97-03+04H--Sometimes when custom tunes get downloaded to the gryphon there will be a message when done. It will read "Connecting to Bridge". Simply ignore it and unplug the Gryphon from the USB cable.

9. There will be three warning screens the first three times the Gryphon starts up. Simply press Enter on the Gryphon to pass the screen. After the third warning it will not show up unless you do another update. It is nothing to worry about.
10. Put the Gryphon back in the truck and plug it in. Very simple to do. Note: Before programming, be sure to keep electrical devices (cell phones, etc) away from the unit to prevent any interference. Make sure your battery is fully-charged. Also turn off all unnecessary accessories (radio, A/C, etc). In the words of a wise man:
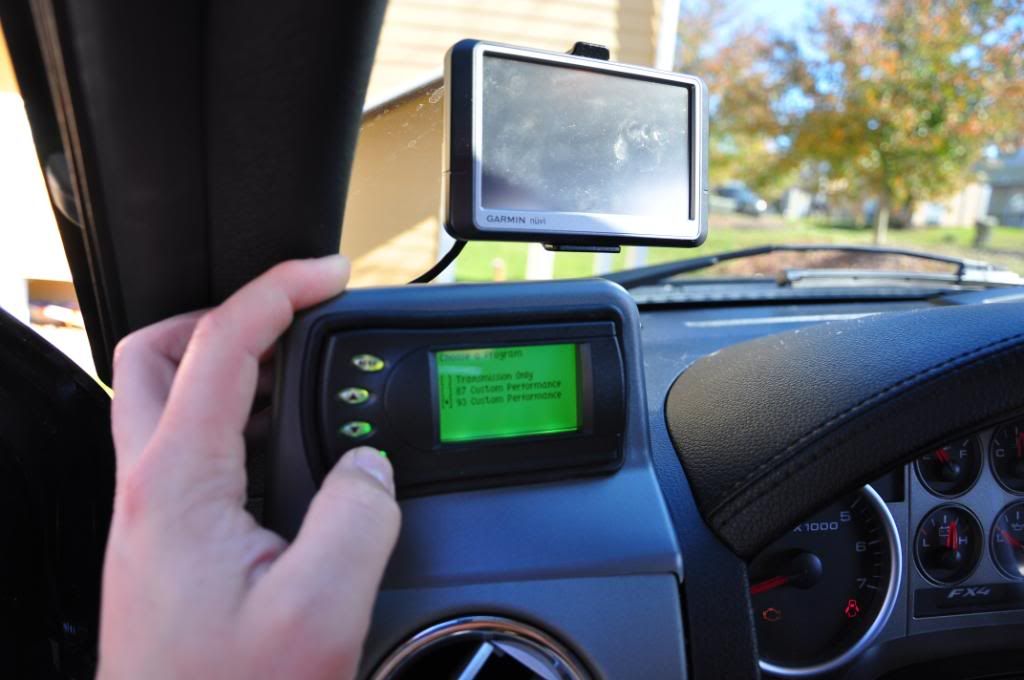
11. Select Power Programming.
12. Choose the level you want. I chose 93 performance.
13. During the first programming session, you will be given the choice of "Creating a Custom Program". It is best to skip this option the first time so that the Gryphon can build its stock files properly. If you want to adjust something like the Tire Size to correct your speedometer readings, you would go ahead and choose this option in later Power Programming sessions.
14. Warning: DO NOT turn the ignition off or start the engine until programming is complete. After it is complete she's clear to start.

1. Make sure Bill from PHP is done with your tunes (he will let you know). If you currently have the Gryphon in the vehicle with canned tunes program the vehicle back to stock before attempting to update it. Failure to do so will cause the updates to fail.
2. From PHP's Support Page download the Pegasus Update Client (the version will be newer than the one shown in this post) and the Pegasus Installation and Quick Start User's Guide from the dropdown box about halfway down the page that's titled: "PEGASUS AND PHOENIX FLASH (FU) SOFTWARE".
3. Read the Pegasus Guide to get familiar with the program. It installs like any regular Windows program. Install it now.
4. Gather your necessary materials: computer, mini-usb cable, and Gryphon programmer.
5. Plug the Gryphon unit into the computer using the mini-usb cable. The screen will light up (in my case, it turned red).
6. Open the Pegasus Update Client that you installed in Step 3. The Gryphon screen will change colors (in my case, it turned green).
7. From the top menu select Updates and from that drop-down menu select Targeted Functions. DO NOT select "Gryphon Update Manager" here.
Edit: In the latest version of Pegasus (V2.01.0640) the selection is: [Updates]->[Custom FIle Download].
8. The unit will begin the update and will show you the progression as it updates (first picture). After the updates are complete you should see what is in the second picture. At this point, you can simply unplug the Gryphon from your PC. On 97-03+04H--Sometimes when custom tunes get downloaded to the gryphon there will be a message when done. It will read "Connecting to Bridge". Simply ignore it and unplug the Gryphon from the USB cable.
9. There will be three warning screens the first three times the Gryphon starts up. Simply press Enter on the Gryphon to pass the screen. After the third warning it will not show up unless you do another update. It is nothing to worry about.
10. Put the Gryphon back in the truck and plug it in. Very simple to do. Note: Before programming, be sure to keep electrical devices (cell phones, etc) away from the unit to prevent any interference. Make sure your battery is fully-charged. Also turn off all unnecessary accessories (radio, A/C, etc). In the words of a wise man:
Originally Posted by JackandJanet
The bottom line during programming is: you want the truck to be in a non-demanding environment temperature and electromagnetic interference wise and with an electrical system that's putting out full power.
11. Select Power Programming.
12. Choose the level you want. I chose 93 performance.
13. During the first programming session, you will be given the choice of "Creating a Custom Program". It is best to skip this option the first time so that the Gryphon can build its stock files properly. If you want to adjust something like the Tire Size to correct your speedometer readings, you would go ahead and choose this option in later Power Programming sessions.
14. Warning: DO NOT turn the ignition off or start the engine until programming is complete. After it is complete she's clear to start.
Last edited by JackandJanet; 04-28-2010 at 06:51 PM. Reason: V2.01.0640 changed update menu and fixed link to Pegasus download
#4
01-22-2010, 03:12 PM

Former Sponsor
Join Date: Jan 2010
Location: so fla
Posts: 409
Likes: 0
Received 0 Likes
on
0 Posts
Figure I may as well contribute here for Predator/Trinity users:
How to load a custom tune for 04-up F150:
http://www.diablosport.com/downloads...structions.doc
How to load a custom tune for a 99-03 F150:
http://www.diablosport.com/downloads...structions.doc
Let me know if anyone needs any assistance!
Thanks
Mike
How to load a custom tune for 04-up F150:
http://www.diablosport.com/downloads...structions.doc
How to load a custom tune for a 99-03 F150:
http://www.diablosport.com/downloads...structions.doc
Let me know if anyone needs any assistance!
Thanks
Mike
#6
01-22-2010, 09:07 PM

Thank you Mike. That was a good addition! 
I still keep hoping, tarajerame! If Vista is the issue, is there any tech support for livelink that might break the bottleneck? I know Bill at PHP spent a good deal of effort to solve the issues between the Pegasus updating software and Vista, you'd think someone at SCT might do the same.
- Jack
I still keep hoping, tarajerame! If Vista is the issue, is there any tech support for livelink that might break the bottleneck? I know Bill at PHP spent a good deal of effort to solve the issues between the Pegasus updating software and Vista, you'd think someone at SCT might do the same.
- Jack
Go to the start button on the bottom left corner, and click on all programs
Go to the sct folder and open it
Right click on Live Link and go to properties
Click on the compatability tab
In the compatability area, select Windows xp and check the box above it
In the settings area directly below the compatability area, put a check in disable desktop composition.
Below that, put a check run as administrator.
Click apply, then ok.
Plug in your xcal2 to your laptop and make sure it gets recognized.
Go to your car, turn the key on, and connect everything.
Open live link and click on the box for datalogging, everything should now be connected.
If you still get a pop-up and just click ok when you see it.
Also works in Win7 32-bit.
Last edited by MGDfan; 01-22-2010 at 09:18 PM.
#7
01-24-2010, 05:04 PM

I just got it in compatability mode, I will be running the Xcal3 in the morning to verify if we have to do this each and every time or not...
I'll also show pics of what I was doing wrong so others know what not to do
the xcal2 worked just fine so hopefully this solved the Xcal3 issue thanks guys,
yet more proof why this site is awsome
Trending Topics
#8
04-23-2010, 02:51 PM
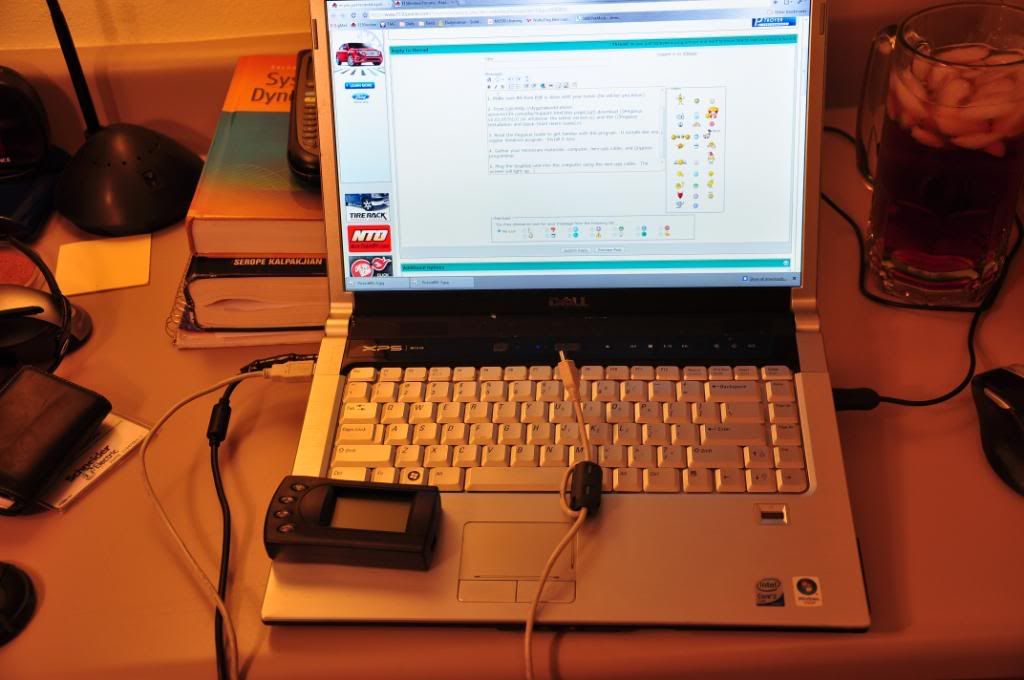
datalogging with an Xcal2/3
now that your tune is loaded, it's time to double check your tuners work
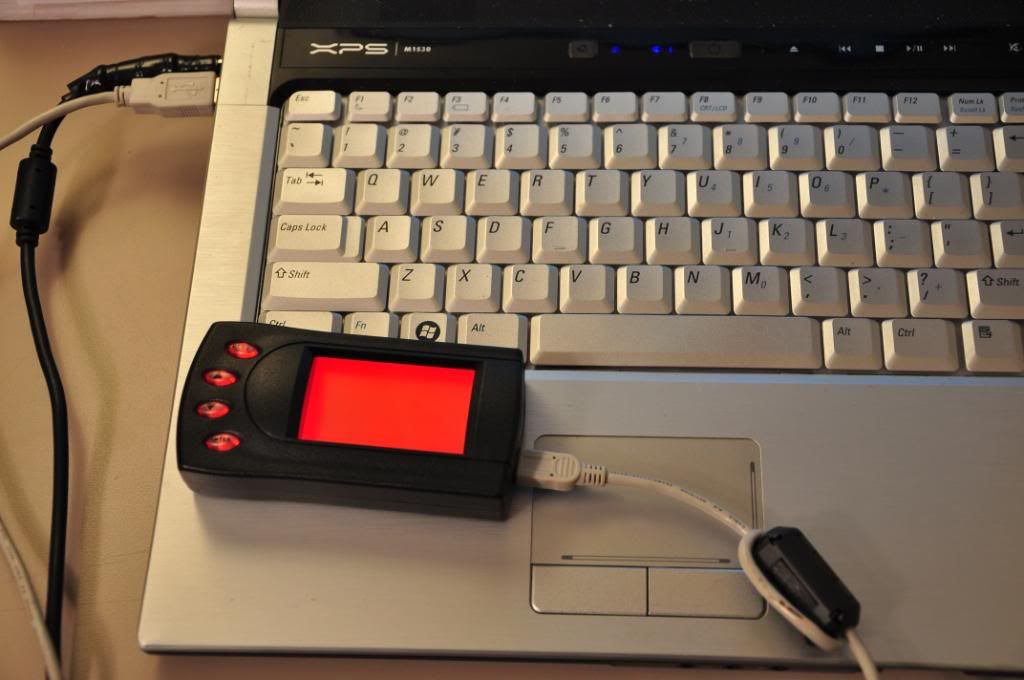
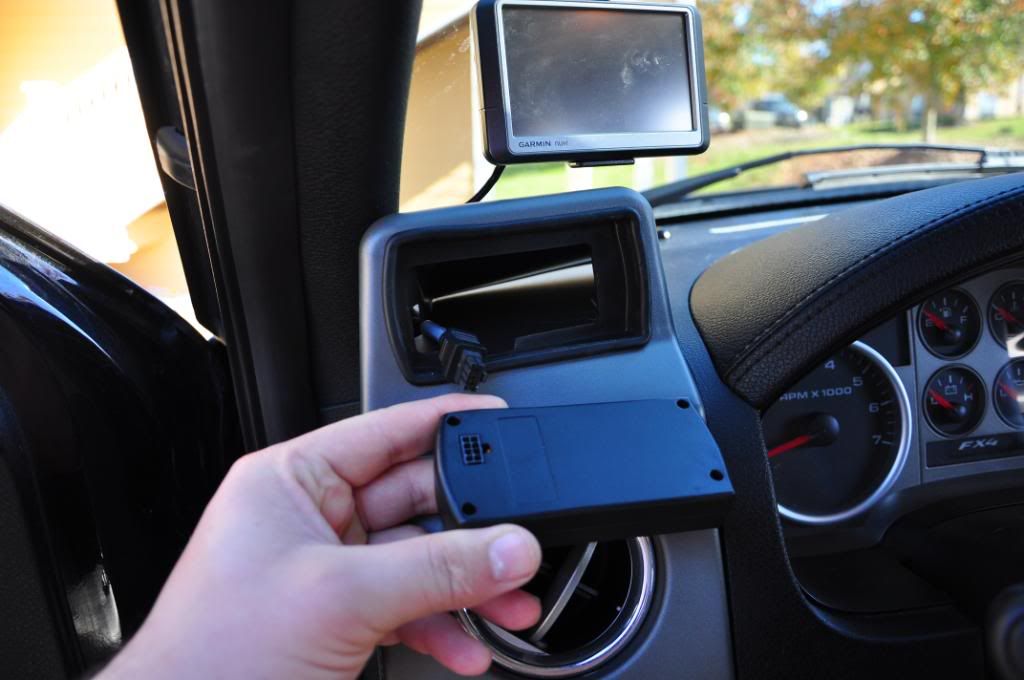
#1 start your vehicle and plug your tuning device into your vehicles OBD2 port

#2 connect the USB cable to the tuning device

I tuck my tuning device under the floor mats to keep it from shifting while driving

#3 plug in the USB cable to your laptop and select which live link program you need to use (I am using an Xcal3 and Live link version 6.0 due to vista, but I have version 5.1 for when I use the Xcal2)

not all computers will ask for this but mine does for security reason, so go ahead and click "continue"

and live link will open (this is version 6.0, version 5.1 is slightly different)

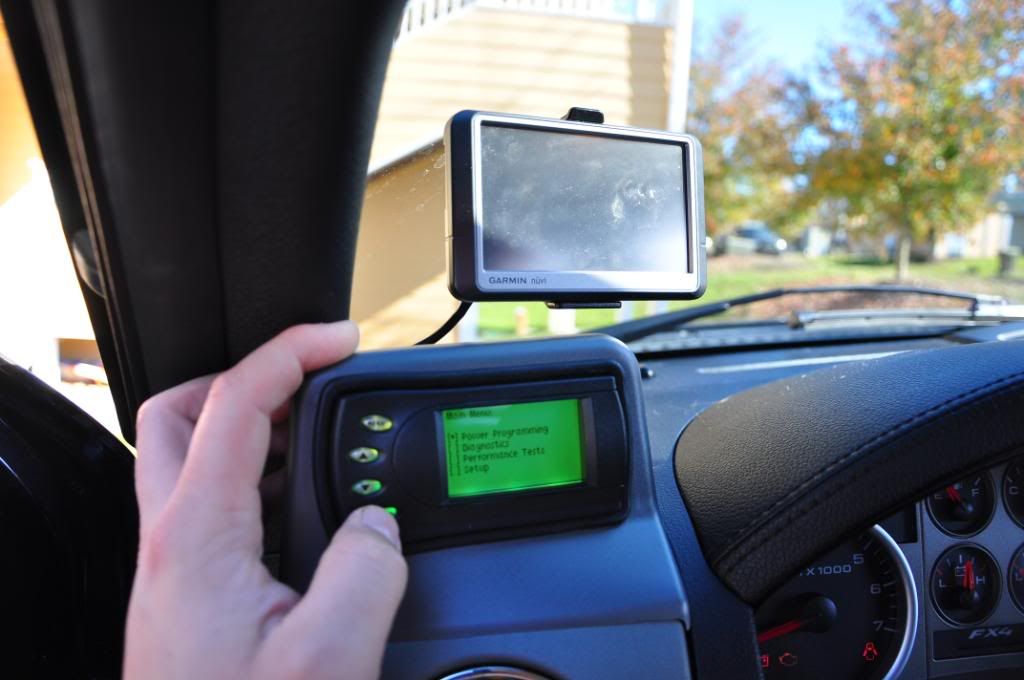
#4 click on the "module" button in the top left hand corner and set your system up

#5 set up your PID's (things to datalog) by clicking the "command" button in the top left hand corner of your screen

once you click on the "command" button, scroll down and click on "configure datalog items"
next you will see the following


now the fun begins (select the PID's as your tuner requires, 25 maximum if you're playing around or doing your own tuning) just click on the "+" sign by each name and the choices will expand

I chose to only select one since this is a "how to" (of the 502 options, if you look closely at the lower left hand corner you can see I only chose one) and click "ok" when your selections have been made

once you click the "ok" button your choices will be initialized

when you see this screen you are ready to begin recording information from your vehicles ECM (aka datalogging)

once again head to the top left hand side of the screen and click on teh green button (it says "start datalogging")

to stop, just click on the red button there at teh top left hand side of the screen (it says "stop datalogging")

now how to save the file to your computer so you can attach it to an email and send to your tuner
once again head to the upper left hand side of the screen, click on "file" and scroll down to "save file as"

then choose a name and location for the file and click "save"


congratulations, you are now ready to send that file to your tuner or review it yourself
when you click to open the file it will open as a Microsoft Excel document, for easy review

#1 start your vehicle and plug your tuning device into your vehicles OBD2 port
#2 connect the USB cable to the tuning device
I tuck my tuning device under the floor mats to keep it from shifting while driving
#3 plug in the USB cable to your laptop and select which live link program you need to use (I am using an Xcal3 and Live link version 6.0 due to vista, but I have version 5.1 for when I use the Xcal2)
not all computers will ask for this but mine does for security reason, so go ahead and click "continue"
and live link will open (this is version 6.0, version 5.1 is slightly different)
#4 click on the "module" button in the top left hand corner and set your system up
#5 set up your PID's (things to datalog) by clicking the "command" button in the top left hand corner of your screen
once you click on the "command" button, scroll down and click on "configure datalog items"
next you will see the following
now the fun begins (select the PID's as your tuner requires, 25 maximum if you're playing around or doing your own tuning) just click on the "+" sign by each name and the choices will expand
I chose to only select one since this is a "how to" (of the 502 options, if you look closely at the lower left hand corner you can see I only chose one) and click "ok" when your selections have been made
once you click the "ok" button your choices will be initialized
when you see this screen you are ready to begin recording information from your vehicles ECM (aka datalogging)
once again head to the top left hand side of the screen and click on teh green button (it says "start datalogging")
to stop, just click on the red button there at teh top left hand side of the screen (it says "stop datalogging")
now how to save the file to your computer so you can attach it to an email and send to your tuner
once again head to the upper left hand side of the screen, click on "file" and scroll down to "save file as"
then choose a name and location for the file and click "save"
congratulations, you are now ready to send that file to your tuner or review it yourself
when you click to open the file it will open as a Microsoft Excel document, for easy review