How to add KC lights behind 04-09 grill "Step by Step"!
#1
 12-30-2009, 10:27 PM


Join Date: Feb 2007
Location: Georga
Posts: 137
Likes: 0
Received 0 Likes
on
0 Posts
How to add KC lights behind 04-09 grill "Step by Step"!
I spent a few min putting together this pictorial step by step guide on how to install KC or any driving lights behind the grill of a 04-09 body style. Hope this helps those who wanted to but wasn't sure how. The total project took around 3 hours and a few "COLD ADULT BEVERAGES."
Parts list:
48" strap steel from Lowes or Home Depot; I used 1"x1/8"x48".
(4) bolts with nuts; I used stainless bolts with locking nuts.
(1) can of paint color of choice; I used black hammered look.
(1) set of lights of choice; I used KC Daylighter Driving 130W.
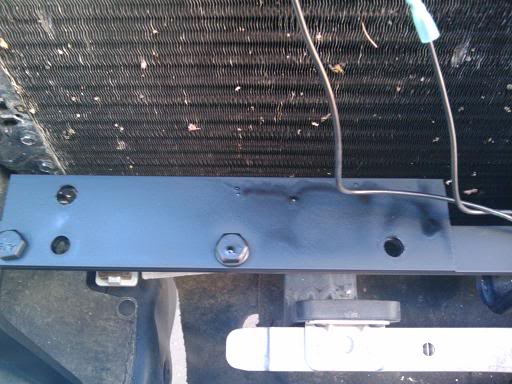
First lets take a look at the area we will be installing the lights in; I will be using the bumper skin bolts at the bottom left and far right of the pick to attach the lower part of the mount to:

These are the lights of my choice for the install; 6" KC Daylighter 130W Driving:

The first parts to fabricate is the lower part of the light bracket that will be mounted to the truck. Cut (2) 7" pieces off of your 48" stock. Next measure in 1.5" in from one end on both pieces of the 7" stock and make a mark.


On the other end of the two pieces of stock measure in 2" and make a mark.

Next thing you will do is mount the stock into a vice and bend each piece of stock to look like a "Z". This is not rocket science, they can be adjusted to the truck as we start to mount them up. Now is also a good time to drill a hole at each large enough for bolts you bought and the bumper bolts.
NOTE: the hole for the bumper bolt is the part that was measured at 1.5"; the hole for your bolts go on the 2" leg of the "Z".
They should look like this when your done:

Next mark and cut 25" off of you stock; this will be the bar that the lights will be mounted on.

Set the light bar aside; now lets mount the lower brackets to the truck.
NOTE: now is a good time for the a beverage that I spoke of earlier!!
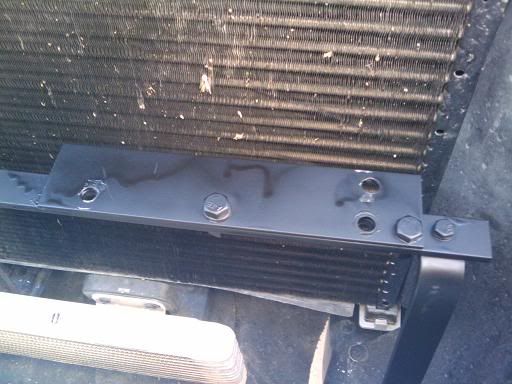
This is what the two lower brackets look like once they are mounted:


Notice the position of the top of the "Z" bar in relation to the oil cooler; now is a good time to adjust the "Z" bar to fit for your lights. Take the 25" light bar and lay it on the "Z" brackets and adjust them to level. This is what it should look like:

After you have the lower mount where you want them; Measure in 5" from both ends of the light bar and drill a hole for the mounting bolt to the "Z" bar. Also at this time determine where you want to mount your lights and drill their holes. I mounted my KC Daylighters at 2 5/8" in from the ends. This gave me enough room to get to the bolt under the light bar and placed the light in a good spot in the grill area for me.
NOTE: You can mount your lights any where on the bar you wish to your taste and light size.
This is what mine looked like:

The light bar set in fount of the center bar that the temperature prob is mounted to about 1.5"; as seen below:

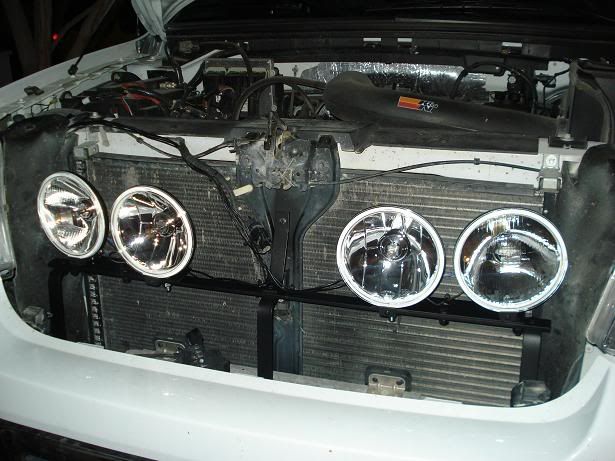
Now is a good time mock in the lights and check your clearances of the lights in relation to the grill and the radiator. You can still make adjustments to the brackets that hold the light bar at this point.
This is some pick of what mine looked like:


Now its time to fabercate the center mount bracket. Take the remaining stock 8~8.5" and mark in 1" and make a right angle. Put a hole in the 1" tab that fits your bolts and center on the light bar and make a mark for the bolt to go thru the light bar.
It should look like this:


Notice the space between the impact censer and the support bar. Mine was around 1/4".

Remove the support bar and take a moment to remove the temperature probe on the center support member.
NOTE: 1st remove the probe from the nylon tab then remove the mounting tab. Be gentle but force full with the nylon mounting tab when removing from the center support.
Once you remove the temp probe you will see a larger hole over a smaller home. I used the larger hole to run my bolt thru. I put the bolt with the head toward the radiator and the threads facing forward.
Go ahead and bent you light bar center support bracket so that it clears the impact censor and rest agents the center radiator bracket. Mark and drill a hole in the center light support the uses the existing large hole in the radiator bracket.
This is what it looks like:


NOTE: now is a good time for the a beverage that I spoke of earlier!! Your almost done!!
Go ahead and disassemble everything and take a grinder and clean up the corners of the light bar and the center support; like this:


While you have every thing apart go ahead and drill a hole for the temp probe in the light bar center bracket for the nylon mounting tab.
Here is what it looks like:


CONGRATULATIONS !!! you have finished the mount. Now its time to put a finish of your choice on the bracket. I chose hammered black. Here are some picks of it being finished in my makeshift paint booth!!


And here is the finished mount:

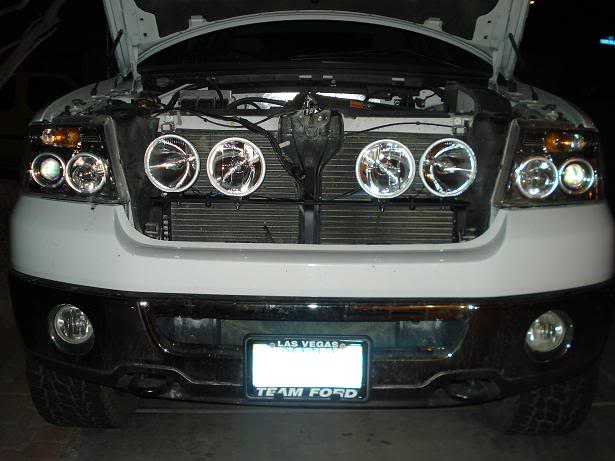
Finley lets put the finished product on the truck and mount everything up!
This is what mine looked like!!


This is a view of where I mounted the relay for the KC Light. I placed it behind the pass side head light bucket on the frame. I used the high beam power wire for a trigger on the relay. Therefore the KCs come on with the High Beams only.... Works for me and keeps the law happy!!

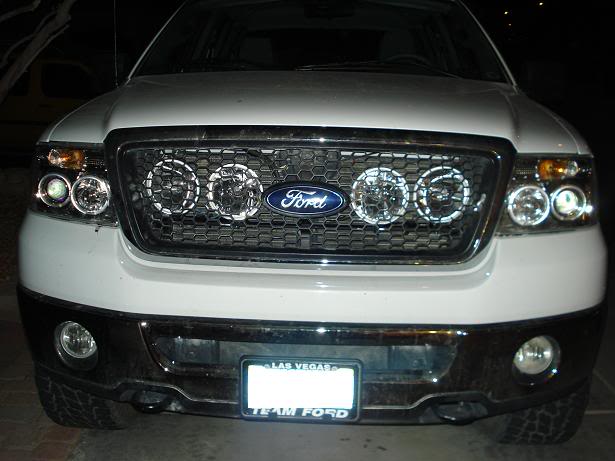
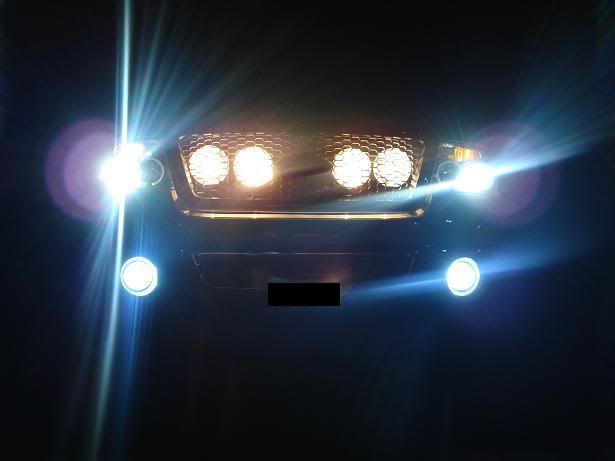
Lastly sit back and admire your finished work!!
here are some shots of my truck "in action":


I hope this helps answer some questions for those who always wanted to install lights behind the grill. No this was not my design, I saw it here in a post at F150. I couldn't find it any more so I decided to do a step by step article. Feel free to drop me a post if there are any questions.
Have Fun!!!!
Skip
Parts list:
48" strap steel from Lowes or Home Depot; I used 1"x1/8"x48".
(4) bolts with nuts; I used stainless bolts with locking nuts.
(1) can of paint color of choice; I used black hammered look.
(1) set of lights of choice; I used KC Daylighter Driving 130W.
First lets take a look at the area we will be installing the lights in; I will be using the bumper skin bolts at the bottom left and far right of the pick to attach the lower part of the mount to:
These are the lights of my choice for the install; 6" KC Daylighter 130W Driving:
The first parts to fabricate is the lower part of the light bracket that will be mounted to the truck. Cut (2) 7" pieces off of your 48" stock. Next measure in 1.5" in from one end on both pieces of the 7" stock and make a mark.
On the other end of the two pieces of stock measure in 2" and make a mark.
Next thing you will do is mount the stock into a vice and bend each piece of stock to look like a "Z". This is not rocket science, they can be adjusted to the truck as we start to mount them up. Now is also a good time to drill a hole at each large enough for bolts you bought and the bumper bolts.
NOTE: the hole for the bumper bolt is the part that was measured at 1.5"; the hole for your bolts go on the 2" leg of the "Z".
They should look like this when your done:
Next mark and cut 25" off of you stock; this will be the bar that the lights will be mounted on.
Set the light bar aside; now lets mount the lower brackets to the truck.
NOTE: now is a good time for the a beverage that I spoke of earlier!!
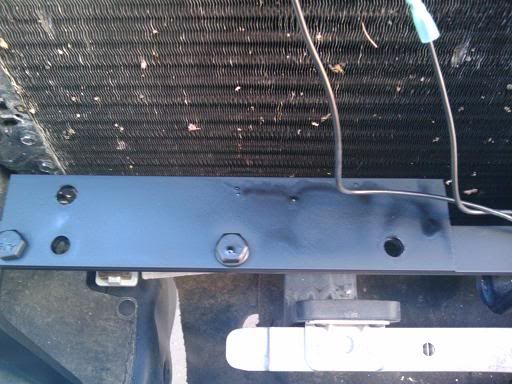
This is what the two lower brackets look like once they are mounted:
Notice the position of the top of the "Z" bar in relation to the oil cooler; now is a good time to adjust the "Z" bar to fit for your lights. Take the 25" light bar and lay it on the "Z" brackets and adjust them to level. This is what it should look like:
After you have the lower mount where you want them; Measure in 5" from both ends of the light bar and drill a hole for the mounting bolt to the "Z" bar. Also at this time determine where you want to mount your lights and drill their holes. I mounted my KC Daylighters at 2 5/8" in from the ends. This gave me enough room to get to the bolt under the light bar and placed the light in a good spot in the grill area for me.
NOTE: You can mount your lights any where on the bar you wish to your taste and light size.
This is what mine looked like:
The light bar set in fount of the center bar that the temperature prob is mounted to about 1.5"; as seen below:
Now is a good time mock in the lights and check your clearances of the lights in relation to the grill and the radiator. You can still make adjustments to the brackets that hold the light bar at this point.
This is some pick of what mine looked like:
Now its time to fabercate the center mount bracket. Take the remaining stock 8~8.5" and mark in 1" and make a right angle. Put a hole in the 1" tab that fits your bolts and center on the light bar and make a mark for the bolt to go thru the light bar.
It should look like this:
Notice the space between the impact censer and the support bar. Mine was around 1/4".
Remove the support bar and take a moment to remove the temperature probe on the center support member.
NOTE: 1st remove the probe from the nylon tab then remove the mounting tab. Be gentle but force full with the nylon mounting tab when removing from the center support.
Once you remove the temp probe you will see a larger hole over a smaller home. I used the larger hole to run my bolt thru. I put the bolt with the head toward the radiator and the threads facing forward.
Go ahead and bent you light bar center support bracket so that it clears the impact censor and rest agents the center radiator bracket. Mark and drill a hole in the center light support the uses the existing large hole in the radiator bracket.
This is what it looks like:
NOTE: now is a good time for the a beverage that I spoke of earlier!! Your almost done!!
Go ahead and disassemble everything and take a grinder and clean up the corners of the light bar and the center support; like this:
While you have every thing apart go ahead and drill a hole for the temp probe in the light bar center bracket for the nylon mounting tab.
Here is what it looks like:
CONGRATULATIONS !!! you have finished the mount. Now its time to put a finish of your choice on the bracket. I chose hammered black. Here are some picks of it being finished in my makeshift paint booth!!
And here is the finished mount:
Finley lets put the finished product on the truck and mount everything up!
This is what mine looked like!!
This is a view of where I mounted the relay for the KC Light. I placed it behind the pass side head light bucket on the frame. I used the high beam power wire for a trigger on the relay. Therefore the KCs come on with the High Beams only.... Works for me and keeps the law happy!!
Lastly sit back and admire your finished work!!
here are some shots of my truck "in action":
I hope this helps answer some questions for those who always wanted to install lights behind the grill. No this was not my design, I saw it here in a post at F150. I couldn't find it any more so I decided to do a step by step article. Feel free to drop me a post if there are any questions.
Have Fun!!!!
Skip
Last edited by skiptemp; 01-03-2010 at 10:39 PM.
#2
12-31-2009, 06:40 PM

Senior Member
Join Date: Mar 2009
Location: Hart, MI
Posts: 245
Likes: 0
Received 0 Likes
on
0 Posts
#3
01-01-2010, 09:23 AM
Join Date: Feb 2007
Location: Georga
Posts: 137
Likes: 0
Received 0 Likes
on
0 Posts
thank you!
Yes I recall the same post. I couldn't find it any more, and if memory services me right, he only showed the final outcome. I figured I would do a write up starting from the beginning to the end.
As far as the billet grill, I think it would work as long as the space between the bars was large enough.. certainly the less the space the less the light that will go thru. Kinda like adjusting blinds in front of a window!!
Thanks again for the props!
Skip

#4
01-02-2010, 07:42 AM
Senior Member
Join Date: Mar 2009
Location: Hart, MI
Posts: 245
Likes: 0
Received 0 Likes
on
0 Posts
Ordered my billet grill (upper and lower) yesterday. Once I get that installed I'm going to take one of my lights (Hella 500 Driving Lights) and wire it up quick for a driveway test. If it seems to show thru good I'll plan to mock up something like you have! If not, I'll continue my search for a bull bar, which I kind of want, love the look...But...$$$$
#5
01-02-2010, 06:45 PM
Join Date: Feb 2007
Location: Georga
Posts: 137
Likes: 0
Received 0 Likes
on
0 Posts
Ordered my billet grill (upper and lower) yesterday. Once I get that installed I'm going to take one of my lights (Hella 500 Driving Lights) and wire it up quick for a driveway test. If it seems to show thru good I'll plan to mock up something like you have! If not, I'll continue my search for a bull bar, which I kind of want, love the look...But...$$$$
Sounds like a plan!!
Have fun!
Skip
#7
01-02-2010, 08:37 PM

Member
Join Date: Oct 2009
Location: Fargo, ND
Posts: 40
Likes: 0
Received 0 Likes
on
0 Posts

Trending Topics
#8
01-03-2010, 07:51 AM
Join Date: Feb 2007
Location: Georga
Posts: 137
Likes: 0
Received 0 Likes
on
0 Posts
There is some heat; however the lights sit back from the grill about .75 of an inch. With the truck running there is always some air runing through the grill. I have not experienced any heat problems. Remember they only come on with the high beams, so rarely do I find my self at a stand still with the high beams only on. Thanks for the good question!
I have an IR temp gauge; I'll do some test and post them here.
Skip
Last edited by skiptemp; 01-03-2010 at 10:55 PM.


#13
01-04-2010, 07:12 AM

Great work and great write-up! I did mine pretty much like that except I used four 6" Hella lights (one pair of 500's and another pair of 500FF's) and aluminum stick 1" by 1/4". I ran into some issues, lol.
First thing I ran into was the distance between the bracket and grill. When I installed my lights for a test fit, I noticed my outer lights made contact with the grill because the honeycomb grill I have recesses going towards the headlights. So I had to add plates to give me an added inch of depth.
Second thing I noticed was the angle of my cross beam was too high. My lights can't be adjusted forward any greater than perpendicular to the surface it's mounted to. My truck is leveled, so I had to re-bend my brackets whch gave me a more downward beam that I could adjust upward at the light itself.
Third thing I noticed is my light wobbled. One thing I did differently from yours is I added a 3rd "Z" bracket in the middle because my others were so far apart. I think this made the wobbling occur because this helped give my bar a point of centrifugal motion. I had to bend brackets and bolt them to the ends of the cross beam and one of the headlight housing mounting points.
Here is what I have. My other images are on my other computer, along with the images of the stability bars I added at the ends of the cross beam.
#14
01-04-2010, 08:18 AM
Join Date: Feb 2007
Location: Georga
Posts: 137
Likes: 0
Received 0 Likes
on
0 Posts
Reece;
Thank you! Yes there is some movement when going over big bumps like rough train tracks. However this was not designed for off road or going cross country. I use them primary for Bambi lookers on the road due to the fact we have a lot of deer here. And the occasional Geico squirrel!
Thanks
Skip
Thank you! Yes there is some movement when going over big bumps like rough train tracks. However this was not designed for off road or going cross country. I use them primary for Bambi lookers on the road due to the fact we have a lot of deer here.
And the occasional Geico squirrel!Thanks
Skip
#15
01-04-2010, 09:02 AM
Join Date: Feb 2007
Location: Georga
Posts: 137
Likes: 0
Received 0 Likes
on
0 Posts
Great work and great write-up! I did mine pretty much like that except I used four 6" Hella lights (one pair of 500's and another pair of 500FF's) and aluminum stick 1" by 1/4". I ran into some issues, lol.
First thing I ran into was the distance between the bracket and grill. When I installed my lights for a test fit, I noticed my outer lights made contact with the grill because the honeycomb grill I have recesses going towards the headlights. So I had to add plates to give me an added inch of depth.
Second thing I noticed was the angle of my cross beam was too high. My lights can't be adjusted forward any greater than perpendicular to the surface it's mounted to. My truck is leveled, so I had to re-bend my brackets whch gave me a more downward beam that I could adjust upward at the light itself.
Third thing I noticed is my light wobbled. One thing I did differently from yours is I added a 3rd "Z" bracket in the middle because my others were so far apart. I think this made the wobbling occur because this helped give my bar a point of centrifugal motion. I had to bend brackets and bolt them to the ends of the cross beam and one of the headlight housing mounting points.
Here is what I have. My other images are on my other computer, along with the images of the stability bars I added at the ends of the cross beam.


First thing I ran into was the distance between the bracket and grill. When I installed my lights for a test fit, I noticed my outer lights made contact with the grill because the honeycomb grill I have recesses going towards the headlights. So I had to add plates to give me an added inch of depth.
Second thing I noticed was the angle of my cross beam was too high. My lights can't be adjusted forward any greater than perpendicular to the surface it's mounted to. My truck is leveled, so I had to re-bend my brackets whch gave me a more downward beam that I could adjust upward at the light itself.
Third thing I noticed is my light wobbled. One thing I did differently from yours is I added a 3rd "Z" bracket in the middle because my others were so far apart. I think this made the wobbling occur because this helped give my bar a point of centrifugal motion. I had to bend brackets and bolt them to the ends of the cross beam and one of the headlight housing mounting points.
Here is what I have. My other images are on my other computer, along with the images of the stability bars I added at the ends of the cross beam.
Great commentary. I feel your pain with "some issues".

Please find your other picks and post them to this thread. I am very interested in the additional side brackets you made. That's the whole idea of this post; every additional idea is great. Besides I'm thinking of making a vs 2.0 light bracket. Always looking to make a better mouse trap and sharing it here so we all share the benefits.
Thanks again!
Skip