
 04-13-2015, 12:52 PM
Last edit by: IB Advertising
Need to set the timing on your 4.6L or 5.4L two valve? This thread includes an invaluable write-up with pictures.
Read the full discussion below to find out how to set your timing.
Read the full discussion below to find out how to set your timing.

Timing Procedure for the 97 -03 Two valve 4.6L & 5.4L Modular Engines
#1
10-09-2009, 11:34 PM


Timing Procedure for the 97 -03 Two valve 4.6L & 5.4L Modular Engines
Posted by Dynotech
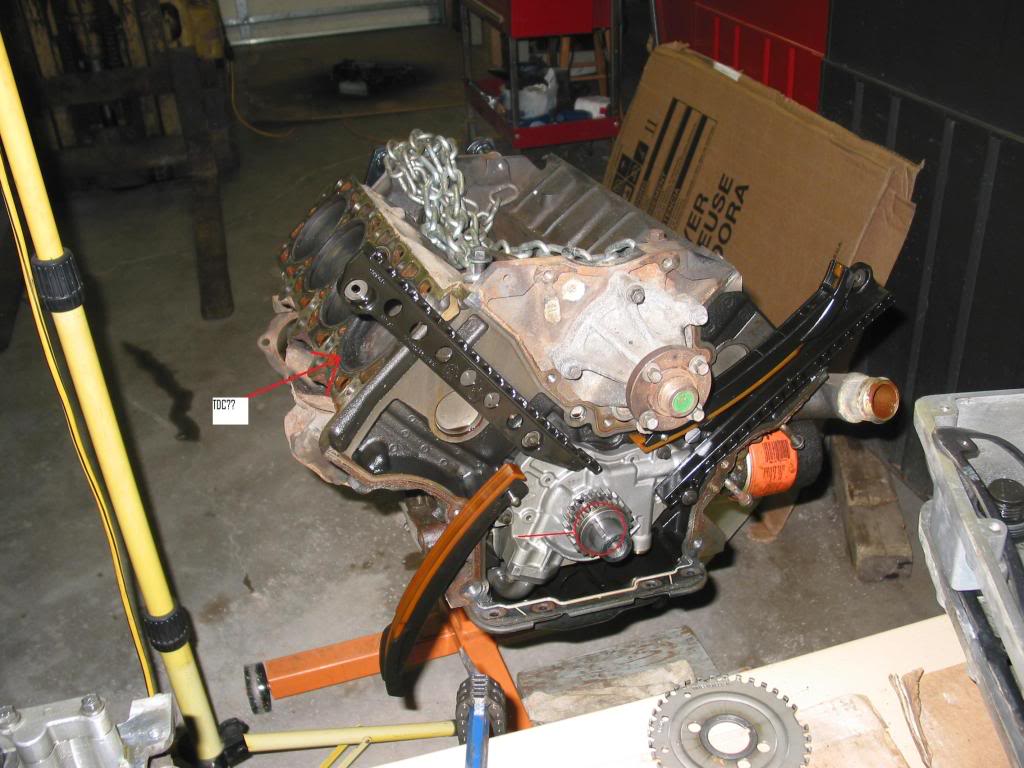
In regards to cam timing. Remove cam covers, damper and front cover. Do not remove chains,chain tensioners, or guides yet. Now rotate the crankshaft so the crank keyway is at 12:00. IMPORTANT! Do not move the crankshaft again until both chains,tensioners and guides have been reinstalled and tensioners released. Now remove the chain tensioners and chains. The pistons will all be low enough in the bores with the crank in this position so you can reinstall heads and rotate the cams to set the timing without bending valves. Two ways of finding the correct links to place on the crank and cam timing marks. Look carefully and you should be able to find two darker links on each chain each 180 degs from each other. Those would be the original copper colored timing links. The best way is to lay each chain down flat on a table and pull them lengthwise so you have two parallel rows of links tight against each other. At each end you will have one link facing the opposite direction of the two rows of links. There will be an equal number of links in each row making these end links the two you want to mark with a paint pen. They will be the links that are placed on the timing marks, one on the cam gear and one on the crank gear timing mark. Install the cam timing gears and crank timing gears. Now place the driverside chain with paint marked link on the crank timing gear mark. Holding the chain move it up to the cam gear and while rotating the cam timing gear only NOT THE CRANK! align the other painted chain link up with the cam gear timing mark and place it over the timing gear and into place aligned with the cam gear timing mark. The chain should now be in place with paint marked links one on the crank gear timing mark the other on the cam gear timing mark. While holding the chain tight install the chain tensioner under the chain guide and tighten both tensioner bolts. Now perform the same operation to the passenger side chain. Now visually inspect the painted links making sure that all 4 are lined up with the timing gear marks, two on the crank timing gear and one on each cam timing gear. Now remove the chain tensioner retaining pin allowing the tensioners to extend and put pressure against the chain. Reinstall HDR wheel, front cover, etc. Remember not to move the crankshaft through out all this leaving it's keyway at 12:00 through out the entire process. This is one of those things that once you do it you and get the hang of it it's quite easy. No need for special cam locks and or anything else. Good luck.
In regards to cam timing. Remove cam covers, damper and front cover. Do not remove chains,chain tensioners, or guides yet. Now rotate the crankshaft so the crank keyway is at 12:00. IMPORTANT! Do not move the crankshaft again until both chains,tensioners and guides have been reinstalled and tensioners released. Now remove the chain tensioners and chains. The pistons will all be low enough in the bores with the crank in this position so you can reinstall heads and rotate the cams to set the timing without bending valves. Two ways of finding the correct links to place on the crank and cam timing marks. Look carefully and you should be able to find two darker links on each chain each 180 degs from each other. Those would be the original copper colored timing links. The best way is to lay each chain down flat on a table and pull them lengthwise so you have two parallel rows of links tight against each other. At each end you will have one link facing the opposite direction of the two rows of links. There will be an equal number of links in each row making these end links the two you want to mark with a paint pen. They will be the links that are placed on the timing marks, one on the cam gear and one on the crank gear timing mark. Install the cam timing gears and crank timing gears. Now place the driverside chain with paint marked link on the crank timing gear mark. Holding the chain move it up to the cam gear and while rotating the cam timing gear only NOT THE CRANK! align the other painted chain link up with the cam gear timing mark and place it over the timing gear and into place aligned with the cam gear timing mark. The chain should now be in place with paint marked links one on the crank gear timing mark the other on the cam gear timing mark. While holding the chain tight install the chain tensioner under the chain guide and tighten both tensioner bolts. Now perform the same operation to the passenger side chain. Now visually inspect the painted links making sure that all 4 are lined up with the timing gear marks, two on the crank timing gear and one on each cam timing gear. Now remove the chain tensioner retaining pin allowing the tensioners to extend and put pressure against the chain. Reinstall HDR wheel, front cover, etc. Remember not to move the crankshaft through out all this leaving it's keyway at 12:00 through out the entire process. This is one of those things that once you do it you and get the hang of it it's quite easy. No need for special cam locks and or anything else. Good luck.
The following users liked this post:


#4
10-11-2009, 07:28 PM

Senior Member
Join Date: May 2008
Location: Minnesota
Posts: 969
Likes: 0
Received 0 Likes
on
0 Posts
somethings goofy.
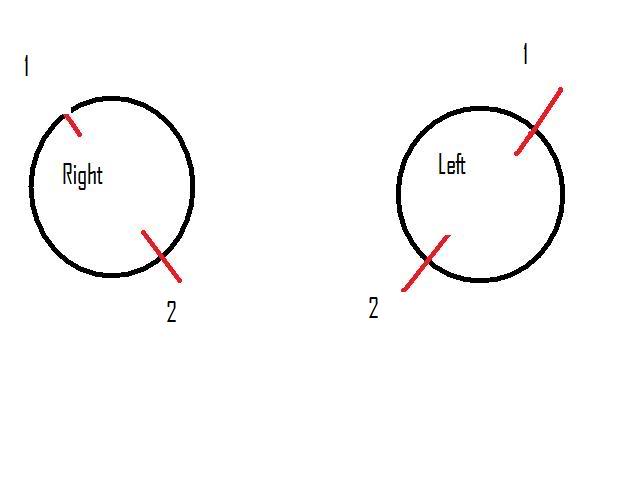
Assumed, the questions arise! Alright so when i set my crank to what i thought was TDC, the cam gear markings faced downward toward the crank, (lines 2) but the only way i can see being able to line the "darkend links" on the chains with the cam gear markings, they would have to be like lines 1. 1# is the passanger side piston closest to the bumper furthest foward, right? Well that is sitting on TDC and the markings faced downwards. I know there are 2 rotations to the crank, so do i need to rotate the crank 1 more time to TDC and spin the cams so they are facing like lines 1? That is all i need to know to get this right! And ask JBrew, i am not only frusterated, but desperate! 
Picture was created looking at the front of the motor, cam gears.
Picture was created looking at the front of the motor, cam gears.
#6
10-11-2009, 10:25 PM

Senior Member
Join Date: Aug 2003
Location: Susquehanna Valley, pa.
Posts: 1,921
Likes: 0
Received 0 Likes
on
0 Posts
The cams rotate twice for every rotation of the crank and the crank rotates twice for every power stroke, hence a 4 stroke engine.
The #1 piston could be at TDC on the compression or the exhaust stroke if the heads were still on but since you have both heads off, just set both heads and cams up like its on TDC#1 and align all the marks.
The #1 piston could be at TDC on the compression or the exhaust stroke if the heads were still on but since you have both heads off, just set both heads and cams up like its on TDC#1 and align all the marks.
#7
10-11-2009, 10:49 PM
Senior Member
Join Date: May 2008
Location: Minnesota
Posts: 969
Likes: 0
Received 0 Likes
on
0 Posts
its hard to do so because i took the chains off without making any marks at all and i look at the chains and see absolutely no markings at all or darkend links, so im assuming i have to get new chains because they either faded or marks wore off, i dont know. I am going to go up to oreilys tomorrow and see what new chains look like. If they have the markings, im going to buy them than.
Trending Topics
#8
10-11-2009, 11:42 PM
Senior Member
Join Date: Aug 2003
Location: Susquehanna Valley, pa.
Posts: 1,921
Likes: 0
Received 0 Likes
on
0 Posts
#9
10-13-2009, 02:05 AM
I better paste this one in here as well, -for future reference, -a few of these and of course - 

https://www.f150online.com/forums/v8...ny-good-2.html
and of course - https://www.f150online.com/forums/v8...ny-good-2.html
Last edited by jbrew; 10-13-2009 at 11:33 AM.
#12
10-15-2009, 09:13 PM
Senior Member
Join Date: May 2008
Location: Minnesota
Posts: 969
Likes: 0
Received 0 Likes
on
0 Posts
Jbrew, they came from this site. Click READ MORE + in yellow, this guy spells it out visually and verbally!
http://www.justanswer.com/questions/...e-1997-f-150-5
http://www.justanswer.com/questions/...e-1997-f-150-5
#13
10-15-2009, 09:15 PM
Senior Member
Join Date: May 2008
Location: Minnesota
Posts: 969
Likes: 0
Received 0 Likes
on
0 Posts

#15
03-24-2012, 02:08 AM

Member
Hey guys I have a few questions so any information will be greatly appreciated. First off Im in the process of changing head gaskests on a 01 4.6. I have the oct valve spring compressor tool and the crankshaft postioning tool. My question is do i still need the camshaft locking tool since I'm removing the valve spring. Alldata doesnt mention using it.
