How to Paint Headlights
#1
 12-20-2008, 02:37 AM


Join Date: Jun 2006
Location: Louisiana
Posts: 428
Likes: 0
Received 0 Likes
on
0 Posts
How to Paint Headlights
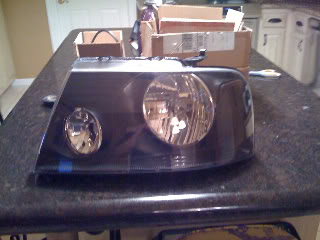
I had aftermarket black headlights but the lens was loosing it's clarity...so I decided to paint my factory lights and do a how-to on how to paint your factory f150 headlights.
Supplies:
Kitchen oven
masking tape
sharp straight edge razor
Torx T-10 screw driver
needle nose pliers
flat-head screw drivers
400 grit sandpaper
Plastic paint
Automotive grade silicone sealant
piece of cardboard
Step 1: Remove your headlights from your truck and remove the bulbs. You may also want to give your headlight a good wipe down with a wet cloth so you don't get any dirt or mud in your kitchen oven.
S2: Preheat your oven to 250 degrees F. Turn off your oven. Place a piece of cardboard between the oven shelf and the headlight. Let the headlight sit for 10 minutes. (DO NOT EXCEED 10 MINUTES, you will melt your headlight). For the geniuses...bake one headlight and pry it open and bake the other don't try two at a time.
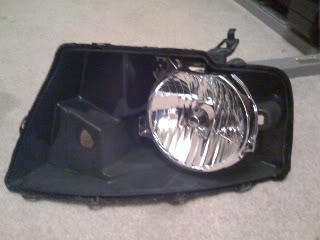
S3: After baking for 10 minutes, take a screwdriver and pry the headlight apart (your headlight will get slightly deformed around the edges of the black plastic). Use the screw driver to pry half apart then use your hands to pull the rest apart. You may have to put the headlights back into the oven several times (BE SURE TO REMOVE THE CARDBOARD EACH TIME YOU RE-HEAT THE OVEN.)
I found this corner to be the easiest side to start on.

S4: Use your torx screw driver and remove the reflector part of the headlight from the clear lens. The two screws are located here.
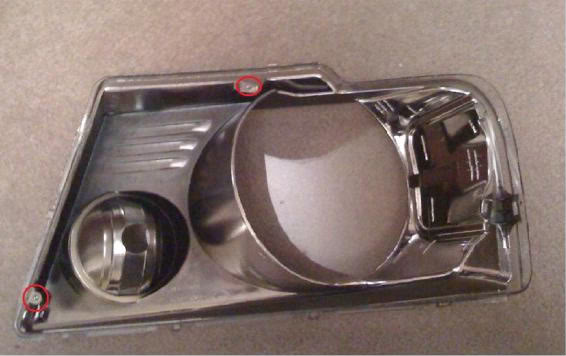
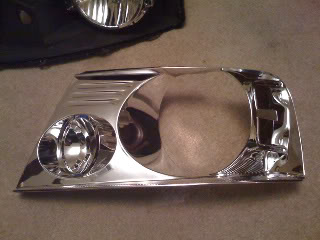
S5: Do NOT get any finger prints on the chrome reflector or orange reflector it will show up when you paint the parts. Remove the orange reflector from the larger chrome piece. Using 400 grit sand paper, sand the chrome off the larger piece shown below. Use some masking tape and tape off the smaller turn signal/parking light housing. I used a very sharp straight edge razor to get a good circular cut.
S6: After sanding use some paint thinner to clean the large reflector piece and the orange reflector (if you plan on painting the reflector too). You can use what ever kind of paint you want as long as it's made for plastics. I used Krylon black glossy plastic paint for the large piece and VHT Niteshades for the orange reflector. Paint the pieces in a low humid area and also out of the wind. I used very very light coats of paint on the larger pieces until the whole can was used. Then on the orange reflector I painted the reflector with the niteshades to the darkness I liked (If you paint it too dark on the first time don't worry). After about 2 hours the orange reflector will be dry, take it and sand it with 400 grit sand paper until all the paint is gone and leave the edges of the orange reflector black. Repaint the reflectors to your liking. (I did not paint mine too dark because of the law here states that your reflector has to be seen from at least 30 feet, the reason for painting and sanding is so your edges of your reflector will be good and black so they will blend in easy, if you don't do this step the edges will tend to be brighter orange than the rest of the piece.)
S7: Let the pieces dry for at least 5 hours. Clean the clear lens very good inside and out you don't want any finger prints inside the light after it's all sealed up again. Then put the orange reflector back into the larger piece and screw the assembly back onto the clear lens.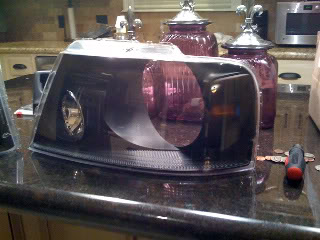
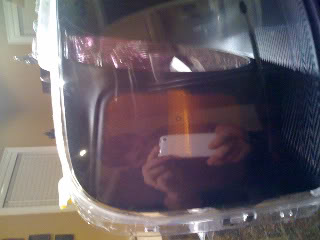
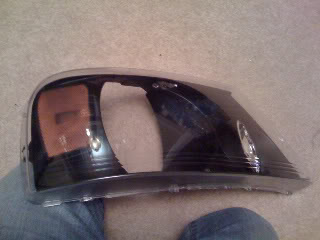
Make sure there is nothing inside your oven and preheat it to 250 degrees F. One at a time, place the back part of the headlight (shown below) into the oven again for 10 minutes with the oven off. Use a small flat-head screw driver and needle nose pliers to pull all the remaining silicone out of the headlight, you don't want any left at all, this could ruin the final product.
S8: Give the main headlight circular reflector a good cleaning and fill the little area around the edge of the back piece with the silicone, make sure you fill the little "ditch" with a lot of silicone. Then push the clear lens back into the back piece making sure it is firming back in place and that all the clips are in place. Remove any excess silicone sealant with your finger. Once both headlights' sealant are completely dry go over the seals with a little more sealant to ensure that your headlights will not fog up down the road.
Supplies:
Kitchen oven
masking tape
sharp straight edge razor
Torx T-10 screw driver
needle nose pliers
flat-head screw drivers
400 grit sandpaper
Plastic paint
Automotive grade silicone sealant
piece of cardboard
Step 1: Remove your headlights from your truck and remove the bulbs. You may also want to give your headlight a good wipe down with a wet cloth so you don't get any dirt or mud in your kitchen oven.
S2: Preheat your oven to 250 degrees F. Turn off your oven. Place a piece of cardboard between the oven shelf and the headlight. Let the headlight sit for 10 minutes. (DO NOT EXCEED 10 MINUTES, you will melt your headlight). For the geniuses...bake one headlight and pry it open and bake the other don't try two at a time.
S3: After baking for 10 minutes, take a screwdriver and pry the headlight apart (your headlight will get slightly deformed around the edges of the black plastic). Use the screw driver to pry half apart then use your hands to pull the rest apart. You may have to put the headlights back into the oven several times (BE SURE TO REMOVE THE CARDBOARD EACH TIME YOU RE-HEAT THE OVEN.)
I found this corner to be the easiest side to start on.
S4: Use your torx screw driver and remove the reflector part of the headlight from the clear lens. The two screws are located here.
S5: Do NOT get any finger prints on the chrome reflector or orange reflector it will show up when you paint the parts. Remove the orange reflector from the larger chrome piece. Using 400 grit sand paper, sand the chrome off the larger piece shown below. Use some masking tape and tape off the smaller turn signal/parking light housing. I used a very sharp straight edge razor to get a good circular cut.
S6: After sanding use some paint thinner to clean the large reflector piece and the orange reflector (if you plan on painting the reflector too). You can use what ever kind of paint you want as long as it's made for plastics. I used Krylon black glossy plastic paint for the large piece and VHT Niteshades for the orange reflector. Paint the pieces in a low humid area and also out of the wind. I used very very light coats of paint on the larger pieces until the whole can was used. Then on the orange reflector I painted the reflector with the niteshades to the darkness I liked (If you paint it too dark on the first time don't worry). After about 2 hours the orange reflector will be dry, take it and sand it with 400 grit sand paper until all the paint is gone and leave the edges of the orange reflector black. Repaint the reflectors to your liking. (I did not paint mine too dark because of the law here states that your reflector has to be seen from at least 30 feet, the reason for painting and sanding is so your edges of your reflector will be good and black so they will blend in easy, if you don't do this step the edges will tend to be brighter orange than the rest of the piece.)
S7: Let the pieces dry for at least 5 hours. Clean the clear lens very good inside and out you don't want any finger prints inside the light after it's all sealed up again. Then put the orange reflector back into the larger piece and screw the assembly back onto the clear lens.
Make sure there is nothing inside your oven and preheat it to 250 degrees F. One at a time, place the back part of the headlight (shown below) into the oven again for 10 minutes with the oven off. Use a small flat-head screw driver and needle nose pliers to pull all the remaining silicone out of the headlight, you don't want any left at all, this could ruin the final product.
S8: Give the main headlight circular reflector a good cleaning and fill the little area around the edge of the back piece with the silicone, make sure you fill the little "ditch" with a lot of silicone. Then push the clear lens back into the back piece making sure it is firming back in place and that all the clips are in place. Remove any excess silicone sealant with your finger. Once both headlights' sealant are completely dry go over the seals with a little more sealant to ensure that your headlights will not fog up down the road.
#2
12-20-2008, 08:55 AM

Senior Member
Join Date: Apr 2007
Location: GA
Posts: 1,670
Likes: 0
Received 0 Likes
on
0 Posts


#4
12-20-2008, 11:18 AM


#7
12-20-2008, 04:56 PM
Join Date: Jun 2006
Location: Louisiana
Posts: 428
Likes: 0
Received 0 Likes
on
0 Posts

Trending Topics

#9
12-21-2008, 01:42 PM


#10
12-21-2008, 04:21 PM

Senior Member
Join Date: Nov 2008
Location: NE Arkansas
Posts: 188
Likes: 0
Received 0 Likes
on
0 Posts
#11
12-22-2008, 02:55 AM
Join Date: Jun 2006
Location: Louisiana
Posts: 428
Likes: 0
Received 0 Likes
on
0 Posts
Hey sorry to hear that man...did you use a big flat head screw driver? i used one that was about a half inch wide.
#12
12-22-2008, 02:58 AM
Join Date: Jun 2006
Location: Louisiana
Posts: 428
Likes: 0
Received 0 Likes
on
0 Posts
nice! very informative looking to try this soon!
i have a couple of questions about your truck. did you paint your tail lights?
what kind of body lift? did you regear for the 37s? if so what gear?4:56? plmk i am really wanting to do pretty much the same thing to mine thanks, william
i have a couple of questions about your truck. did you paint your tail lights?
what kind of body lift? did you regear for the 37s? if so what gear?4:56? plmk i am really wanting to do pretty much the same thing to mine thanks, william
#13
12-22-2008, 08:28 AM
Senior Member
Join Date: Nov 2008
Location: NE Arkansas
Posts: 188
Likes: 0
Received 0 Likes
on
0 Posts
#14
12-22-2008, 03:51 PM
Join Date: Jun 2006
Location: Louisiana
Posts: 428
Likes: 0
Received 0 Likes
on
0 Posts
#15
12-22-2008, 05:21 PM
Senior Member
Join Date: Apr 2007
Location: GA
Posts: 1,670
Likes: 0
Received 0 Likes
on
0 Posts