Auxiliary backup lights installed (How to/pics)
#31
 11-30-2009, 03:27 PM


Senior Member
Join Date: Dec 2006
Location: dallas, TEXAS
Posts: 850
Likes: 0
Received 0 Likes
on
0 Posts

#33
12-11-2009, 06:41 PM

Senior Member
Join Date: Dec 2009
Location: Merritt Island, Fla.
Posts: 266
Likes: 0
Received 0 Likes
on
0 Posts
Blackjack,
I spotted these same lights yesterday at one of our local parts store only they were packages under the name Blazer White Lights ( UW3534 ( for $39.95. They were packaged identical to the ones you show. Interestingly, when I was looking at them it looked like they would throw a vertical light beam rather than a flat horizontal beam you would want for fog lamps. I would like to set mine up so they would work with the backup lamps but also be able to turn them on independantly. Reason for that is on the ranch where our hunting lease is we have a lot of gates and gaps we have to open and close and when I'm out there by myself I'd like to have some rear lights on when I have to go back and close a gate.
Question is, what kind of a directed beam do they project?
#34
12-16-2009, 10:30 PM
Senior Member
Join Date: Dec 2009
Location: Merritt Island, Fla.
Posts: 266
Likes: 0
Received 0 Likes
on
0 Posts
#35
12-18-2009, 09:22 AM
Senior Member
Join Date: Dec 2009
Location: Merritt Island, Fla.
Posts: 266
Likes: 0
Received 0 Likes
on
0 Posts
I thought the same thing too till I saw his pictures. Then I thought, "Hey, that'd be really useful for hooking up the trailer in the dark." It shouldn't be too big of a challenge to make them come on with the reverse lights and also with the switch. Just wiring the relay properly. I like this idea.
Also, what do you think those dark lights would look like if they were mounted on the plastic next to the license plate lamps instead of under the bumper where they could get damaged somehow?
#36
12-22-2009, 08:59 PM

Senior Member
Join Date: May 2006
Location: Mandeville, La
Posts: 920
Likes: 0
Received 0 Likes
on
0 Posts
That's the wiring scenario I'd like to do because I am going to put backup lights on my trailer but I also want to have additional lights at the back of the truck. I'd like to have them tied into my backup lights but also be able to switch them on without the truck being in reverse because most of the time I am by myself. Anybody have an idea on how to do that? I actually have two vehicles I need to do this to.
Also, what do you think those dark lights would look like if they were mounted on the plastic next to the license plate lamps instead of under the bumper where they could get damaged somehow?
Also, what do you think those dark lights would look like if they were mounted on the plastic next to the license plate lamps instead of under the bumper where they could get damaged somehow?
If you dont know about diodes, get a rectification diode from radio shack. To make current flow through the diode, orient the stripe towards the grounded side of the circuit.
Edit: added pics
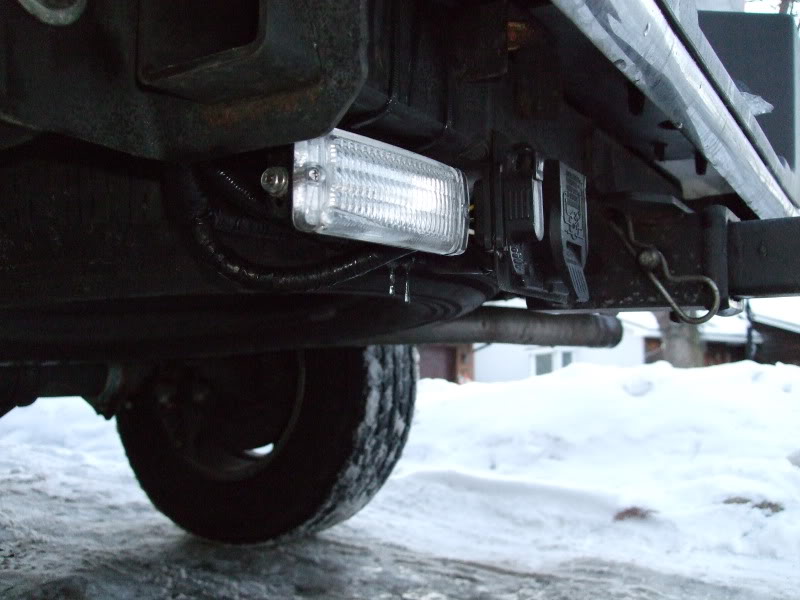
If you look closely, you can see the wire tap that I put on the reverse wire. This is from the passenger side kick panel.

Here is a crude diagram of how to wire things up. Use fuses as close to any 12v sources as you can. You can get the diodes at radioshack still.

I used a 30amp lighting relay, you need one sized appropriately to handle the current draw of your lights. The switch circuit and diode are only going to support the current required by the relay coil to activate. Use a 1 amp fuse, 5 amp max. On the aux light circuit, use a fuse sized for the lights.
When the reverse lights are on, the aux lights come on. When you flip the switch, the aux lights come on. They stay on until you turn them off. The reverse lights nor the trailer reverse lights will come on with the manual switch.
I love this setup. I have reverse lights on may trailer too. I park my trailer in my yard. The reverse lights make it easy to back into the yard without hitting trees. These lights under the bumper make life very easy for hooking a trailer and for backing up in dark areas.
Last edited by hllon4whls; 12-22-2009 at 09:35 PM.
#37
12-22-2009, 09:50 PM
Senior Member
Join Date: Dec 2009
Location: Merritt Island, Fla.
Posts: 266
Likes: 0
Received 0 Likes
on
0 Posts
Does the pink wire with the black stripe then go to the round trailer connector also? This is GREAT and I greatly appreciate the feed back. This is something I am definately going to do. First I'm going to need to rewire my trailer with a 5 wire system so I can add backup light to the trailer also. Yeah, at night I have to back my trailer a good 75 ft up my driveway to park it.
#38
12-22-2009, 10:45 PM
As far as the wiring goes, its very simple. The reverse wire runs up the passenger side and goes above the fuse box. Its a pink wire with a black stripe, the same wire thats at the trailer connector. You can use that signal to activate the relay. Put a diode inline with the relay and you can tie an external switch into the relay side of the diode. This will isolate your trucks wiring from all aux light wiring and prevent a reverse emf spike generated by the realy from reaching the truck.
If you dont know about diodes, get a rectification diode from radio shack. To make current flow through the diode, orient the stripe towards the grounded side of the circuit.
Edit: added pics
If you look closely, you can see the wire tap that I put on the reverse wire. This is from the passenger side kick panel.
Here is a crude diagram of how to wire things up. Use fuses as close to any 12v sources as you can. You can get the diodes at radioshack still.
I used a 30amp lighting relay, you need one sized appropriately to handle the current draw of your lights. The switch circuit and diode are only going to support the current required by the relay coil to activate. Use a 1 amp fuse, 5 amp max. On the aux light circuit, use a fuse sized for the lights.
When the reverse lights are on, the aux lights come on. When you flip the switch, the aux lights come on. They stay on until you turn them off. The reverse lights nor the trailer reverse lights will come on with the manual switch.
I love this setup. I have reverse lights on may trailer too. I park my trailer in my yard. The reverse lights make it easy to back into the yard without hitting trees. These lights under the bumper make life very easy for hooking a trailer and for backing up in dark areas.
Last edited by DJ2007; 12-22-2009 at 11:15 PM.
#39
12-22-2009, 11:36 PM

Looks great. I plan on adding back ups the same time I do my front lights. I had planned on flood lights, but I like the low profile look of the compact fogs. That is probably what I will end up going with. I think I am going to go with a remote switch for all of my lights. That way I do not need to run wires into the cab, and I can wire the remote to the ignition. Figure I can use the remote switch to trigger the relays for each set of lights.
http://www.autobarn.net/plsw29.html
http://www.autobarn.net/plsw29.html
Last edited by Glen R; 01-04-2010 at 08:55 AM.
#40
12-22-2009, 11:54 PM
Senior Member
Join Date: Dec 2009
Location: Merritt Island, Fla.
Posts: 266
Likes: 0
Received 0 Likes
on
0 Posts
Looks great. I plan on adding back ups the smae time I do my front lights. I had planned on flood lights, but I like teh low profile look of the compact fogs. That is probably what I will end up going with. I think I am going to go with a remote switch for all of my lights. That way I do not need to run wiresinto the cab, and I can wire the remote to the ignition. Figure I can use teh remote switch to trigger the relays for each set of lights.
http://www.autobarn.net/plsw29.html
http://www.autobarn.net/plsw29.html
Nice post and interesting switching concept. Thanks also for the new web site. I hadn't run across that before.


#43
01-12-2010, 11:19 AM

Senior Member
Join Date: Dec 2009
Location: New Port Richey, Florida
Posts: 231
Likes: 0
Received 0 Likes
on
0 Posts


#45
01-16-2010, 06:14 PM


Join Date: Nov 2005
Location: Land of 10,000 Lakes
Posts: 889
Likes: 0
Received 0 Likes
on
0 Posts
Update
UPDATE:
Here is an update to anyone that is still planning to do this mod.
I have since changed out the lights for another set. The new ones are made by the same manufacturer as the first set. Reason I changed them out was I have had them through two Minnesota winters and they were starting to rust inside the housing and also one bulb blew out so I thought now is the time to change them.
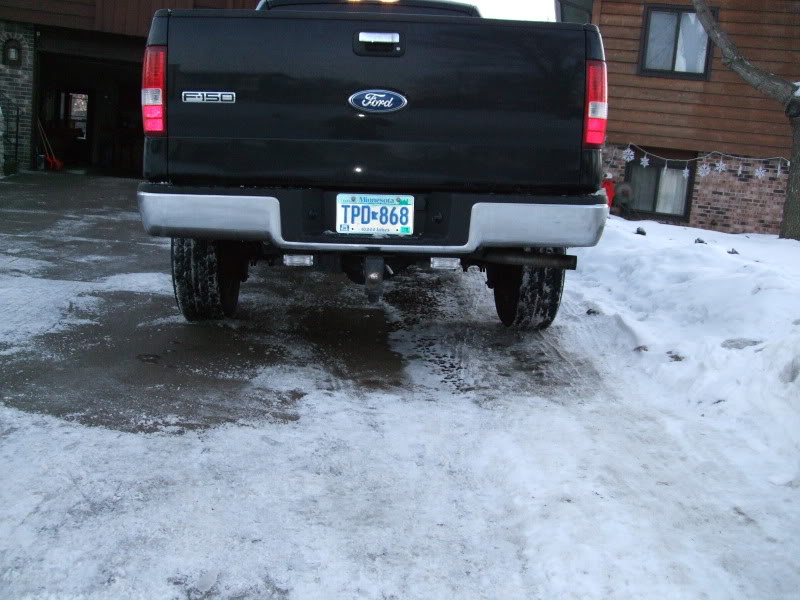
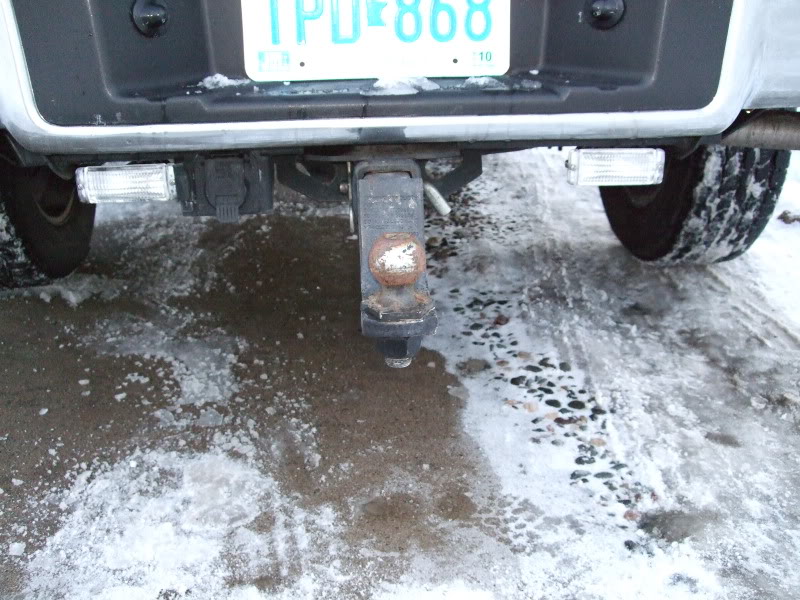
I went and picked up a set of actual "backup lights" or so that is what the box said, got them from Fleet Farm. Just looking at these I could tell they would give off a wider beam. They give you brackets to mount them to the hitch but with the brackets it made them look too bulky. Instead I just zipped tied them right to the hitch without the bracket, as they fit perfect on each side. Also they came with 55w bulbs and I replaced them with 100w bulbs.
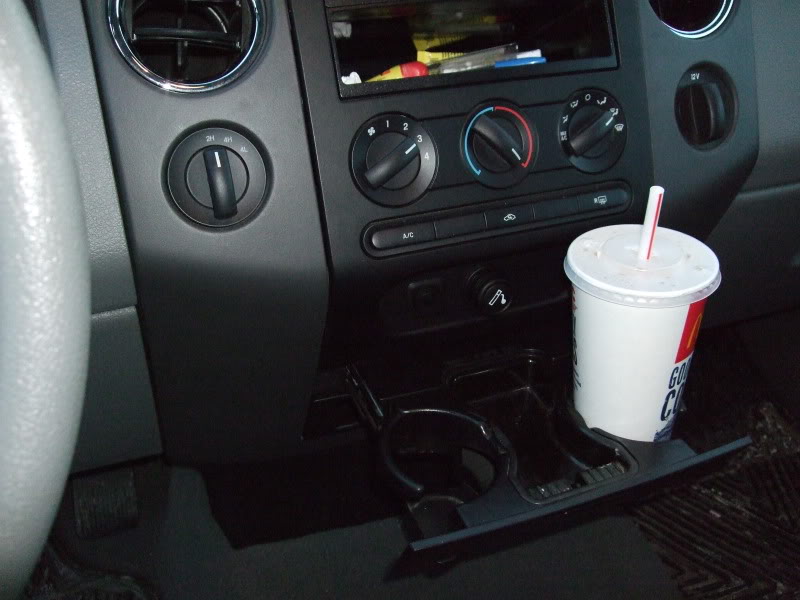
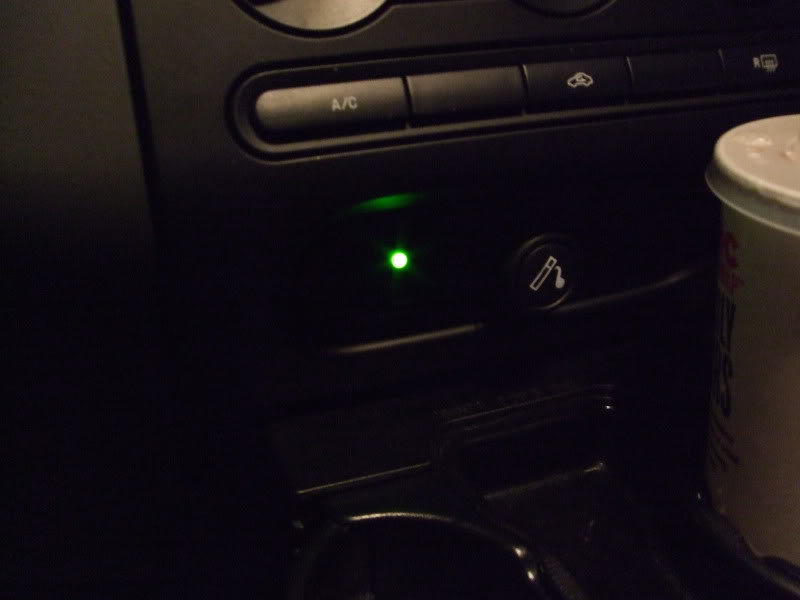
I also moved the switch off the brake controller to right next to the cigarette lighter

Here is a picture of them in the day…
Here they are at night. All I got to say is that I thought the first set was bright but these are at least 3x brighter and also have a much wider and more general beam pattern.
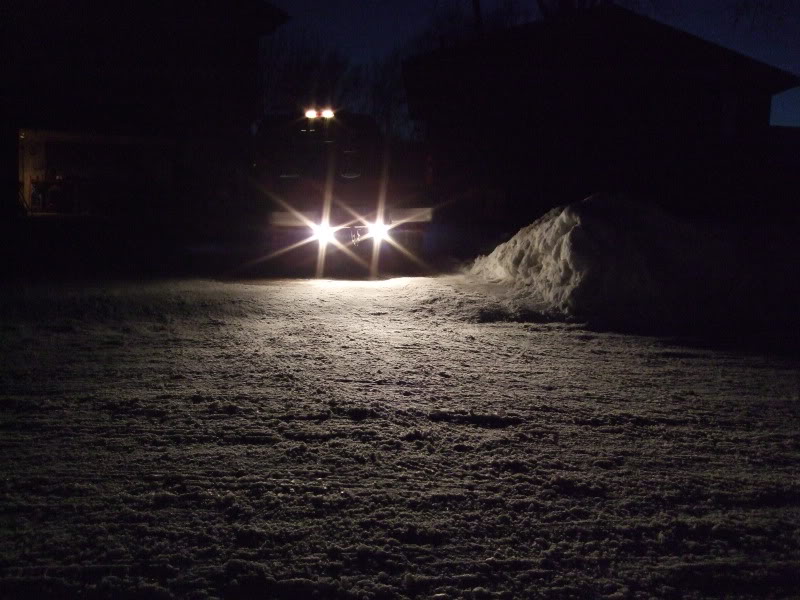
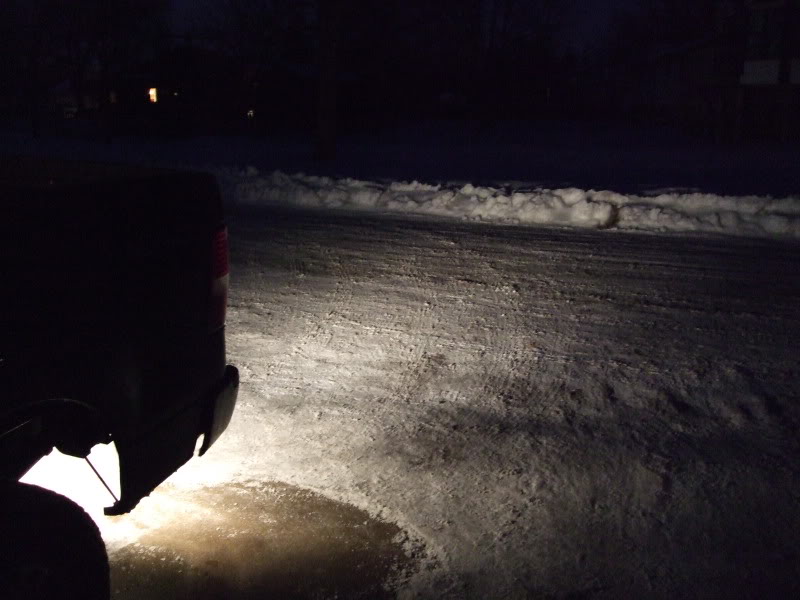
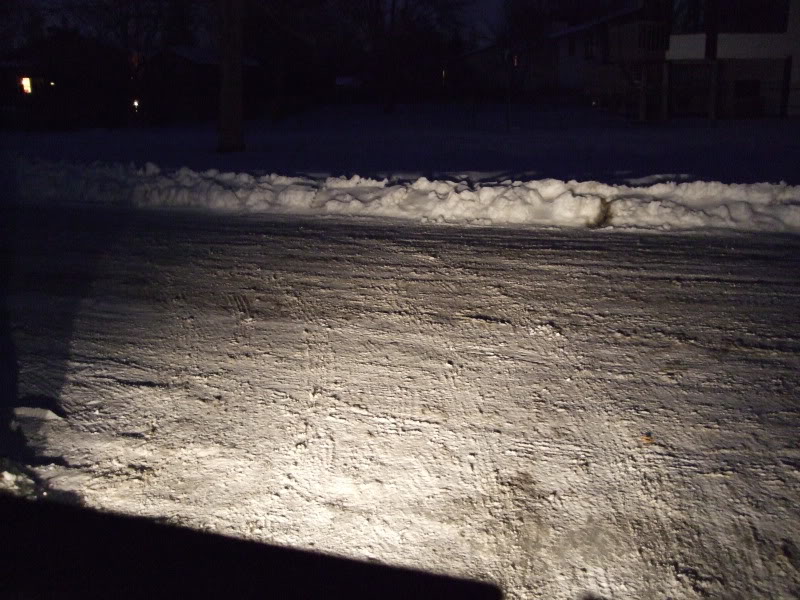
The beam on the left side is getting cut off by the snow bank...otherwise it looks just like the right side...the snow bank behind me is also blocking it too ... But you can see they do light up the neighbors house behind me!!
Here is an update to anyone that is still planning to do this mod.
I have since changed out the lights for another set. The new ones are made by the same manufacturer as the first set. Reason I changed them out was I have had them through two Minnesota winters and they were starting to rust inside the housing and also one bulb blew out so I thought now is the time to change them.
I went and picked up a set of actual "backup lights" or so that is what the box said, got them from Fleet Farm. Just looking at these I could tell they would give off a wider beam. They give you brackets to mount them to the hitch but with the brackets it made them look too bulky. Instead I just zipped tied them right to the hitch without the bracket, as they fit perfect on each side. Also they came with 55w bulbs and I replaced them with 100w bulbs.
I also moved the switch off the brake controller to right next to the cigarette lighter
Here is a picture of them in the day…
Here they are at night. All I got to say is that I thought the first set was bright but these are at least 3x brighter and also have a much wider and more general beam pattern.
The beam on the left side is getting cut off by the snow bank...otherwise it looks just like the right side...the snow bank behind me is also blocking it too ... But you can see they do light up the neighbors house behind me!!
Last edited by blackjack8900; 01-19-2010 at 01:35 AM.