"How-To" - O2 Sensor Install
#1
 01-09-2008, 04:43 AM


Join Date: Oct 2007
Posts: 129
Likes: 0
Received 0 Likes
on
0 Posts
"How-To" - O2 Sensor Install
I have gotten so much great info on this site, and wanted to give back a little. My 1997 F150 5.4 was throwing code P1131 awhile back and I narrowed it down to the O2 sensor on the passenger side. I asked here in the forum for tips on changing them out. To my surprise I got responses like "passenger side is a PITA," "I had to grind down an O2 sensor socket," etc. It sounded awful. So I decided that when I did mine, I would figure out the easiest/quickest method to this and post a how-to. I replaced the sensors on both sides at the same time, so I have pics for both.
Hope you all enjoy.
Note: I did this entire job with the exhaust fairly cold. I did not use any heat on it, no blaster of any kind, etc. My truck was sitting outside in the snow, I pulled it in the garage, and that is about as warm as it got � maybe 30-40 seconds running.
PASSENGER SIDE
1. Get yourself an O2 sensor socket that looks like the below pic. This is a crow's foot type socket in 7/8" (or 22 mm). I saw some with a longer leg on it, which I think would work better on the driver side. But the shorter leg is probably better for the passenger side. DO NOT use a wrench. DO NOT try to get other types of O2 sockets. This one works. Believe me, I tried to get short wrenches in, other sockets, etc. I could not find the socket up here in Alaska so I ordered it off of ebay for $10, plus another $5 to ship.
Thanks goes out to jbrew for the tip on getting this socket. Hadn't seen it before he pointed it out. So thanks.

2. Tools and items needed (some tools not used on both sides) (top to bottom, left to right): 3/8" drive extension, 18 inches long; scratch awl type screwdriver; 3/8 ratchet; 8 mm socket; adapter w/ 1/2" female, 3/8" male; 3/8" universal swivel; 1/2" drive ratchet; O2 sensor socket from above; 1/2" drive extension, 12 inches; small packet of anti-seize; Bosch O2 sensors, #15716 (4 wire, upstream sensors with 8" wiring).

3. Next, you need to remove the fender well liner from the wheel-well. I did this a couple weeks prior to changing the sensors to see what I was getting into, so I do not have a pic for removing it. It is almost impossible to get in and even see the sensor without this removed. There are screws along the fender and a few plastic plugs to pull out. Also, a wiring harness is connected to it, so once the liner drops down, you can pop that out. Take your time as this is the hardest part of the job in my opinion.
Once the liner is removed, turn your wheels to the left. If your tires are oversized, you might need to jack up your truck and remove the wheel. I was able get between the tire and wheel well to access the sensor fairly easy, and just didn�t feel like taking the time to remove the wheel. Here is what you will be looking at.

Hope you all enjoy.
Note: I did this entire job with the exhaust fairly cold. I did not use any heat on it, no blaster of any kind, etc. My truck was sitting outside in the snow, I pulled it in the garage, and that is about as warm as it got � maybe 30-40 seconds running.
PASSENGER SIDE
1. Get yourself an O2 sensor socket that looks like the below pic. This is a crow's foot type socket in 7/8" (or 22 mm). I saw some with a longer leg on it, which I think would work better on the driver side. But the shorter leg is probably better for the passenger side. DO NOT use a wrench. DO NOT try to get other types of O2 sockets. This one works. Believe me, I tried to get short wrenches in, other sockets, etc. I could not find the socket up here in Alaska so I ordered it off of ebay for $10, plus another $5 to ship.
Thanks goes out to jbrew for the tip on getting this socket. Hadn't seen it before he pointed it out. So thanks.
2. Tools and items needed (some tools not used on both sides) (top to bottom, left to right): 3/8" drive extension, 18 inches long; scratch awl type screwdriver; 3/8 ratchet; 8 mm socket; adapter w/ 1/2" female, 3/8" male; 3/8" universal swivel; 1/2" drive ratchet; O2 sensor socket from above; 1/2" drive extension, 12 inches; small packet of anti-seize; Bosch O2 sensors, #15716 (4 wire, upstream sensors with 8" wiring).
3. Next, you need to remove the fender well liner from the wheel-well. I did this a couple weeks prior to changing the sensors to see what I was getting into, so I do not have a pic for removing it. It is almost impossible to get in and even see the sensor without this removed. There are screws along the fender and a few plastic plugs to pull out. Also, a wiring harness is connected to it, so once the liner drops down, you can pop that out. Take your time as this is the hardest part of the job in my opinion.
Once the liner is removed, turn your wheels to the left. If your tires are oversized, you might need to jack up your truck and remove the wheel. I was able get between the tire and wheel well to access the sensor fairly easy, and just didn�t feel like taking the time to remove the wheel. Here is what you will be looking at.
#2
01-09-2008, 04:45 AM
Join Date: Oct 2007
Posts: 129
Likes: 0
Received 0 Likes
on
0 Posts
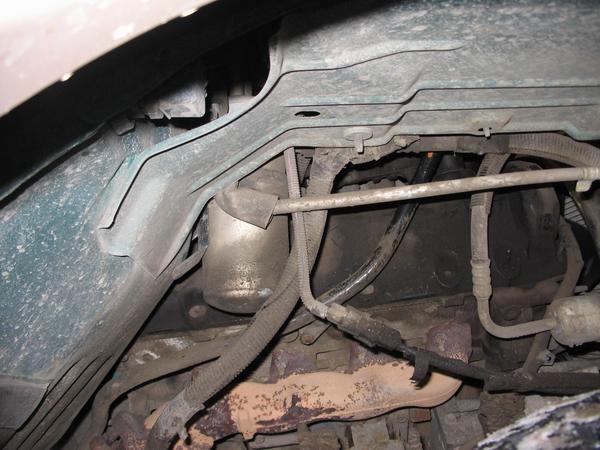
4. Open your hood, disconnect your battery, and REMOVE your transmission dipstick. The transmission fill tube goes very tight against the O2 sensor and I could not find away around this. In the first pic below, you can see the tube that runs parallel to the exhaust manifold. Where it makes its downturn there on the left � the O2 sensor is right behind there. And I mean RIGHT BEHIND there.
The second pic is a closeup of where the tube goes down, again, with the sensor right behind it. Follow this tube all the way to the end. Roll under your truck on a creeper and follow it down to see where it is that it goes into the transmission. You don�t want to try to find the entry point later without having seen it, so just follow it down to see where it goes. The third pic is the bolt that holds the tube in that is about right near the middle of the tube. Remove it with your 3/8� drive ratchet and 8 mm socket. Once you remove the bolt, the tube will fall away from the block. It is held in the transmission by a rubber tube. Taking it out is a bit easier than putting it back in, but worry about that later. Basically, pull up on the tube where it goes down behind the exhaust and it will pull right out.


Once the transmission tube is removed, you will see the sensor. Notice how the sensor points directly towards the engine block. The angle and the close quarters here is why you need the O2 sensor socket above. Also, notice right above the sensor, the plug goes into the wire harness (white plug into green socket). The female portion of the socket is actually connected to the block, so do NOT pull this hard as you probably don�t want your wiring harness flopping around near the exhaust pipe later.

The second pic is a closeup of where the tube goes down, again, with the sensor right behind it. Follow this tube all the way to the end. Roll under your truck on a creeper and follow it down to see where it is that it goes into the transmission. You don�t want to try to find the entry point later without having seen it, so just follow it down to see where it goes. The third pic is the bolt that holds the tube in that is about right near the middle of the tube. Remove it with your 3/8� drive ratchet and 8 mm socket. Once you remove the bolt, the tube will fall away from the block. It is held in the transmission by a rubber tube. Taking it out is a bit easier than putting it back in, but worry about that later. Basically, pull up on the tube where it goes down behind the exhaust and it will pull right out.
Once the transmission tube is removed, you will see the sensor. Notice how the sensor points directly towards the engine block. The angle and the close quarters here is why you need the O2 sensor socket above. Also, notice right above the sensor, the plug goes into the wire harness (white plug into green socket). The female portion of the socket is actually connected to the block, so do NOT pull this hard as you probably don�t want your wiring harness flopping around near the exhaust pipe later.
#3
01-09-2008, 04:49 AM
Join Date: Oct 2007
Posts: 129
Likes: 0
Received 0 Likes
on
0 Posts
6. Disconnect the wiring. There is a small tab that has to be pushed in on the male portion of the plug, then pull down the plug. I had a little bit of a hard time getting this, so I used the pointed scratch awl type screwdriver to stick into the tab, then pull down. Remember, don�t pull too hard because you don�t want the female part of the plug coming off the block (mine didn�t so I don�t know what will happen if it did. Just didn�t seem like it would be a good idea).
7. Once the wiring is disconnected, put your socket onto the sensor. There is a gap in the socket to slide the wiring into and the socket slides right onto the sensor. The socket portion is only on one side of the socket, so make sure you have it facing the right way. You want to adjust the socket so that the leg sticks out above the exhaust pipe, like this:

8 . Next, I ran my long (18� I think) 3/8� drive extension to the socket�s leg, straight out towards the tire. I then used a 1/ 2� to 3 /8� adapter to attach a 1/ 2� drive ratchet to the extension. You could use a regular 3 /8� drive ratchet or 3/8� breaker bar, but my 1/2" drive ratchet was longer and gave more leverage. The below pic shows how I ran this out (notice the tranny dipstick tube hanging there):
Now, THIS IS IMPORTANT!!!! Because the O2 socket is facing away from you, the old adage of �right tighty, left loosy� DOES NOT APPLY here. If you have your ratchet set to tighten a normal bolt, you will never get it loose. If you think the O2 socket is super tight, stop, take a breath, and check your ratchet direction. As I said above, I did this job cold. The sensors were original (I believe � they had Ford stamped on them) and had 114,000 miles. They loosened up pretty easy.
I gave it a good tug on the ratchet and it popped loose right away. It was not difficult at all. Your socket will bind up against the exhaust pipe, so you will have to back it off the sensor, adjust it, then turn it some more. After a couple of turns, you reach in with your hand and finish backing it out. Sensor is out.
Old sensor versus new sensor.
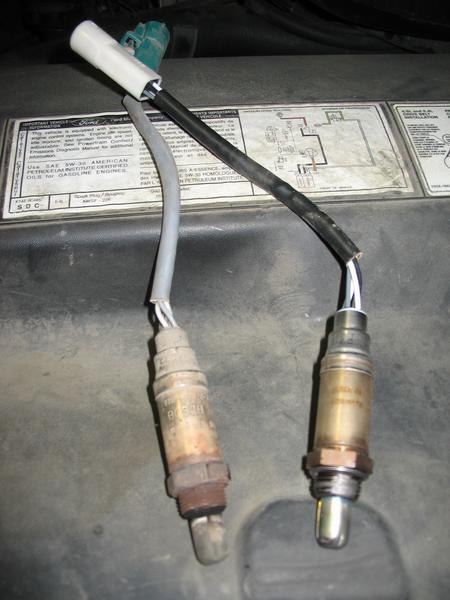
On my 1997, 5.4L, the sensors have an 8 inch wiring. While ordering them, I think there were 13 and 16 inch wires available also, but my originals had 8. Stick with 8 so that you don�t have excess wire to rub over on the exhaust.
9. The new sensor comes with a little bit of anti-seize on the threads. Many people have suggested it is a good idea to add more to the threads. As I said, these were my original O2s with 114k miles and they popped right out. So I don�t think you really need additional, but in the spirit of taking advice I had gotten on the forums here, I added a little bit of additional to the threads.

10. Put the new sensor into the hole on the exhaust and turn it to your left to tighten (it is backwards again). Tighten in by hand, then with the O2 sensor socket and extensions, same as you took them out. Plug in the socket.
11. Next, you want to turn your attention back to the transmission dipstick tube. My wheel-well area was a bit dirty and got some dirt on the part of the tube that goes into the rubber grommet on the tranny. I used a paper towel to wipe this area off really well before guiding the tube back into place above and down behind the exhaust pipe. I then laid on a creeper and rolled under the truck. Hopefully you followed the advice earlier and followed the tube to its entry point into the tranny before you pulled it out so you know exactly where it goes in. If not, you will see just above the exhaust heat shield where the rubber tube going into the tranny is. Wipe the end of the tube off one more time and then guide it into the rubber tube. Replace the bolt that holds the tube to the engine block and put the dipstick back in. Getting the tranny tube back down to this position took a little bit of working it just to get it right into the position down behind the exhaust.
12. Re-install your wheel-well liner and connect the battery.
This job looks far harder than it is. The most difficult part is removing and installing the wheel-well liner. That took me about 20 minutes alone to get removed. If you use the right socket and extensions for the sensor, it comes out pretty quick. I already had my wheel-well liner out when I actually replaced the sensor, so without counting the wheel liner, start to finish on this one sensor was about 20-25 minutes.
7. Once the wiring is disconnected, put your socket onto the sensor. There is a gap in the socket to slide the wiring into and the socket slides right onto the sensor. The socket portion is only on one side of the socket, so make sure you have it facing the right way. You want to adjust the socket so that the leg sticks out above the exhaust pipe, like this:
8 . Next, I ran my long (18� I think) 3/8� drive extension to the socket�s leg, straight out towards the tire. I then used a 1/ 2� to 3 /8� adapter to attach a 1/ 2� drive ratchet to the extension. You could use a regular 3 /8� drive ratchet or 3/8� breaker bar, but my 1/2" drive ratchet was longer and gave more leverage. The below pic shows how I ran this out (notice the tranny dipstick tube hanging there):
Now, THIS IS IMPORTANT!!!! Because the O2 socket is facing away from you, the old adage of �right tighty, left loosy� DOES NOT APPLY here. If you have your ratchet set to tighten a normal bolt, you will never get it loose. If you think the O2 socket is super tight, stop, take a breath, and check your ratchet direction. As I said above, I did this job cold. The sensors were original (I believe � they had Ford stamped on them) and had 114,000 miles. They loosened up pretty easy.
I gave it a good tug on the ratchet and it popped loose right away. It was not difficult at all. Your socket will bind up against the exhaust pipe, so you will have to back it off the sensor, adjust it, then turn it some more. After a couple of turns, you reach in with your hand and finish backing it out. Sensor is out.
Old sensor versus new sensor.
On my 1997, 5.4L, the sensors have an 8 inch wiring. While ordering them, I think there were 13 and 16 inch wires available also, but my originals had 8. Stick with 8 so that you don�t have excess wire to rub over on the exhaust.
9. The new sensor comes with a little bit of anti-seize on the threads. Many people have suggested it is a good idea to add more to the threads. As I said, these were my original O2s with 114k miles and they popped right out. So I don�t think you really need additional, but in the spirit of taking advice I had gotten on the forums here, I added a little bit of additional to the threads.
10. Put the new sensor into the hole on the exhaust and turn it to your left to tighten (it is backwards again). Tighten in by hand, then with the O2 sensor socket and extensions, same as you took them out. Plug in the socket.
11. Next, you want to turn your attention back to the transmission dipstick tube. My wheel-well area was a bit dirty and got some dirt on the part of the tube that goes into the rubber grommet on the tranny. I used a paper towel to wipe this area off really well before guiding the tube back into place above and down behind the exhaust pipe. I then laid on a creeper and rolled under the truck. Hopefully you followed the advice earlier and followed the tube to its entry point into the tranny before you pulled it out so you know exactly where it goes in. If not, you will see just above the exhaust heat shield where the rubber tube going into the tranny is. Wipe the end of the tube off one more time and then guide it into the rubber tube. Replace the bolt that holds the tube to the engine block and put the dipstick back in. Getting the tranny tube back down to this position took a little bit of working it just to get it right into the position down behind the exhaust.
12. Re-install your wheel-well liner and connect the battery.
This job looks far harder than it is. The most difficult part is removing and installing the wheel-well liner. That took me about 20 minutes alone to get removed. If you use the right socket and extensions for the sensor, it comes out pretty quick. I already had my wheel-well liner out when I actually replaced the sensor, so without counting the wheel liner, start to finish on this one sensor was about 20-25 minutes.
#4
01-09-2008, 04:51 AM
Join Date: Oct 2007
Posts: 129
Likes: 0
Received 0 Likes
on
0 Posts
DRIVER SIDE SENSOR
The good news for replacing the driver side O2 sensor is that you do not have to remove the wheel-well liner. That was the most difficult part on the passenger side. The bad news is that the sensor is at a different angle, so you have to go underneath the car to get it done.
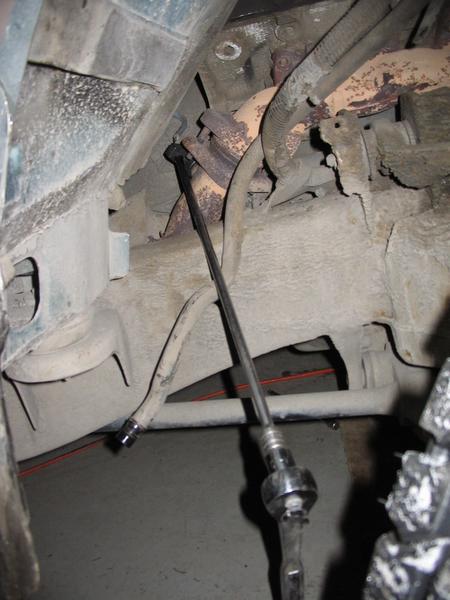
1. Below is a pic of the O2 sensor on the driver side. The top portion of this pic is the wheel-well liner still in place. In the middle of the pic you can see a wiring harness that goes from top to bottom and curves to the right there near the bottom. Just under the wheel-well liner and to the right of the wiring harness, you can see the O2 sensor coming out of the exhaust (just below the shadow). You will notice that this sensor does not point towards the engine block like the passenger side. Rather, this sensor points towards the rear of the vehicle.

Another pic showing more of the sensor:

2. Go up under the vehicle and trace the sensor wiring up to the plug. Disconnect by pushing in the tab or placing an awl/screwdriver into the tab and pulling down. The wiring on this side did not have nearly as much slack as the passenger side, so was a little more difficult to work at getting it unplugged.
Here is a pic of the socket from underneath the vehicle with the O2 sensor socket on it.

3. You might be able to get the sensor out from the wheel-well, but I was not able to get good leverage from there. With the wheel off the vehicle it might be easier, but I did not take the wheel off.
So I went up under the vehicle. Get your O2 sensor socket onto the sensor like the above. You want the leg to the side of the exhaust manifold towards the center of the vehicle so that you can get a 3/8� drive universal swivel onto the socket. It will be a tight fit against the exhaust. I then plugged in my 1/2" to 3/8� drive adapter into the swivel, and then ran my 1/2" drive extension (foot long) off the adapter. At this point, you have your extension running off the swivel towards the front of the vehicle. This extension gives you the room and the leverage you will need to break loose the sensor (again, all of this was done cold).
IMPORTANT: If your sensor seems super tight and won�t come, stop, take a breath, and then make sure your ratchet is going the correct direction. Because you are actually facing the opposite direction of the sensor, you will want to set your ratchet to what is normally �tighten.� My sensor was the original with 114k miles and it broke loose fairly easy.
I was not able to get a pic of my ratchet set up with the extension attached (not enough hands), but here is a pic that I took once the sensor was broke loose. I removed the extension, so what you see here is just the socket, swivel, and ratchet.

As you begin to loosen it, you will have to readjust your socket as it goes around and hits against the exhaust. Continue to do this until it is loose enough that you can do it by hand.
Add anti-seize to the new sensor if you would like, screw it back into the exhaust, and tighten. Once I got the sensor snug by hand, I used the ratchet setup with the extension so that I had enough leverage to get it nice and tight.
The driver�s side O2 sensor is a bit easier to replace than the passenger side because you do not have to remove additional items (wheel-well liner and tranny tube), but it is a little bit tight for getting a ratchet and extension in there without going under the vehicle. Total time to replace this sensor was about 20 minutes. Now that I�ve done it once, it could probably be done again in 10-15 minutes.
The good news for replacing the driver side O2 sensor is that you do not have to remove the wheel-well liner. That was the most difficult part on the passenger side. The bad news is that the sensor is at a different angle, so you have to go underneath the car to get it done.
1. Below is a pic of the O2 sensor on the driver side. The top portion of this pic is the wheel-well liner still in place. In the middle of the pic you can see a wiring harness that goes from top to bottom and curves to the right there near the bottom. Just under the wheel-well liner and to the right of the wiring harness, you can see the O2 sensor coming out of the exhaust (just below the shadow). You will notice that this sensor does not point towards the engine block like the passenger side. Rather, this sensor points towards the rear of the vehicle.
Another pic showing more of the sensor:
2. Go up under the vehicle and trace the sensor wiring up to the plug. Disconnect by pushing in the tab or placing an awl/screwdriver into the tab and pulling down. The wiring on this side did not have nearly as much slack as the passenger side, so was a little more difficult to work at getting it unplugged.
Here is a pic of the socket from underneath the vehicle with the O2 sensor socket on it.
3. You might be able to get the sensor out from the wheel-well, but I was not able to get good leverage from there. With the wheel off the vehicle it might be easier, but I did not take the wheel off.
So I went up under the vehicle. Get your O2 sensor socket onto the sensor like the above. You want the leg to the side of the exhaust manifold towards the center of the vehicle so that you can get a 3/8� drive universal swivel onto the socket. It will be a tight fit against the exhaust. I then plugged in my 1/2" to 3/8� drive adapter into the swivel, and then ran my 1/2" drive extension (foot long) off the adapter. At this point, you have your extension running off the swivel towards the front of the vehicle. This extension gives you the room and the leverage you will need to break loose the sensor (again, all of this was done cold).
IMPORTANT: If your sensor seems super tight and won�t come, stop, take a breath, and then make sure your ratchet is going the correct direction. Because you are actually facing the opposite direction of the sensor, you will want to set your ratchet to what is normally �tighten.� My sensor was the original with 114k miles and it broke loose fairly easy.
I was not able to get a pic of my ratchet set up with the extension attached (not enough hands), but here is a pic that I took once the sensor was broke loose. I removed the extension, so what you see here is just the socket, swivel, and ratchet.
As you begin to loosen it, you will have to readjust your socket as it goes around and hits against the exhaust. Continue to do this until it is loose enough that you can do it by hand.
Add anti-seize to the new sensor if you would like, screw it back into the exhaust, and tighten. Once I got the sensor snug by hand, I used the ratchet setup with the extension so that I had enough leverage to get it nice and tight.
The driver�s side O2 sensor is a bit easier to replace than the passenger side because you do not have to remove additional items (wheel-well liner and tranny tube), but it is a little bit tight for getting a ratchet and extension in there without going under the vehicle. Total time to replace this sensor was about 20 minutes. Now that I�ve done it once, it could probably be done again in 10-15 minutes.
#5
01-09-2008, 04:57 AM
Join Date: Oct 2007
Posts: 129
Likes: 0
Received 0 Likes
on
0 Posts
One More Thing
I just wanted to add one more thing. Up here in Alaska I have Carquest, Napa, and Schucks for auto parts stores (and Ford). All of these places sell the Bosch O2 sensors. The sensors at Schucks run $66.99 if I go in and pick them up. BUT, I ordered it onlne, for pickup in the store, for $44.99. Pretty decent savings of $22 per sensor. Schucks is tied in with Kragen Auto and I think Checker. Check out the online ordering at cskauto.com. You guys might be able to do better at Auto Zone down there, but that is what I had available.
#6
01-09-2008, 05:34 AM


#7
01-09-2008, 07:19 AM

Senior Member
Join Date: Jun 2006
Location: NJ
Posts: 520
Likes: 0
Received 0 Likes
on
0 Posts
Bosch caution on Expy's
I replaced mine in my 03 Expy. The Bosch sensors are a wee-bit longer than the OEM. On the psgr side, the wires SLIGHTLY touch the rear AC/heater lines!!! Doh. I should have known better. After 4 months I was back in there taking out a grounded O2.
Probably not a problem on the 150's. Just a note to say the Bosch's are longer and space is at a premium down there!
Probably not a problem on the 150's. Just a note to say the Bosch's are longer and space is at a premium down there!
Trending Topics
#8
01-09-2008, 09:26 AM

Senior Member
Join Date: May 2005
Location: Alabama
Posts: 576
Likes: 0
Received 0 Likes
on
0 Posts
#9
01-09-2008, 01:14 PM
Join Date: Oct 2007
Posts: 129
Likes: 0
Received 0 Likes
on
0 Posts
Originally Posted by jbrew
Tried to PM you , not working yet -
This write-up is too good for a sticky. It needs to go in the "Tech Articles" section.
If you write Rockpick (moderator) - I'm sure he will put it in.
Very helpful info!! Again, great Job!!!
This write-up is too good for a sticky. It needs to go in the "Tech Articles" section.
If you write Rockpick (moderator) - I'm sure he will put it in.
Very helpful info!! Again, great Job!!!
Now that my CEL code is gone, it will be TB/AIC cleaning and plugs/COPs. Didn't want to do all of them at once until I kicked the code.

#11
01-09-2008, 02:10 PM
Originally Posted by jmg-in-alaska
Thanks jbrew. I think the PM function is one of those that does not work until 100 posts. I'll drop Rockpick a line. Glad you enjoyed it.
Now that my CEL code is gone, it will be TB/AIC cleaning and plugs/COPs. Didn't want to do all of them at once until I kicked the code.
Now that my CEL code is gone, it will be TB/AIC cleaning and plugs/COPs. Didn't want to do all of them at once until I kicked the code.
Yea that O2 socket makes it easy.. I have a few write ups I started and haven't finished yet (Ignition systems) (Emissions) that I need get finished.
I remember the first time attacking that O2 sensor on the passenger side and thought -No way, how am I going to get that out of their lol. Now I don't have one their any more. But yea, this is a good right up most definitely.
#12
01-10-2008, 03:12 PM
Join Date: Oct 2007
Posts: 129
Likes: 0
Received 0 Likes
on
0 Posts
Originally Posted by jbrew
Tried to PM you , not working yet -
This write-up is too good for a sticky. It needs to go in the "Tech Articles" section.
If you write Rockpick (moderator) - I'm sure he will put it in.
Very helpful info!! Again, great Job!!!
This write-up is too good for a sticky. It needs to go in the "Tech Articles" section.
If you write Rockpick (moderator) - I'm sure he will put it in.
Very helpful info!! Again, great Job!!!
I sent an e-mail off to Rockpick for it. Thanks again jbrew.

#14
01-17-2008, 01:25 PM

Is your next project going to be fixing the busted exhaust manifold studs??
I'm in the same boat on that one!!
Thanks for the pic with the fender liner out! That lets me see that I should be able to do my manifolds on the pass side.
Did you have to take the actual fender flare part off of the truck to get to the liner screws?? I've looked at mine, and I can't see any screws, other then the ones that hold on the flare??
I'm going to tackle the manifold project soon... I have all the parts.. Cost over $200 from the Ford parts counter!! I don't even have new manifolds! That's just studs, nuts and gaskets!
Mitch
#15
01-17-2008, 01:32 PM
Once the wheels off Mitch , you can pull the liner in about 2 minutes . It's a 5 or 6mm - Zip screw..7 or 8 of them . A couple push plugs as well . Your 4wd vac line may be fastened to it under the hood , so watch for that..
Okay , maybe 5 minutes , you can have it out

You'll need a 12 & 13mm for the manifold nuts- My studs were stainless , but they still looked like hell on the outside . I had to wire wheel them first and use miscellaneous extensions with universals w/a little cordless impact gun on the manifold nuts. All the studs backed out fine for me.
BTW - Stock manifolds on ebay $27 last time I seen them..There's one eBay store where you can get new ones real cheap. I would suggest that seeing how your exhaust to manifold bolts are going to break on yuh..
Okay , maybe 5 minutes , you can have it out
You'll need a 12 & 13mm for the manifold nuts- My studs were stainless , but they still looked like hell on the outside . I had to wire wheel them first and use miscellaneous extensions with universals w/a little cordless impact gun on the manifold nuts. All the studs backed out fine for me.
BTW - Stock manifolds on ebay $27 last time I seen them..There's one eBay store where you can get new ones real cheap. I would suggest that seeing how your exhaust to manifold bolts are going to break on yuh..
Last edited by jbrew; 01-17-2008 at 01:46 PM.

