Need Help - trailer electrical hook up
#1
 06-13-2011, 08:18 AM


Join Date: Apr 2011
Posts: 157
Likes: 0
Received 0 Likes
on
0 Posts
Need Help - trailer electrical hook up
I am trying to re-wire my waverunner trailer, bought an LED light kit.
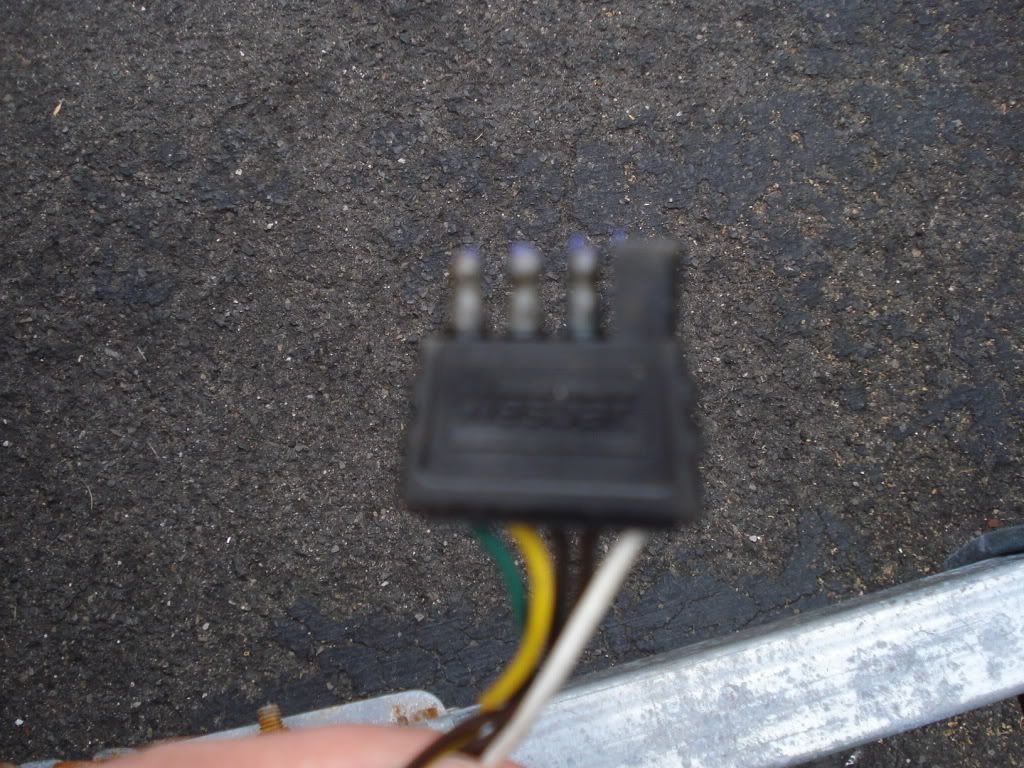
Here's my biggest issue, this is currently the connection that I have that fits right into the outlet on my truck..
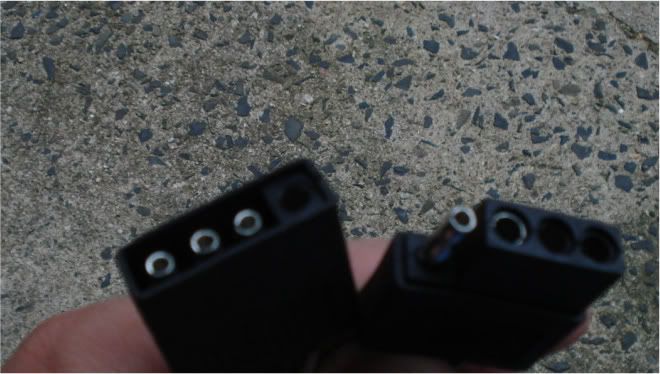
Now the connections that came with the kit look like this;
Can I use the old connection and splice the wires from the new set of wires?
Appreciate all the help. I've never seen those connections that came with the new kit, even my old boat trailer had the connections that are currently on the waverunner trailer.
Here's my biggest issue, this is currently the connection that I have that fits right into the outlet on my truck..
Now the connections that came with the kit look like this;
Can I use the old connection and splice the wires from the new set of wires?
Appreciate all the help. I've never seen those connections that came with the new kit, even my old boat trailer had the connections that are currently on the waverunner trailer.
#2
06-13-2011, 10:21 AM

#3
06-13-2011, 10:54 AM
Join Date: Apr 2011
Posts: 157
Likes: 0
Received 0 Likes
on
0 Posts
Wow, I'll feel really really stupid if all I have to do is cut the plastic. I know this may sound stupid, but is that how they all come? I have never received or rewired trailer lights before. Just cut the 3 male ends on the one on the left, and leave the female end open. That could make sense...but is that the right way to do it? I don't want to do damage to my truck..
#4
06-13-2011, 11:37 AM
Join Date: Apr 2011
Posts: 157
Likes: 0
Received 0 Likes
on
0 Posts
Just for more reference, this is the wiring diagram that came with this kit...
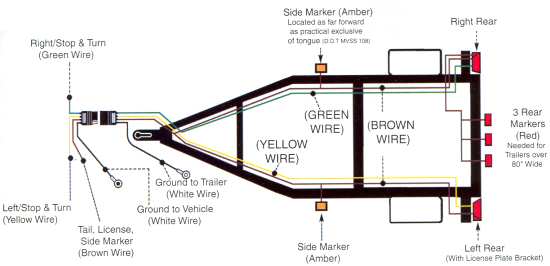
The front where they are showing the two connections is confusing me... now I have to splice the tail lights into the wiring already, I didn't want to splice the front end too. Any input is appreciated...
The front where they are showing the two connections is confusing me... now I have to splice the tail lights into the wiring already, I didn't want to splice the front end too. Any input is appreciated...
Last edited by NJ11FX4; 06-13-2011 at 11:41 AM.
#5
06-13-2011, 11:51 AM
The shape of the male ends are different than your old ones and what I am familiar with. Make sure all the lights are off, and test the single (ground) side of the right harness into one female end on the truck to see if it fits and you get a good metal on metal contact. If so, then you can just cut off the plastic/rubber and go from there.
I wired my utility trailer with new LED light set from Harbor Freight, twice. First, I got the rectangle submersible set. They were too wide and ended up breaking one. The other had grounding issues. So I got the square set and re-ran all the wires including a ground wire. All good now. I don't remember now what the harness looks like now. I did not cut any cover on the harness, though.
Don't worry about mis-wiring. The truck has fuses in case you screw up!
#6
06-13-2011, 12:08 PM
Join Date: Apr 2011
Posts: 157
Likes: 0
Received 0 Likes
on
0 Posts
Is that what you have? http://www.harborfreight.com/one-pai...hts-94137.html
If so, thats exactly my setup, just square, same wiring came with it, exactly same. Those two ends connected together are in the middle...
If so, thats exactly my setup, just square, same wiring came with it, exactly same. Those two ends connected together are in the middle...
#7
06-13-2011, 02:34 PM
Had those, now have these ones. Both work fine until I broke the wider ones.
Last edited by APT; 06-13-2011 at 04:21 PM.
Trending Topics
#10
06-13-2011, 04:25 PM
Join Date: Apr 2011
Posts: 157
Likes: 0
Received 0 Likes
on
0 Posts
#11
06-13-2011, 06:51 PM
#12
06-13-2011, 07:18 PM
Join Date: Apr 2011
Posts: 157
Likes: 0
Received 0 Likes
on
0 Posts
Appreciate all the help, you were right. I peeled back the shroud and sure enough there it is. Thanks again. Any tips for installing this kit?
I see each taillight has a ground plus up front has the ground. It appears straight forward, but I'm a novice when it comes to this so I appreciate your time and help.
I see each taillight has a ground plus up front has the ground. It appears straight forward, but I'm a novice when it comes to this so I appreciate your time and help.
#13
06-13-2011, 10:12 PM
I'd run a ground wire from the connector to each light instead of relying on the frame. Mine rusted at some of the frame connections and the ground was lost, and the lights became intermittent over a few years. Start with the tail lights and get those working first. Splice in side marker lights if you care to some day. Take your time, test each light, each step. A volt meter might help if you know how to use one. Make sure all the wires are secure after they function, not loose. Wind and debris have a way of catching them and taking out something.
#14
06-13-2011, 10:14 PM
#15
06-14-2011, 08:20 AM
Join Date: Apr 2011
Posts: 157
Likes: 0
Received 0 Likes
on
0 Posts
I'd run a ground wire from the connector to each light instead of relying on the frame. Mine rusted at some of the frame connections and the ground was lost, and the lights became intermittent over a few years. Start with the tail lights and get those working first. Splice in side marker lights if you care to some day. Take your time, test each light, each step. A volt meter might help if you know how to use one. Make sure all the wires are secure after they function, not loose. Wind and debris have a way of catching them and taking out something.
 . I am actually going to tackle this starting tonight, at least removing the old wiring ect.
Now what do you mean, run a ground wire from the connector to each light?
Do you mean splice into the main ground up front and run that to each rear tail light??
I thought that each light should be grounded to the trailer and then up front at the connector.... (As in this diagram) ????

(I don't have the rear three markers)
Again, I apologise if it seems like I'm un educated with this, it's because I am
However, I do have a volt meter and I know how to use it!