HOWTO: Change engine Coolant / AntiFreeze
#1
 03-25-2006, 07:14 PM


Join Date: Oct 2003
Location: Topeka Kansas
Posts: 1,490
Likes: 0
Received 0 Likes
on
0 Posts
#2
03-25-2006, 07:18 PM
Join Date: Oct 2003
Location: Topeka Kansas
Posts: 1,490
Likes: 0
Received 0 Likes
on
0 Posts
Tools needed:
3/8 inch Hex wrench.
Drain pan.
Gasket Dressing and Flange sealant.
2 (or 3) gallons of antifreeze.
2 gallons of distilled water.
A 5 gallon bucket with lid for disposal of old antifreeze at a hazardous material/recycle center.
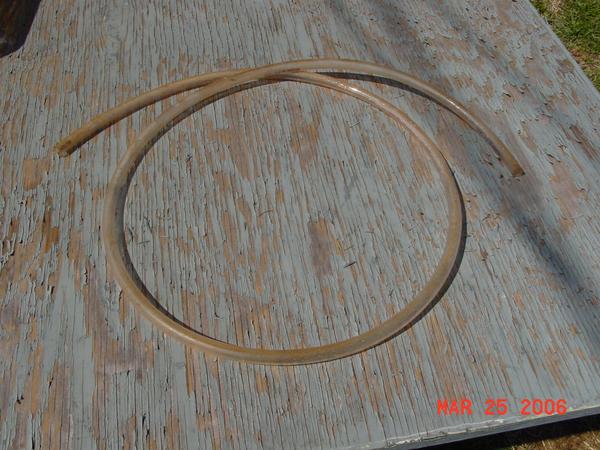
2 feet of 3/8 inch inside diameter - 1/2 inch outside diameter hose.
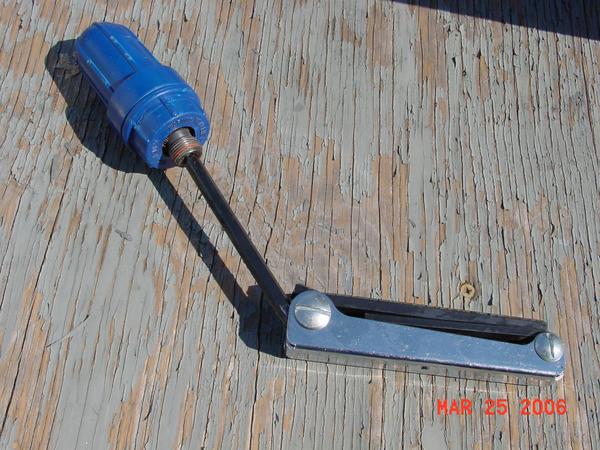
Antifreeze tester (optional).
Pliers or small channel locks.
A funnel or equivilent contraption used for filling antifreeze.
You will need a garden hose connected to a supply somewhere that can reach the Degas bottle on your vehicle.
3/8 inch Hex wrench.
Drain pan.
Gasket Dressing and Flange sealant.
2 (or 3) gallons of antifreeze.
2 gallons of distilled water.
A 5 gallon bucket with lid for disposal of old antifreeze at a hazardous material/recycle center.
2 feet of 3/8 inch inside diameter - 1/2 inch outside diameter hose.
Antifreeze tester (optional).
Pliers or small channel locks.
A funnel or equivilent contraption used for filling antifreeze.
You will need a garden hose connected to a supply somewhere that can reach the Degas bottle on your vehicle.
#3
03-25-2006, 07:20 PM
Join Date: Oct 2003
Location: Topeka Kansas
Posts: 1,490
Likes: 0
Received 0 Likes
on
0 Posts
PREPARE:
Inspect radiator hoses and clamps before starting.
If you think you need to get some new ones then go get them before you start into this process.
You may be changing your coolant because of a bad water pump or thermostat.
Park your vehicle and apply the parking brake.
Get the tools and supplies needed and place them near your workarea.
WARNING:
Antifreeze is highly toxic if ingested. Always keep an eye on kids or animals while you are changing to coolant. Children and pets may be attracted by it's sweet smell and may drink it. See if there are disposal sites in your area for hazardous materials.
#4
03-25-2006, 07:24 PM
Join Date: Oct 2003
Location: Topeka Kansas
Posts: 1,490
Likes: 0
Received 0 Likes
on
0 Posts
WARNING: Removing the cap could be dangerous if the coolant is hot. Be careful when removing the cap or working around hot engine parts. I suggest waiting until things cool down for a while if you have been driving the vehicle around.

Remove the Degas bottle cap. This will prevent a vacuum from forming inside the coolant system which would slow down or stop the coolant from draining. I also turn the heater on full blast to open up the coolant path to the heater core.
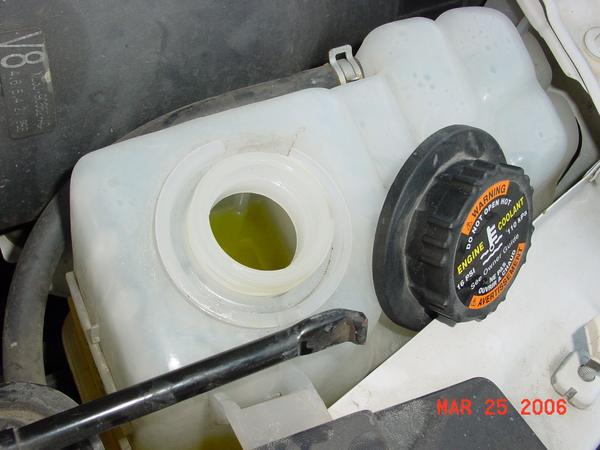

Remove the Degas bottle cap. This will prevent a vacuum from forming inside the coolant system which would slow down or stop the coolant from draining. I also turn the heater on full blast to open up the coolant path to the heater core.
#5
03-25-2006, 07:29 PM
Join Date: Oct 2003
Location: Topeka Kansas
Posts: 1,490
Likes: 0
Received 0 Likes
on
0 Posts


#7
03-25-2006, 07:35 PM
Join Date: Oct 2003
Location: Topeka Kansas
Posts: 1,490
Likes: 0
Received 0 Likes
on
0 Posts

Trending Topics
#8
03-25-2006, 07:39 PM
Join Date: Oct 2003
Location: Topeka Kansas
Posts: 1,490
Likes: 0
Received 0 Likes
on
0 Posts


#9
03-25-2006, 07:42 PM
Join Date: Oct 2003
Location: Topeka Kansas
Posts: 1,490
Likes: 0
Received 0 Likes
on
0 Posts

#10
03-25-2006, 07:48 PM
Join Date: Oct 2003
Location: Topeka Kansas
Posts: 1,490
Likes: 0
Received 0 Likes
on
0 Posts
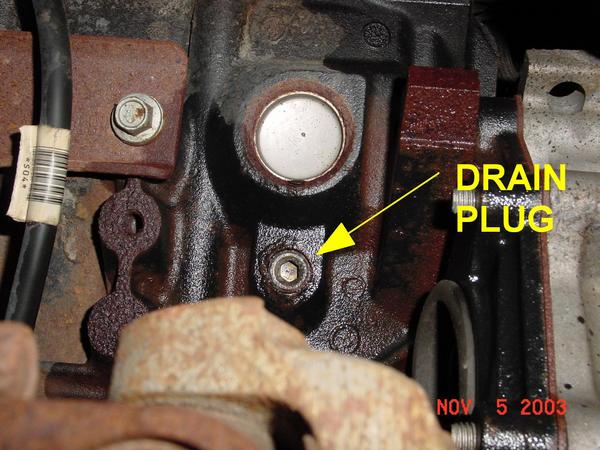
Empty the drain pan into the bucket and move it underneath the drivers side of the engine. Place the lid on the bucket and place it in a safe place away from kids and pets. You will have to get under the drivers side of the vehice (from the drivers door area) and locate the engine drain plug. You will need a 3/8 inch hex wrench to remove the plug. Loosen the plug until you can turn it by hand. Be sure that the drain pan is under the engine plug area and be prepared for coolant to shoot out all over the place (or it might not). Some of mine missed the drain pan. This will usually drain up to another gallon of coolant from the engine.
#11
03-25-2006, 07:53 PM
Join Date: Oct 2003
Location: Topeka Kansas
Posts: 1,490
Likes: 0
Received 0 Likes
on
0 Posts
Clean the drain plug while the coolant is draining from the engine block. You can use a wire brush. The reason for cleaning thread is to remove any rust that might weld threaded parts together. Welding is an oxidation process that joins metal surfaces together. Rust is just a milder form of this process. The application of gasket dressing helps to prevent the metal from rusting/welding together in the future so it will be easier to remove the plug in the future. I just happen to have a battery terminal cleaner that is just the right size for cleaning the threads. I just turn it in with my hex wrench and then turn it back out.
#12
03-25-2006, 07:59 PM
Join Date: Oct 2003
Location: Topeka Kansas
Posts: 1,490
Likes: 0
Received 0 Likes
on
0 Posts
Flush the radiator with water from the garden hose until it runs clear at the engine block drain. This will remove sediments from the radiator but will not remove rust and scale. I also suggest putting another drain pan under the radiator drain valve and opening it up to flush sediments out the radiator. You could also re-install the engine drain plug and move the drain pan under the radiator drain valve if you only have one drain pan.
You can use a radiator flush chemical at this point by re-installing the engine block plug; closing the radiator drain valve and following the directions for using the flushing chemical. This will dilute any remaining old antifreeze in the engine and remove rust and scale deposits from the engine and cooling tube surfaces.
You will have start back at the point where you drain from the radiator valve and the engine block plug until you get back to this point.
#13
03-25-2006, 08:03 PM
Join Date: Oct 2003
Location: Topeka Kansas
Posts: 1,490
Likes: 0
Received 0 Likes
on
0 Posts
At this point you have flushed the radiator and are ready to apply gasket dressing to the engine plug. So...
Apply gasket dressing to the engine block plug. The product I use is specifically designed for engine block plugs and is temperature rated to 600 degrees. This dressing will prevent the plug threads from rusting/welding and will make it easier to remove the plug in the future.
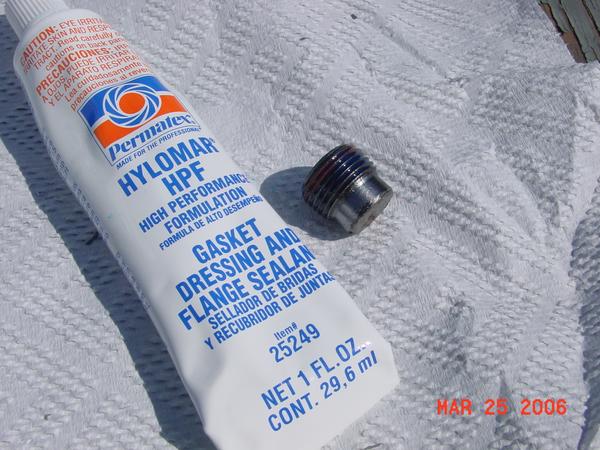

Apply gasket dressing to the engine block plug. The product I use is specifically designed for engine block plugs and is temperature rated to 600 degrees. This dressing will prevent the plug threads from rusting/welding and will make it easier to remove the plug in the future.
#14
03-25-2006, 08:09 PM
Join Date: Oct 2003
Location: Topeka Kansas
Posts: 1,490
Likes: 0
Received 0 Likes
on
0 Posts
I usually let the gasket dressing set for a few minutes. Get the 3/8 inch hex wrench and the engine plug and get underneath the vehicle again. Try to start the plug by hand so that it turns a few times before using a wrench. If you learn this technique you will reduce the likelyhood of messing up the threads in the event the plug does not start correctly. Tighten the plug to the correct torque (I just snug it good).
At this point you can replace any of those hoses, clamps, waterpump or a thermostat if you decided they needed to be replaced.
At this point you can replace any of those hoses, clamps, waterpump or a thermostat if you decided they needed to be replaced.
#15
03-25-2006, 08:13 PM
Join Date: Oct 2003
Location: Topeka Kansas
Posts: 1,490
Likes: 0
Received 0 Likes
on
0 Posts
Ok, check one more time that the radiator valve is closed and the engine block plug is installed and tight. Remove the hose from the radiator valve if you haven't already. Dump any old antifreeze that is in the drain pan into the 5 gallon bucket and put the lid on the bucket. Place the bucket in a safe area away from kids and pets.
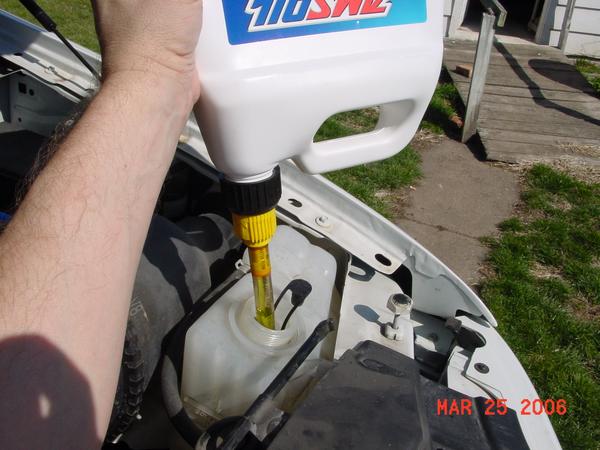
NOTE: Using a mixture of greater that 60% glycol based antifreeze with 40% water can actually start to raise the freezeing point of the coolant so I would suggest never using more than a 60% antifreeze to 40% water mix.
Place a funnel in the degas bottle and add premixed 50/50 antifreeze until it reaches the cold fill marks on the degas bottle. If you have pure 100% antifreeze then mix one part anti-freeze with one part distilled water and then add the mixture until it reaches the cold fill marks on the degas bottle.
I used Amsoil antifreeze that is good for 7 years or 150,000 miles.

