Mark another one on the wall for a sparkplug broke off in a head
#91
 08-25-2006, 09:34 AM


#92
08-26-2006, 06:18 PM

TSB 06-5-9
FORD: 2004 F-150
ISSUE:
Some 2004 F-150 vehicles with a 5.4L 3-valve engine may experience difficulty with spark plug removal which may cause damage to the spark plug and leave part of the spark plug in the cylinder head.
ACTION:
Refer to the following Service Procedure for techniques to remove the spark plugs and extract broken spark plugs.
SERVICE PROCEDURE
General Spark Plug Removal
To remove spark plugs without damage, it is necessary to adhere exactly to this procedure before removal is attempted.
1. Make sure the engine is warm (hand touch after cooling down).
CAUTION: DO NOT REMOVE PLUGS WHEN THE ENGINE IS EXTREMELY HOT OR COLD SOAKED. THIS INCREASES THE CHANCE THE THREADS COULD BE DAMAGED.
CAUTION: BE SURE TO WEAR SAFETY GLASSES FOR STEP 2.
3. Remove the coil-on-plug assemblies and thoroughly blow out the spark plug wells and surrounding valve cover area with compressed air.
4. Back out the spark plugs, no more than 1/8 to 1/4 of a turn. Apply penetrating oil (AeroKroil or equivalent) and fill the spark plug well just above where the jamb nut hex sits. A minimum period of 5 to 10 minutes of soak time is required. The penetrating oil will wick down to the ground electrode shield in this time.
CAUTION: EXCESSIVE PENETRANT, OR REPEATING THE PROCESS SEVERAL TIMES WITH TOO MUCH FLUID, COULD INTRODUCE ENOUGH LIQUID VOLUME TO HYDRO-LOCK THE ENGINE.
CAUTION: DO NOT USE AIR OR POWER TOOLS FOR PLUG REMOVAL. THE PLUG MUST ONLY BE REMOVED WITH HAND TOOLS.
6. Slowly turn the spark plug out. Some screeching and high effort may be noticed but, not in every case. The expected removal torque is about 33 lb-ft (45 N-m) but should decrease on the way out. If it is higher, try turning the spark plug back in a half turn, then back out again. If the turning torque still seems high, repeat the back and forth rotation along with some penetrating oil to reduce turning effort.
Separated/Broken Spark Plug Removal
If the plug does come apart even after following the General Spark Plug Removal Procedure, it will break in one of two modes:
Mode 1: The ground electrode shield is left behind as an empty shell (Figure 1).

Figure 1 - Article 06-5-9
Mode 2: The porcelain center and ground electrode shield is left behind and only the upper jamb nut comes out. In this case more soaking is required and long-reach nose pliers should be used to grasp and remove the porcelain center from the ground electrode shield (Figure 2).

Figure 2 - Article 06-5-9
Once there is only an empty ground electrode shield left in the cylinder head, perform the following steps to remove the shield using Rotunda Special Service Tool 303-1203 (Figure 3).
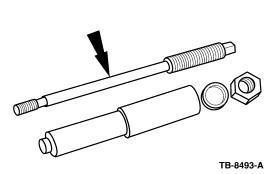
Figure 3 - Article 06-5-9
FORD: 2004 F-150
ISSUE:
Some 2004 F-150 vehicles with a 5.4L 3-valve engine may experience difficulty with spark plug removal which may cause damage to the spark plug and leave part of the spark plug in the cylinder head.
ACTION:
Refer to the following Service Procedure for techniques to remove the spark plugs and extract broken spark plugs.
SERVICE PROCEDURE
General Spark Plug Removal
To remove spark plugs without damage, it is necessary to adhere exactly to this procedure before removal is attempted.
1. Make sure the engine is warm (hand touch after cooling down).
CAUTION: DO NOT REMOVE PLUGS WHEN THE ENGINE IS EXTREMELY HOT OR COLD SOAKED. THIS INCREASES THE CHANCE THE THREADS COULD BE DAMAGED.
CAUTION: BE SURE TO WEAR SAFETY GLASSES FOR STEP 2.
3. Remove the coil-on-plug assemblies and thoroughly blow out the spark plug wells and surrounding valve cover area with compressed air.
4. Back out the spark plugs, no more than 1/8 to 1/4 of a turn. Apply penetrating oil (AeroKroil or equivalent) and fill the spark plug well just above where the jamb nut hex sits. A minimum period of 5 to 10 minutes of soak time is required. The penetrating oil will wick down to the ground electrode shield in this time.
CAUTION: EXCESSIVE PENETRANT, OR REPEATING THE PROCESS SEVERAL TIMES WITH TOO MUCH FLUID, COULD INTRODUCE ENOUGH LIQUID VOLUME TO HYDRO-LOCK THE ENGINE.
CAUTION: DO NOT USE AIR OR POWER TOOLS FOR PLUG REMOVAL. THE PLUG MUST ONLY BE REMOVED WITH HAND TOOLS.
6. Slowly turn the spark plug out. Some screeching and high effort may be noticed but, not in every case. The expected removal torque is about 33 lb-ft (45 N-m) but should decrease on the way out. If it is higher, try turning the spark plug back in a half turn, then back out again. If the turning torque still seems high, repeat the back and forth rotation along with some penetrating oil to reduce turning effort.
Separated/Broken Spark Plug Removal
If the plug does come apart even after following the General Spark Plug Removal Procedure, it will break in one of two modes:
Mode 1: The ground electrode shield is left behind as an empty shell (Figure 1).
Figure 1 - Article 06-5-9
Mode 2: The porcelain center and ground electrode shield is left behind and only the upper jamb nut comes out. In this case more soaking is required and long-reach nose pliers should be used to grasp and remove the porcelain center from the ground electrode shield (Figure 2).
Figure 2 - Article 06-5-9
Once there is only an empty ground electrode shield left in the cylinder head, perform the following steps to remove the shield using Rotunda Special Service Tool 303-1203 (Figure 3).
Figure 3 - Article 06-5-9
#93
08-26-2006, 06:19 PM
NOTE: THIS TOOL IS ONLY DESIGNED TO WORK WITH AN EMPTY GROUND ELECTRODE SHIELD. IF THE SPARK PLUG CAME APART IN MODE 2, THE PORCELAIN CENTER MUST BE REMOVED PRIOR TO FOLLOWING THESE STEPS.
1. The combustion chamber must be protected from contamination during the extraction process by using a modified vacuum cap (382444-S) as a stopper-type plug. This is because the remaining ground electrode shield will be thread-tapped, so the cap is needed to prevent thread chips from falling into the cylinder bore. Cut a vacuum cap to a 3/8" (10 mm) length for each ground electrode shield that needs to be removed.
2. Install the modified cap with a long drill bit or suitable wire (Figure 4), sized for the internal diameter of the cap. The rubber cap should bottom-out on the electrode strap of the ground electrode shield once installed.

Figure 4 - Article 06-5-9
3. Thread-tap the ground electrode shield Using a 9.0 x 1.0 mm "plug" tap (tap profile is about 3-4 reduced diameter threads on the tip end).
a. Coat the end of the tap with general purpose grease as shown in Figure 5.

Figure 5 - Article 06-5-9
b. Turn the tap about 3 to 4 turns into the ground electrode shield once the tap begins to cut. As the shield is tapped, for every 1/2 turn, the tap should be backed up 1/8 turn to "break chips" and prevent any cut material from coiling-up and laying in the spark plug well. All of the thread chips will embed in the grease pack or drop inside the vacuum cap when following this procedure. A suitably sized tap wrench of about 7-9 inches in handle length will aid in reaching down the well. If not available, use an 8 point socket with a ratchet and drive extension. Keep the shank aligned with the axis of the spark plug bore cavity to prevent possible thread bore damage. Use care not to damage any spark plug threads on the way in.
CAUTION: DO NOT ATTEMPT TO REMOVE THE GROUND ELECTRODE SHIELD WITH THE TAP AND WRENCH. THE TAP MAY BREAK IF THIS IS ATTEMPTED.
c. Carefully back out the tap while maintaining the residual grease coat on the tap which contains some chips. Take care not to touch the sides of the spark plug well bore during removal.
4. Once the ground electrode shield is tapped, thread Rotunda Special Service Tool 303-1203 into the ground electrode shield to extract it from the spark plug well and encapsulate any remaining chips from falling into the combustion chamber.
NOTE: SEE FIGURE 6 FOR DETAILS OF THE TOOL AS INSTALLED IN THE HEAD.
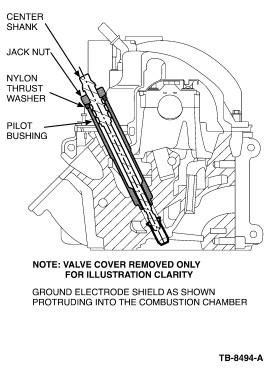
Figure 6 - Article 06-5-9
a. Install the stepped end of the tool pilot bushing into the spark plug well ensuring it bottoms out.
b. Screw the center shank into the ground electrode shield. Do not over tighten the shank, to prevent thread stripping.
c. Install the nylon washer and jack nut until finger tight.
d. Turn the jack nut with a socket and 3/8" drive ratchet until the ground electrode is freed from the cavity and withdraw the tool assembly. Several turns of the nut are required. Upon removal, any remaining chips not caught earlier by the tap grease will be captured by the rubber plug sitting at the bottom of the ground electrode shield.
NOTE: ONCE THE SPARK PLUGS HAVE ALL BEEN REMOVED, NEW PLUGS SHOULD BE INSTALLED USING A FILM COATING OF NICKEL ANTI-SEIZE ON THE GROUND ELECTRODE SHIELD OF THE NEW SPARK PLUG. DO NOT COAT THE ELECTRODE STRAP OR THE PLUG WILL MISFIRE. THE NEW PLUGS SHOULD BE INSTALLED WITH NO LUBRICANT ON THE THREADS AND TORQUED TO SPECIFICATION, 25 LB-FT (34 N-m).
PART NUMBER PART NAME
AeroKroil Obtain through www.kanolabs.com or by calling 1-800-311-3374 (orange aerosol can)
382444-S Vacuum Cap
1. The combustion chamber must be protected from contamination during the extraction process by using a modified vacuum cap (382444-S) as a stopper-type plug. This is because the remaining ground electrode shield will be thread-tapped, so the cap is needed to prevent thread chips from falling into the cylinder bore. Cut a vacuum cap to a 3/8" (10 mm) length for each ground electrode shield that needs to be removed.
2. Install the modified cap with a long drill bit or suitable wire (Figure 4), sized for the internal diameter of the cap. The rubber cap should bottom-out on the electrode strap of the ground electrode shield once installed.
Figure 4 - Article 06-5-9
3. Thread-tap the ground electrode shield Using a 9.0 x 1.0 mm "plug" tap (tap profile is about 3-4 reduced diameter threads on the tip end).
a. Coat the end of the tap with general purpose grease as shown in Figure 5.
Figure 5 - Article 06-5-9
b. Turn the tap about 3 to 4 turns into the ground electrode shield once the tap begins to cut. As the shield is tapped, for every 1/2 turn, the tap should be backed up 1/8 turn to "break chips" and prevent any cut material from coiling-up and laying in the spark plug well. All of the thread chips will embed in the grease pack or drop inside the vacuum cap when following this procedure. A suitably sized tap wrench of about 7-9 inches in handle length will aid in reaching down the well. If not available, use an 8 point socket with a ratchet and drive extension. Keep the shank aligned with the axis of the spark plug bore cavity to prevent possible thread bore damage. Use care not to damage any spark plug threads on the way in.
CAUTION: DO NOT ATTEMPT TO REMOVE THE GROUND ELECTRODE SHIELD WITH THE TAP AND WRENCH. THE TAP MAY BREAK IF THIS IS ATTEMPTED.
c. Carefully back out the tap while maintaining the residual grease coat on the tap which contains some chips. Take care not to touch the sides of the spark plug well bore during removal.
4. Once the ground electrode shield is tapped, thread Rotunda Special Service Tool 303-1203 into the ground electrode shield to extract it from the spark plug well and encapsulate any remaining chips from falling into the combustion chamber.
NOTE: SEE FIGURE 6 FOR DETAILS OF THE TOOL AS INSTALLED IN THE HEAD.
Figure 6 - Article 06-5-9
a. Install the stepped end of the tool pilot bushing into the spark plug well ensuring it bottoms out.
b. Screw the center shank into the ground electrode shield. Do not over tighten the shank, to prevent thread stripping.
c. Install the nylon washer and jack nut until finger tight.
d. Turn the jack nut with a socket and 3/8" drive ratchet until the ground electrode is freed from the cavity and withdraw the tool assembly. Several turns of the nut are required. Upon removal, any remaining chips not caught earlier by the tap grease will be captured by the rubber plug sitting at the bottom of the ground electrode shield.
NOTE: ONCE THE SPARK PLUGS HAVE ALL BEEN REMOVED, NEW PLUGS SHOULD BE INSTALLED USING A FILM COATING OF NICKEL ANTI-SEIZE ON THE GROUND ELECTRODE SHIELD OF THE NEW SPARK PLUG. DO NOT COAT THE ELECTRODE STRAP OR THE PLUG WILL MISFIRE. THE NEW PLUGS SHOULD BE INSTALLED WITH NO LUBRICANT ON THE THREADS AND TORQUED TO SPECIFICATION, 25 LB-FT (34 N-m).
PART NUMBER PART NAME
AeroKroil Obtain through www.kanolabs.com or by calling 1-800-311-3374 (orange aerosol can)
382444-S Vacuum Cap
#94
08-26-2006, 06:57 PM

Haha, I could only imagine a routine spark plug change involving this nightmare. Not in my wildest dreams could I have imagined that much work for a simple spark plug. The internal combustion engine has been using spark plugs for decades, if not an entire century. And somehow, despite this, this simple spark emitting plug deisgn has become this complicated. It boggles my mind.
#95
08-31-2006, 03:53 PM

Member
Join Date: Mar 2006
Location: A-town Illinois
Posts: 81
Likes: 0
Received 0 Likes
on
0 Posts
so it sounds like this is luck of the draw...or if you follow the tsb....you'll be fine as well...seems like a lot of you guys know your stuff..and if you say you've changed several with a warm engine and some penetrating oil, and not had problems...well, i guess that's good enough for me...
quick question though..i havent researched the parts yet..but is there a problem with just the OEM plugs...or has anyone picked up some aftermarket ones that haven't had this problem....or is it just going to be any plug going into it?
quick question though..i havent researched the parts yet..but is there a problem with just the OEM plugs...or has anyone picked up some aftermarket ones that haven't had this problem....or is it just going to be any plug going into it?


#97
08-31-2006, 04:46 PM

Senior Member
Join Date: Apr 2005
Location: Maryland
Posts: 117
Likes: 0
Received 0 Likes
on
0 Posts
Originally Posted by kd4crs
Nobody else that I know except Autolite and Motorcraft make this style plug yet.

No oil is getting past the jamnut seal until after the plug is backed out a bit, and by then the electrode tube has already either sheared or freed.
I would follow the warm engine mandate, however it is apparently an art as to just what a "warm" engine might be.
#98
08-31-2006, 04:50 PM

#99
08-31-2006, 05:23 PM
Originally Posted by TysonsLariat
No kidding? And the pentrating oil is a joke!
No oil is getting past the jamnut seal until after the plug is backed out a bit, and by then the electrode tube has already either sheared or freed.
I would follow the warm engine mandate, however it is apparently an art as to just what a "warm" engine might be.
No oil is getting past the jamnut seal until after the plug is backed out a bit, and by then the electrode tube has already either sheared or freed.
I would follow the warm engine mandate, however it is apparently an art as to just what a "warm" engine might be.
Ford should really have a recall to fix the **** poor design, so you have to go through this everytime you change your plugs??!! They need to fix this horrendous eff up instead of continuing to build the motors as they are. How can this be tolerated by consumers?? Im furious.
#101
08-31-2006, 06:03 PM
Originally Posted by jpdadeo
#102
08-31-2006, 06:41 PM

Senior Member
Join Date: Oct 2004
Location: Murray , Kentucky
Posts: 2,392
Likes: 0
Received 0 Likes
on
0 Posts
I was skeptical just like you man.. I sprayed some penetrating oil down in the hole one day just for giggles.. WD-40.
Couple days later, went out and tried to remove the plug.. I put the socket on it ans turned it... yeah it turned EFFORTLESSLY. I was scared at first.. I thought it was already broke. Nope, I removed the plug . The insert 9below the jam nut) was wet and smelled like wd-40.. I didnt believe that penetrating oil would be able to make it past there either.. it does!
I was WRONG.
#103
09-01-2006, 03:08 AM

Senior Member
Join Date: Jun 2001
Location: Knoxville, TN.
Posts: 1,160
Likes: 0
Received 0 Likes
on
0 Posts
Originally Posted by khendrix2374
I was skeptical just like you man.. I sprayed some penetrating oil down in the hole one day just for giggles.. WD-40.
Couple days later, went out and tried to remove the plug.. I put the socket on it ans turned it... yeah it turned EFFORTLESSLY. I was scared at first.. I thought it was already broke. Nope, I removed the plug . The insert 9below the jam nut) was wet and smelled like wd-40.. I didnt believe that penetrating oil would be able to make it past there either.. it does!
I was WRONG.
Couple days later, went out and tried to remove the plug.. I put the socket on it ans turned it... yeah it turned EFFORTLESSLY. I was scared at first.. I thought it was already broke. Nope, I removed the plug . The insert 9below the jam nut) was wet and smelled like wd-40.. I didnt believe that penetrating oil would be able to make it past there either.. it does!
I was WRONG.


#104
09-01-2006, 08:03 AM

Senior Member
Join Date: Mar 2004
Location: Tulsa, O K L A H O M A!
Posts: 305
Likes: 0
Received 0 Likes
on
0 Posts
Originally Posted by TysonsLariat
No kidding? And the pentrating oil is a joke!
No oil is getting past the jamnut seal until after the plug is backed out a bit, and by then the electrode tube has already either sheared or freed.
I would follow the warm engine mandate, however it is apparently an art as to just what a "warm" engine might be.
No oil is getting past the jamnut seal until after the plug is backed out a bit, and by then the electrode tube has already either sheared or freed.
I would follow the warm engine mandate, however it is apparently an art as to just what a "warm" engine might be.
Grim

