
1998 F150 fuel pump replacement
#1
 03-23-2012, 11:47 AM


Join Date: Mar 2009
Location: E. TN
Posts: 16
Likes: 0
Received 0 Likes
on
0 Posts
1998 F150 fuel pump replacement
My 98 F-150 XLT Offroad suddenly died whilst it was idleing when I was unloading material from the bed and wouldn't start back up. It would turn over fine and hit every now and then but wouldn't start. After letting it sit for approx 15 minutes I tried it again and it started and ran like nothing had happened. It had 1/2 tank of gas.
My BIL had borrowed it about 6 months earlier and it died on the interstate on him and after approx 15 minutes it started back fro him and ran fine up until it died on me. The fuel was on the E (empty) line on him so I figured it had sucked up debris, so I didn't worry about it after I filled it back up.
Thats the only two times it's died and it set NO codes so when it died on me I decided it needed a new pump & filter.
After much research I decided to remove the bed and go at it from the top.
This worked out well for me as I had a very strong and non-complaining helper, a Kubota BX w/an FEL (front end loader).
The procedure wasn't bad and took approx 3 hrs total.
I'll detail the removal.
1) Remove the tailgate (it's heavier than what it looks)
2) Remove the plastic bedliner by unscrewing the 4 tie downs. It easily slipped out the rear. Removal of the pad that was under the bed liner.
3) Using a torx bit and a ratchet, I loosened the 6 bed torx bolts then used an air wrench to remove them (I used the ratchet so I could tell if they were stripping when I broke them loose, which they didn't) they actually came out quite easily.
4) Just behind the rear bumper and near the top, unhook the wireing harness, this frees the trucks harness from the taillight harness in the bed. remove the two tag light sockets by twisting and pulling back. The electrical is now free from the bed.
5) Unscrew the 3 #7mm bolts that holds the fuel filler to the bed, this frees it from the bed at the top but you also need to look inside the wheel well and remove the screw clamp from the large hose-to-filler junction as this clamp also secures the large fuel line to a small bracket on the bed. The filler assembly is now totally free from the bed.
6) Lifting and sliding the bed to the rear approx 3'. This is where you'll need help. Two very STRONG men can do this but 3 or 4 is better. In my case I reconnected the 4 tie downs in the bed and used the Kubota's FEL to lift the bed then backed up a few feet and sat it down. Some have used come-alongs etc. The bed will easily lift when you have some strong force to lift it
7) Once the bed is out of the way, the fuel pump is easily accessed. The 2 fuel lines that connect to the pump use quick connects so you need the special tool. The fuel pump is secured via 8 metric bolts (which I think are #9mm) and just simply unscrew.
8) Once the bolts and 2 lines are removed and the electrical connector is disconnected the pump assembly will easily lift out. The new pump assembly goes right in. On the 98 F150 the thick rubber gasket is attached to the bottom of the pump mounting plate and requires no sealer etc. The bolts will compress it as you tighten it up and makes a good tight seal, just like the OEM original.
9) Once the pump is securely fastened to the tank, slide the fuel lines back onto the new pump until they click and reconnect the electric connector to the fuel pump. The pump is now ready to test.
10) I decided to replace the fuel filter and did so before I tested the pump.
The filter is just inside the frame rail just under the drivers side door. It also uses quick connects and is held in place via a large metal spring-loaded clamp. Using the special tool release the rear line 1st. Be aware that the filter will have some fuel left in it so don't be directly under it. I then disconnected the front line and popped the filter out. I had to use a long screw driver to help pop it out of the clamp.
I recommend to pop the new filter in 1st then reconnect the lines as this took me approx less than a minute to reconnect once it was popped back into the clamp.
11) Once the filter is reconnected and secure, you will want to prime the fuel system 1st before you try to start.
Priming entails turning the key to "on" for aprrox 5 - 10 secs then turn it off. Do this 3 or 4 times. This should have filled the new filter back up and pressureized the fuel system up to the injectors.
Now try and start. If all went well it should start right on up. Once it's running check around the filter and pump connections for leaks etc.
Once everything checks out good, you can then reinstall the bed.
*** don't forget to pop the tag lamps back in and secure the clamp to large fuel filler line in the wheel well, they can be easily forgotten
This procedure isn't bad and if one has good mechanical abilities it can be done easily. The only drawback is the method one chooses to lift and move the bed. I was able to do it with one man as I had a machine that could lift and move the bed.
Cost for the pump ($166) and filter ($8.99) rana total of $203.00 counting my local taxes.
disclaimer. I know manuals and other DYI's recommend to either disconnect the battery positive terminal, pull the fuel pump relay or both. I chose not to do this but it is recommended so keep that in mind.
Good luck
Dave
#2
03-25-2012, 07:49 PM
Join Date: Mar 2009
Location: E. TN
Posts: 16
Likes: 0
Received 0 Likes
on
0 Posts
A few pics.
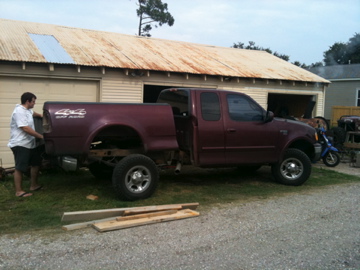
I ended up using anther set of chains to lift both the front and back of the bed. This pic showed me the BX23's FEL would lift it high enough to clear the rear wheels & bumper.
Notice the cardboard and rags between the bed & cab, this keeps the cab from getting scratched up.
I've noticed two improvements already. The engine starts much quicker and strangely I'm not hearing the pinging sound when it's cold. Could it be that the old fuel pump lacked enough pressure to deliver a full charge into the cylinders? I dunno.

A shot of the exposed fuel tank & sender. very easy access from the top.

A shot of the new & Original fuel pump assemblys side by side. The strainer on the old pump wasn't clogged as i thought it may be.

A shot of the new fuel filter installed. I reused the OEM locks. they seemed to be in good servicable shape and I couldn't figure out how to use the new plastic ones anyways

I ended up using anther set of chains to lift both the front and back of the bed. This pic showed me the BX23's FEL would lift it high enough to clear the rear wheels & bumper.
Notice the cardboard and rags between the bed & cab, this keeps the cab from getting scratched up.
I've noticed two improvements already. The engine starts much quicker and strangely I'm not hearing the pinging sound when it's cold. Could it be that the old fuel pump lacked enough pressure to deliver a full charge into the cylinders? I dunno.
A shot of the exposed fuel tank & sender. very easy access from the top.
A shot of the new & Original fuel pump assemblys side by side. The strainer on the old pump wasn't clogged as i thought it may be.
A shot of the new fuel filter installed. I reused the OEM locks. they seemed to be in good servicable shape and I couldn't figure out how to use the new plastic ones anyways
Last edited by Volfandt; 03-25-2012 at 07:51 PM.
#3
03-27-2012, 11:43 PM


#4
02-13-2013, 07:16 PM

#5
02-13-2013, 07:51 PM


#6
02-13-2013, 09:50 PM

I agree. I've done 3 pumps on my truck and I dropped the tank (full of gas even) and had it all done in just over an hour.
#7
02-14-2013, 11:17 AM
Right, it's simple. The procedure to drain the fuel is simple as well. Turn the rear vent 1/4 counter clockwise and it pops out. You then have about a 1.5" opening to remove the fuel.
Trending Topics
#9
02-14-2013, 12:02 PM
It's just more work anyway you look at it. If it was a better way to do it, you can bet Ford would have it in the service manual. But yea, it might be fun to do..Once lol.
#10
02-14-2013, 03:20 PM

Senior Member
Well, you better remove all those bolts first, tail lights, straps, elec connections, cab protection, tail gate, bed liner + what ever else you have in there, breather, filler neck and hope you don't miss anything or.... Ooops.
It's just more work anyway you look at it. If it was a better way to do it, you can bet Ford would have it in the service manual. But yea, it might be fun to do..Once lol.
It's just more work anyway you look at it. If it was a better way to do it, you can bet Ford would have it in the service manual. But yea, it might be fun to do..Once lol.

#12
02-18-2013, 07:04 AM
Join Date: Mar 2009
Location: E. TN
Posts: 16
Likes: 0
Received 0 Likes
on
0 Posts
Funny, just got an email notification that this thread was responded to, but it didn't notify me way back when. Snail mail I rekon
Guess I'll update, theres been no more stalling or performance problems since the fuel pump & filter replacement so it's safe to say they were the problem.
Now I do have a leaking rear window problem when it rains that just cropped up that I'll have to address. Wonder how I'll enlist the services of the Kubota in that repair
re. question on the 03, I dunno but I'd imagine it'll be similar. Good luck
#13
02-18-2013, 08:52 AM
Sorry for the gravedigging... haha. I ended up removing the bed.
AND dropping the tank.
Future reference for others wanting to try bed removal: My 2003 crew cab did NOT expose the filter when the bed was removed. Whether or not that is common knowledge, I don't know. Hope I save someone else some grief.
AND dropping the tank.
Future reference for others wanting to try bed removal: My 2003 crew cab did NOT expose the filter when the bed was removed. Whether or not that is common knowledge, I don't know. Hope I save someone else some grief.
#14
02-18-2013, 09:27 AM