
 04-13-2015, 01:39 PM
Last edit by: IB Advertising
Blend door replacement with pictures
http://www.f150online.com/forums/hva...-pictures.html
ISSUE
�97-�02 F150�s and Expygators temperature blend doors are breaking. This is a labor intensive Do-It-Yourself guide with pictures and details
Read below for the full discussion�
http://www.f150online.com/forums/hva...-pictures.html
ISSUE
�97-�02 F150�s and Expygators temperature blend doors are breaking. This is a labor intensive Do-It-Yourself guide with pictures and details
Read below for the full discussion�

Blend door replacement with pictures
#1
10-26-2005, 07:30 PM


Blend door replacement with pictures
Tis' the season for people wanting heat from their trucks, and tis' the season that I've noted more and more temperature blend doors breaking in '97-'02 F150s and Expygators. Now, not everyone wants to pay a dealer to replace the door, it is a very labor intensive job, usually calling for 10-12 hours of labor depending on where you shop. So, for the DIY'ers around here, I figure I'd snap a few pictures of a Navigator I replaced the blend door in at work. Unfortunately, since I was on the clock officially, I didn't quite have the time to detail disassembly the way I wanted to. I started on it yesterday evening, when I didn't have my camera, and finished this morning just before lunchtime. So, for your viewing pleasure...
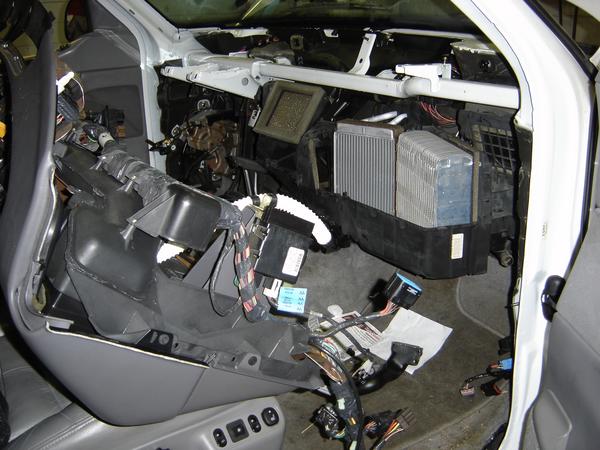
What the...son of a...put that dash back in that truck! Here's the "after," the first picture I took this morning. This shows some of the stuff you'll probably want to take loose to give max room to get in there to the plentum chamber, including the radio antenna lead on the passenger's side, and the three bulkhead connectors on the driver's side.
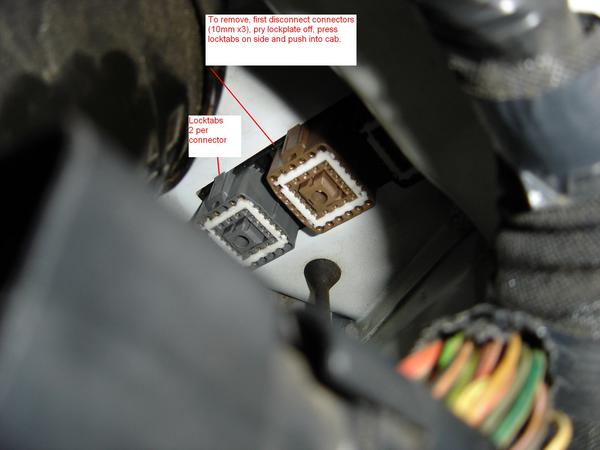
Bulkhead connectors? Wha? Yeap, that's them, to the right (if you've facing it) of the brake booster. Disconnect the three connectors by loosening the 10mm bolts holding them in place, pry the black lockplate off and squeeze the locking tabs to release them from the firewall.

The aforementioned lockplate for the three bulkhead connectors.
Continued...
What the...son of a...put that dash back in that truck! Here's the "after," the first picture I took this morning. This shows some of the stuff you'll probably want to take loose to give max room to get in there to the plentum chamber, including the radio antenna lead on the passenger's side, and the three bulkhead connectors on the driver's side.
Bulkhead connectors? Wha? Yeap, that's them, to the right (if you've facing it) of the brake booster. Disconnect the three connectors by loosening the 10mm bolts holding them in place, pry the black lockplate off and squeeze the locking tabs to release them from the firewall.
The aforementioned lockplate for the three bulkhead connectors.
Continued...
#2
10-26-2005, 07:36 PM
Back inside the vehicle...

The driver's side after removal of the steering column. Disconnect the eleventy connectors going to various things on the steering column, turn the ignition switch to off and wiggle the steering wheel back and forth a little until it locks. This prevents the steering wheel from running off and damaging the clockspring. Now, unbolt the steering shaft pinch bolt (13mm), unbolt the shift indicator (5.5mm) and disconnect it from the shift lever, disconnect the column shifter cable and unbolt the column by removing the 6 - 13mm bolts holding it to the dash support. Also note the three 7mm bolts you'll have to remove to get the dash out as well. There's a 10mm nut on the lower left, and a couple grounds (8mm bolts) to remove in the driver's kickpanel. And while you're down there, go ahead and pull the bulkhead connectors through into the cab that you disconnected from under the hood.

The passenger's side after removal of the airbag. The airbag is retained by one 8mm bolt under the oval shaped cover on top of the dash, and two 8mm bolts accessed through the glovebox. Note, do not unbolt the glovebox hinge to get to those bolts, just unclip it, fold it down, remove the bolts and snap it back into place. The glovebox is spring loaded and can be a pain to get back into place. There's four (or six, CRS, sorry) 7mm bolts you'll have to remove here. There's also a couple more grounds in the passenger's side kickpanel you'll want to remove, as well as connectors to things like the inertia switch, air suspension switch (if equipped), and blower motor amongst other things. This is also where I'd recommend going into the passenger's side front wheel well and disconnecting the antenna lead at the mast and shoving it through the firewall, this'll get you more room to work with when pulling the dash back.

The top of the dash. Now, this'll vary according to what you're working on. On a Navigator, the dash panel that hides the two 7mm bolts you need to get to comes off in one whole piece. In an F150 or Expedition, it's got two or three little plugs that you've gotta pop out to get to the bolts.
Continued...
The driver's side after removal of the steering column. Disconnect the eleventy connectors going to various things on the steering column, turn the ignition switch to off and wiggle the steering wheel back and forth a little until it locks. This prevents the steering wheel from running off and damaging the clockspring. Now, unbolt the steering shaft pinch bolt (13mm), unbolt the shift indicator (5.5mm) and disconnect it from the shift lever, disconnect the column shifter cable and unbolt the column by removing the 6 - 13mm bolts holding it to the dash support. Also note the three 7mm bolts you'll have to remove to get the dash out as well. There's a 10mm nut on the lower left, and a couple grounds (8mm bolts) to remove in the driver's kickpanel. And while you're down there, go ahead and pull the bulkhead connectors through into the cab that you disconnected from under the hood.
The passenger's side after removal of the airbag. The airbag is retained by one 8mm bolt under the oval shaped cover on top of the dash, and two 8mm bolts accessed through the glovebox. Note, do not unbolt the glovebox hinge to get to those bolts, just unclip it, fold it down, remove the bolts and snap it back into place. The glovebox is spring loaded and can be a pain to get back into place. There's four (or six, CRS, sorry) 7mm bolts you'll have to remove here. There's also a couple more grounds in the passenger's side kickpanel you'll want to remove, as well as connectors to things like the inertia switch, air suspension switch (if equipped), and blower motor amongst other things. This is also where I'd recommend going into the passenger's side front wheel well and disconnecting the antenna lead at the mast and shoving it through the firewall, this'll get you more room to work with when pulling the dash back.
The top of the dash. Now, this'll vary according to what you're working on. On a Navigator, the dash panel that hides the two 7mm bolts you need to get to comes off in one whole piece. In an F150 or Expedition, it's got two or three little plugs that you've gotta pop out to get to the bolts.
Continued...
Last edited by Quintin; 10-26-2005 at 07:40 PM.
#3
10-26-2005, 07:43 PM

If everything goes as planned, you'll see something like this. This is the plentum chamber itself, where the evaporator core, heater core, and temperature blend door are. Let's crack that case open and see what's inside...15 - 8mm bolts...
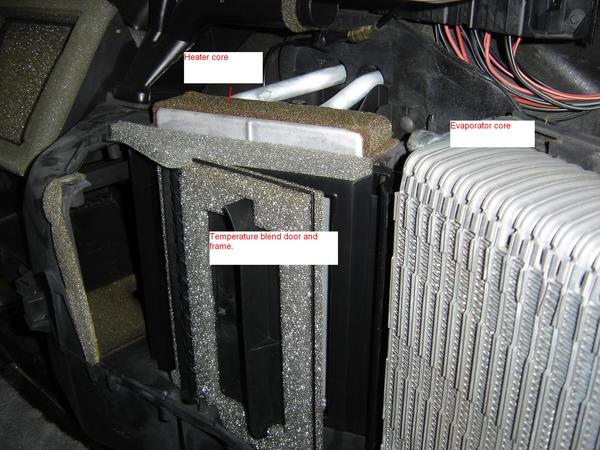
Pictured here are the evaporator and heater cores, and the blend door. The blend door is a snap fit into the case. Pull back on the frame of the door on the passenger's side of it and lift the whole shootin' match out. What's wrong with that door, you say?
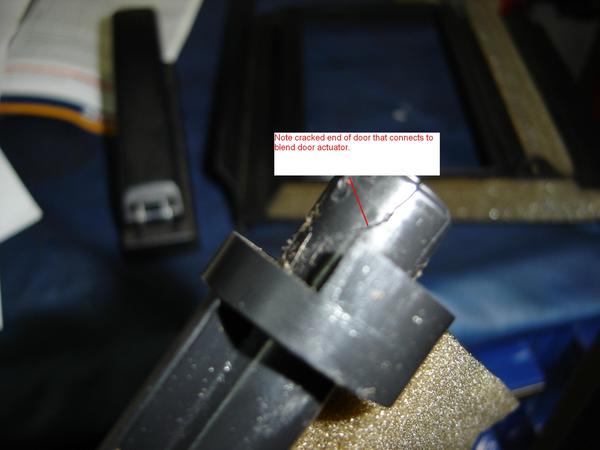
This one actually wasn't split all that bad. The blend door motor went to the parts house in the sky, and while peering through to see if the blend door motor was running during diagnosis, I saw this split in the door. If you've got EATC, this will be accompanied from time to time with DTC B1249 in the self test or test run with a compatible scan tool. You may also hear a popping noise from behind the dash.
#4
10-26-2005, 07:46 PM
The parts used...
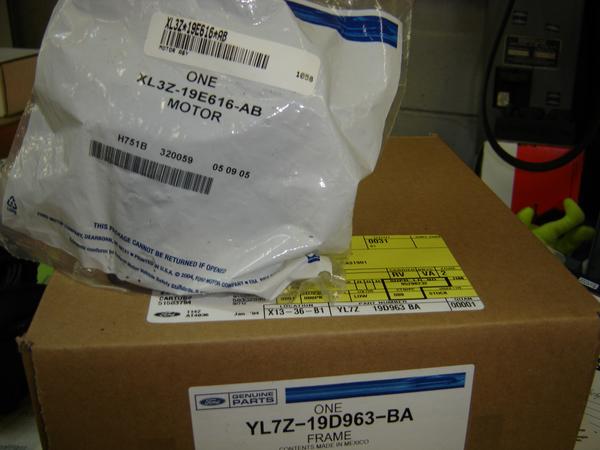
XL3Z-19E616-AB is the blend door actuator itself. I think it might be different on trucks with manual temperature control though, so check with your friendly neighborhood Ford or Lincoln-Mercury store before using this part number for sure. Also, before teardown, if the motor still runs set it to half way temperature (70-80 degrees W/EATC) since it eases removal and installation of the new door. YL7Z-19D963-BA is the blend door.
XL3Z-19E616-AB is the blend door actuator itself. I think it might be different on trucks with manual temperature control though, so check with your friendly neighborhood Ford or Lincoln-Mercury store before using this part number for sure. Also, before teardown, if the motor still runs set it to half way temperature (70-80 degrees W/EATC) since it eases removal and installation of the new door. YL7Z-19D963-BA is the blend door.

#6
11-13-2005, 08:37 AM


#7
11-17-2005, 01:47 AM

 Nice pictures BTW. I have to remove mine from the cab becasue of the stick shift.
Trending Topics
#8
12-16-2005, 05:48 PM

Member
Join Date: Sep 2002
Location: Austin, TX
Posts: 19
Likes: 0
Received 0 Likes
on
0 Posts
#9
12-18-2005, 03:32 PM

Senior Member
Join Date: Aug 2004
Location: New Joisey
Posts: 209
Likes: 0
Received 0 Likes
on
0 Posts
I have a 98 Expy that makes a popping noise when the temp is turned to full cold or full hot. This appears to be the problem I have.
By reading all these threads, this seems to be a common problem with our trucks. Can't Ford redisign the darn thing so this doesn't happen anymore? It looks like all you would have to do is put a small metal sleeve over the end of the shaft to prevent it from spreading if it were to crack.
My wife is not going to be happy when she finds out how long she's gonna be without a truck to get this fixed.
#10
12-18-2005, 08:25 PM
#12
01-08-2006, 10:29 PM

Same prob here too... no heat at all. Got the dash pulled out right now and checked the blend door; it's undamaged. 
I checked the manual temp control impedance and it looked good. The wires from the **** harness to the actuator harness are continuous and contain no shorts. The 12V+ and the ground lines to the actuator harness check out OK as well. So I have to assume that the actuator is fried.
Quintin, how do you get the actuator out? Looks like pulling the dash does not make it more accessible.
TIA,
D
[edit]
It took every colorful word in my vocabulary but I got the actuator out. Cracked it open and found out that it got some antifreeze when the original core sprung a leak back in October. THere is a lot of corrosion and some of the soldered joints are pooched. Tried to clean it up and resolder the joints but there is too much contamination... time to call the dealership, order the part and start the waiting game.
[/edit]
Last edited by sleepermaxima; 01-09-2006 at 03:06 AM.
#13
09-15-2006, 07:49 PM

Member
Join Date: Jun 2006
Location: Spencer, MA
Posts: 55
Likes: 0
Received 0 Likes
on
0 Posts
What an incredible write up! Thanks so much for taking the time. Now I see why the cheapest place I've found to replace the heater core wants $800 to do it.  I have always hated doing heater cores, but I think this quite possibly may be the worst I'll ever attempt. I think I had less aggrivation replacing the motor in my 98 Cobra than I'm going to have replacing this heater core
  I had flushed the system with water and tried some of that stop a leak crap, but I couldn't tell if it worked. The leak seems to be rather small, the level in the radiator overflow doesn't go down and there is no fluid on the carpet. I see now how I was able to still smell antifreeze with the A.C. on with that huge enclosure for the 2 cores.
One question I do have, I was told this 99 Navigator had 2 heater cores, where is the second?
I have always hated doing heater cores, but I think this quite possibly may be the worst I'll ever attempt. I think I had less aggrivation replacing the motor in my 98 Cobra than I'm going to have replacing this heater core I had flushed the system with water and tried some of that stop a leak crap, but I couldn't tell if it worked. The leak seems to be rather small, the level in the radiator overflow doesn't go down and there is no fluid on the carpet. I see now how I was able to still smell antifreeze with the A.C. on with that huge enclosure for the 2 cores.One question I do have, I was told this 99 Navigator had 2 heater cores, where is the second?
#14
09-15-2006, 08:02 PM
#15
09-15-2006, 08:23 PM
Member
Join Date: Jun 2006
Location: Spencer, MA
Posts: 55
Likes: 0
Received 0 Likes
on
0 Posts
Thanks so much for the quick reply. I'm assuming then that my problem is only the main heater core in the dash. My wife drove the truck tonight and tried to use the defroster, but the windshield fogged up bad enough that it was difficult to see out the windshield.
I guess I know now how I'm spending my weekend. I wonder what the chances are the dealer will have that blend door in stock? I did a quick search on here and noticed it seems to be a very common problem with these trucks. I would rather replace it before it breaks rather than have to pull the whole dash a second time. The truck does have 90k on it.
One other quick question if you don't mind, my chilton's manual says the A.C. lines need to be disconnected before the heater lines can be accessed to remove them from the core. I did take a quick look under the hood only to realize I can't even see the firewall or where the connections are. I forsee some blood shed on this project. 
I guess I know now how I'm spending my weekend. I wonder what the chances are the dealer will have that blend door in stock? I did a quick search on here and noticed it seems to be a very common problem with these trucks. I would rather replace it before it breaks rather than have to pull the whole dash a second time. The truck does have 90k on it.
One other quick question if you don't mind, my chilton's manual says the A.C. lines need to be disconnected before the heater lines can be accessed to remove them from the core. I did take a quick look under the hood only to realize I can't even see the firewall or where the connections are. I forsee some blood shed on this project.
