
How To: 5.4 Engine Assembly (Photos)
#1
 02-21-2004, 08:52 PM


Join Date: May 2001
Location: Richmond, VA, USA
Posts: 3,300
Likes: 0
Received 0 Likes
on
0 Posts
How To: 5.4 Engine Assembly (Photos)
Disclaimer: this isn't intended to teach anybody anything. Don't try to follow these instructions for your own motor. If you do and it blows up, then don't blame me!
Ok, now lets get started!.
assuming all of your measurements are done and your clearances are correct, it's time to start building your motor!
step 1: apply some moly lube to the male threads on both ends and install your main studs HAND TIGHT!

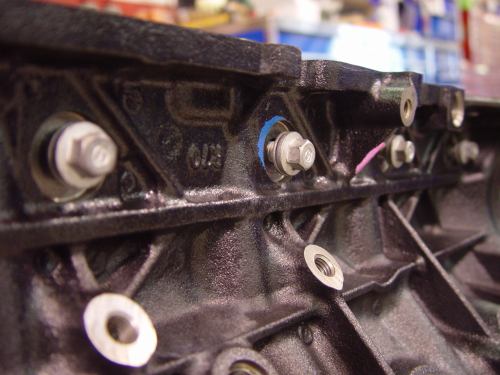
step 2: install the "upper" halves of your main bearings into each main journal. also install the two upper thrust bearings on either side of the #5 or rear main journal. make sure the fillets or channels face the crankshaft surface (not the block) for proper lubrication. you may have to apply a little petroleum jelly or trans assembly grease to the backs of the thrust bearings to keep them stuck in place until you drop the crankshaft in. in this pic you also can see how the oil galley in the #4 main lines up with the oil hole in the upper bearing half.

view of rear main from back of block with thrust bearing installed.

Ok, now lets get started!.
assuming all of your measurements are done and your clearances are correct, it's time to start building your motor!
step 1: apply some moly lube to the male threads on both ends and install your main studs HAND TIGHT!
step 2: install the "upper" halves of your main bearings into each main journal. also install the two upper thrust bearings on either side of the #5 or rear main journal. make sure the fillets or channels face the crankshaft surface (not the block) for proper lubrication. you may have to apply a little petroleum jelly or trans assembly grease to the backs of the thrust bearings to keep them stuck in place until you drop the crankshaft in. in this pic you also can see how the oil galley in the #4 main lines up with the oil hole in the upper bearing half.
view of rear main from back of block with thrust bearing installed.
Last edited by superfords; 02-22-2004 at 03:33 AM.
#2
02-21-2004, 08:57 PM
Join Date: May 2001
Location: Richmond, VA, USA
Posts: 3,300
Likes: 0
Received 0 Likes
on
0 Posts
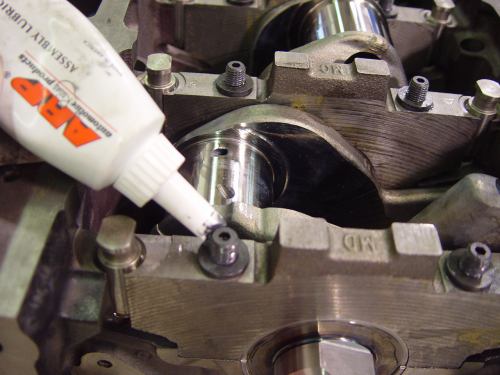
once all of your studs are in and your upper bearing halves are in, apply some assembly lube to each of the bearing surfaces and you are ready to lower the crankshaft into place! be extremely careful not to knick or scratch any of the machined/polished journals when installing the crank.
you can now install the "lower" halves of the main bearings into the main caps. notice that there is a 3rd or "lower" thrust washer on the rear main cap. it will only install in one direction.

with all of the lower bearings installed you should apply some more assembly lube to the bearing surfaces and then you are ready to start installing the main caps! they are numbered 1-5 starting at the front and they all have arrows pointing forward so you don't install them backwards!

you can now install the "lower" halves of the main bearings into the main caps. notice that there is a 3rd or "lower" thrust washer on the rear main cap. it will only install in one direction.
with all of the lower bearings installed you should apply some more assembly lube to the bearing surfaces and then you are ready to start installing the main caps! they are numbered 1-5 starting at the front and they all have arrows pointing forward so you don't install them backwards!
#3
02-21-2004, 09:04 PM
Join Date: May 2001
Location: Richmond, VA, USA
Posts: 3,300
Likes: 0
Received 0 Likes
on
0 Posts
you may need to GENTLY "persuade the main caps into place with a rubber mallot or a dead-blow hammer like so:

once all of the mains have been installed, you can install the steel alignment dowels. put them into place with the flat sides facing the crankshaft.

go ahead and install the side bolts but DO NOT TIGHTEN at this time! the shop manual instructs you to install the main bolts (in our case studs) and torque them down prior to installing the side bolts, but this can make it harder to align the dowels to insert the bolts later. the dowels will turn side to side and move up and down so you need to align the holes in the block/dowel/main cap. starting the bolts by hand first prevents any misalignment of the bolt holes.
once all of the mains have been installed, you can install the steel alignment dowels. put them into place with the flat sides facing the crankshaft.
go ahead and install the side bolts but DO NOT TIGHTEN at this time! the shop manual instructs you to install the main bolts (in our case studs) and torque them down prior to installing the side bolts, but this can make it harder to align the dowels to insert the bolts later. the dowels will turn side to side and move up and down so you need to align the holes in the block/dowel/main cap. starting the bolts by hand first prevents any misalignment of the bolt holes.
#4
02-21-2004, 09:10 PM
Join Date: May 2001
Location: Richmond, VA, USA
Posts: 3,300
Likes: 0
Received 0 Likes
on
0 Posts
next apply some moly lube to the washers and the male threads on the main studs if you haven't already.
start the 12pt nuts onto the main studs and you are ready to torque things down! ARP calls for 60 ft/lbs when using their moly lube. Use the Ford torque sequence to tighten the main caps. I did the torque in steps, 30 and then 60ft/lbs.
here is the torque sequence for the mains:

after you finish with the main studs you are ready to tighten the side support bolts.
I have been told that ARP offers these as well, but I'm not sure. I just used new ford ones. they are torque to yield. tighten in sequence to 22ft/lbs and then an additional 90 degrees.
here's the side support sequence:

start the 12pt nuts onto the main studs and you are ready to torque things down! ARP calls for 60 ft/lbs when using their moly lube. Use the Ford torque sequence to tighten the main caps. I did the torque in steps, 30 and then 60ft/lbs.
here is the torque sequence for the mains:
after you finish with the main studs you are ready to tighten the side support bolts.
I have been told that ARP offers these as well, but I'm not sure. I just used new ford ones. they are torque to yield. tighten in sequence to 22ft/lbs and then an additional 90 degrees.
here's the side support sequence:
#5
02-21-2004, 09:15 PM
Join Date: May 2001
Location: Richmond, VA, USA
Posts: 3,300
Likes: 0
Received 0 Likes
on
0 Posts
at this point, your engine should look something like this:

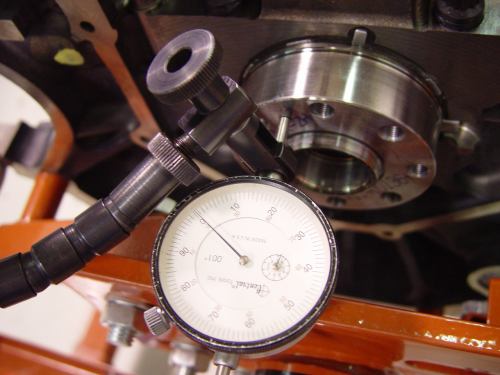
and your crankshaft should spin very freely in the block.
you can now check the crankshaft endplay with a dial indicator. watch those decimal places or you'll spend the afternoon trying to figure out what you are going to do about that "excessive" end play.")
and your crankshaft should spin very freely in the block.
you can now check the crankshaft endplay with a dial indicator. watch those decimal places or you'll spend the afternoon trying to figure out what you are going to do about that "excessive" end play.
#6
02-21-2004, 09:18 PM
Join Date: May 2001
Location: Richmond, VA, USA
Posts: 3,300
Likes: 0
Received 0 Likes
on
0 Posts
by now you are tired and your old lady is complaining about you spending too much time with your truck. so you wrap your motor safely in an engine bag and call it a day!
sleep tight little motor!


you guys like the matching tool box don'tcha!
That's all for now Folks!
But Stay Tuned to this thread for the rest of the story as it unfolds!
later,
chris
sleep tight little motor!
you guys like the matching tool box don'tcha!
That's all for now Folks!
But Stay Tuned to this thread for the rest of the story as it unfolds!
later,
chris
#7
02-21-2004, 09:26 PM

Senior Member
Join Date: Oct 2002
Location: L.I.NEWYORK
Posts: 757
Likes: 0
Received 0 Likes
on
0 Posts
 Nice job superford,i'm picking up my motor from jlp tomorrow.Ill have to put the heads on and cams in the heads.I wish i had the tools you have so i could have built the bottom end.Do you have any torque specs and sequence for the cams and heads you can e mail me?Ive done a search but havent come up with anything.Also anything on setting up the timing would be apreciated.I have some info on that but still a little unclear.I marked the links acording to the marks on the sprockets.Do i just assemble the same way?Thankyou Jason
Your info has been superb,ive benn following your post!
Trending Topics
#8
02-21-2004, 09:35 PM

Account Suspended For 30 Days For Using Multiple Screen Names
Join Date: Jun 2002
Location: Alberta, Canada
Posts: 1,192
Likes: 0
Received 0 Likes
on
0 Posts
#9
02-21-2004, 10:06 PM

Senior Member
Join Date: Mar 2002
Location: Selden NY
Posts: 11,153
Likes: 0
Received 0 Likes
on
0 Posts
Like I said the other day,
There's a HUGE diff between a Mechanic
and a ****** ******
Wow first we couldn't say *****cat,
and now this
AWESOME POST as usual Chris
amazing Pic's, Great info, and very informative "how to"
YOU TEACHING US ALL LOTS OF GREAT INFO HERE
Hey anyone want me to Build them a Motor,
I know how NOW
There's a HUGE diff between a Mechanic
and a ****** ******
Wow first we couldn't say *****cat,
and now this
AWESOME POST as usual Chris
amazing Pic's, Great info, and very informative "how to"
YOU TEACHING US ALL LOTS OF GREAT INFO HERE
Hey anyone want me to Build them a Motor,
I know how NOW

#11
02-21-2004, 11:18 PM
Senior Member
Great pics and info Chris. If I may add a few tips on what you've covered so far... I like to also coat BOTH sides of every main/head stud washer also with the ARP lube, this way you eliminate all chances of galling when torquing them down. Also, for those who don't know, the side bolts are torque-to-yield. That means you MUST replace them, you cannot reuse them. That goes for the ones that come WITH a new Ford block. They have been torqued once already for the main caps to be line honed, so they are junk and must be replaced upon removal. Oh, and on the thrust washers, to make life a little easier, you don't need to pre-install the lowers, they rotate into place once the crank is in. Keep the great pics coming!
#12
02-21-2004, 11:33 PM

Senior Member
Join Date: Aug 2003
Location: medford or
Posts: 250
Likes: 0
Received 0 Likes
on
0 Posts

#13
02-21-2004, 11:43 PM

Senior Member
Join Date: Oct 2001
Location: Warner Robins, GA
Posts: 1,205
Likes: 0
Received 0 Likes
on
0 Posts

#14
02-21-2004, 11:43 PM

Member
Join Date: May 2003
Location: Memphis,Tn.
Posts: 50
Likes: 0
Received 0 Likes
on
0 Posts

#15
02-22-2004, 12:52 AM

Senior Member
Join Date: Dec 2000
Location: Auburn Wa
Posts: 1,514
Likes: 0
Received 0 Likes
on
0 Posts

